
UdemyPSChrisBarin 31-33
4.1. Introduction
P31 - 00:00
Welcome to another section where we talk about layers. These are the meat of all photoshop projects. So that's why we're spending so much time on them. If it were up to me, i'd talk about them all day. Luckily, I know what it's like to watch boring videos for hours on end. So that's why we're going to keep up the pace.
P31 - 00:16保持这种进度的原因。
In this section, we will talk about photoshop's layer types and how each of them has a specific role.
P31 - 00:21图层类型扮演的角色。
You will learn how to choose the best ones for your projects to ensure maximum flexibility and freedom.
P31 - 00:27展示灵活性和自由度。
We'll also talk about customizing your layers panel, because I have some great tips that can help you shorten the learning curve.
P31 - 00:33缩短学习曲线。
You also pick up certain tricks that can help you identify and manipulate layers in various ways.
P31 - 00:39不同方式移动图层。
These are techniques I use in my everyday workflow. So there's no fluff in this section.
P31 - 00:44无实际价值的不说。
I also have another great exercise for you. So you can show off your skills.
P31 - 00:48练习题展示技术。
I'm excited. So let's get going.

4.2. Layer Types Explained
P32 - 00:01
Hello, hello. Photoshop uses different types of layers for different purposes.
P32 - 00:05不同图层不同目标。
In this lecture, we will discuss each of them so you can better understand what's best for your projects.
P32 - 00:10分别介绍,找到适合项目的。
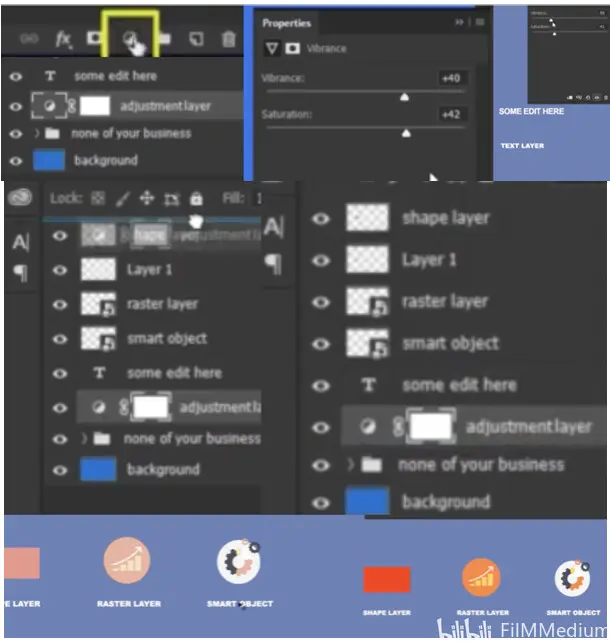
The first layer type will discuss is the shape layer.
P32 - 00:15形状图层。
This is the red rectangle on our canvas. And we can recognize it's a shape layer by looking at its thumbnail.
P32 - 00:19矩形缩略图看来时形状图层。
i’ll zoom. So you can see it better. Okay? That's how you can identify its type through this symbol.
P32 - 00:26通过这标识辨别出来。
Whenever you see it, you're dealing with a shape layer.
P32 - 00:29看到该标志就是形状图层。
to create them. You have all these tools in your left panel,
P32 - 00:33左侧工具创建这些。
the rectangle tools, the ellipse, line, and custom shapes.
P32 - 00:36矩形 椭圆 定制的。
Besides these, you can also create shapes through the pen tool, which we'll discuss in a later lecture.
P32 - 00:41可以通过钢笔工具创建。
The biggest advantage of this latter type is its vector properties.
P32 - 00:47后面类型的好处是矢量属性。
That means you can enlarge it to literally any size, and it won't lose quality.
P32 - 00:51拓展到任何大小,不会失真。
I’ll hit CTRL T to transform it, and i'll make it as big as my canvas.
P32 - 00:56T转化大到和画布一样大。
As you can see, it's still sharp. And that's because it's a vector.
P32 - 01:00依旧锐利,因为那是矢量。
These types of layers are frequently used in web design and mobile APP projects.
P32 - 01:04图层设计用在网页APP设计里。
They also help in various other scenarios, but that's where they really shine.
P32 - 01:08其它领域也发挥作用。
They do have one drawback. They don't allow complete editing.
P32 - 01:12有缺点,不允许完成编辑。
Sure, I can change its size, shape, or color. By the way, for the last part, you can double click its thumbnail. And you can immediately see the change on the canvas as you move around this window.
P32 - 01:22双击缩略图,看到画布的变化。
But I can't erase any part of it with the eraser tool.
P32 - 01:26但是橡皮擦不能擦除。
I also can't paint it with a brush. I can't use filters and all sorts of other tools and features photoshop offers at my disposal. Those vector properties come at a price. Let me get my brush tool. So I can illustrate my point.
P32 - 01:39用刷子解释重点。
You see, I have this shape layer selected in my layers panel.
P32 - 01:42图层面板选中的形状图层。
Once I move my mouse cursor over my canvas, it immediately changes into a forbidden sign.
P32 - 01:48鼠标在画布上变成禁止符号。
That's because this layer type doesn't allow this sort of editing.
P32 - 01:52形状图层不允许这样编辑。
If I click anywhere, i'll get this message that says I need to rasterize, it before I can paint over it. In case I’ll hit Okay.
P32 - 02:00绘制前调整大小。
You'll see, I can paint over it, but i've just lost its vector properties.
P32 - 02:05绘制但是失去矢量属性。
If I try to enlarge it and look what happens,
P32 - 02:08尽量去放大看看发生什么。
let me zoom in so you can see it better. Its edges are now fuzzy.
P32 - 02:11边缘目前模糊的。
Let me go back a few steps. So we'll have it back as a shape layer.
P32 - 02:15比如现在有个形状图层。
So think about what you want to achieve before you use shape layers in your project.
P32 - 02:20项目中图层需要达到什么。
Just so this doesn't set you back. Here's how you can rasterize any shape layer.
P32 - 02:24这是如何调整形状图层的。
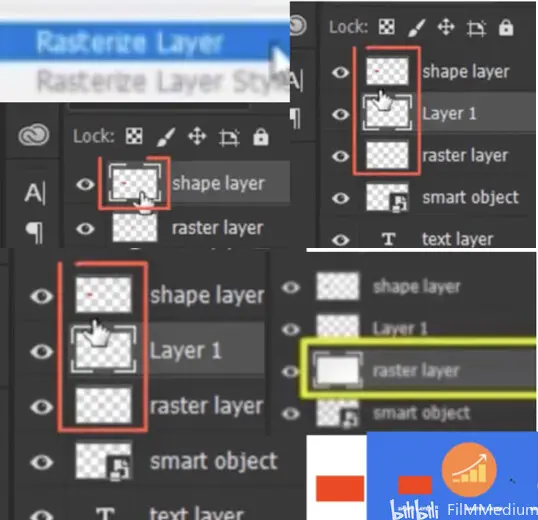
You right click it in the layers panel. And from this list, you can choose rasterize layer.
P32 - 02:30有几图层,选择光光栅化。
And if you check the thumbnail, you'll now see it's lost its shape symbol. So now it's a rasterize layer.
P32 - 02:35如缩略图出现图层形状证明光栅。
Speaking about that. rasterize layer are the preferred layer type in photoshop.
P32 - 02:38光栅图层是目前PS偏好的。
This is what you get when you create a new layer from this bottom icon, a raster layer.
P32 - 02:44这就是图层下面的试映图图层。
a raster layer. How do you recognize its type? Well, if you check the layers panel, you'll see no additional symbol in its thumbnail.
P32 - 02:50缩略图中没有发现特殊的标志。
It will always be clean. Don't be fooled by this checkerboard. If I use the fill command and change its color, you'll now see that's reflected in its thumbnail.
P32 - 02:59别被棋盘迷惑,改颜色图层体现。
But still, it has no symbol above it. So what's the deal with them? Well, they give you complete freedom. They gladly accept or let it.
P32 - 03:08为什么没有标志,那是给你自由。
That means it's a versatile there that you can use for all sorts of situations.
P32 - 03:11多面性适用于所有情况。
Let me get my brush tool and i'll repeat the previous test.
P32 - 03:15刷子来重复最初的监测。
Yep. Here I can paint over it just fine. So it seems like a fantastic choice. The downside is it loses quality. When you try to enlarge it.
P32 - 03:24扩大的时候,失真了。
I'd say anything over 20% will give you noticeable fuzzy edges.
P32 - 03:28超过20%给到明显模糊的边缘。
here. I'll scale it up just a bit. And you can already see how it's lost a lot of quality,
P32 - 03:32比如这放大就失真了。
I’ll use CTRL z to go back to our initial state. Please note that all four layer types can be rasterized.
P32 - 03:40回到最初4图层都可被光栅化。
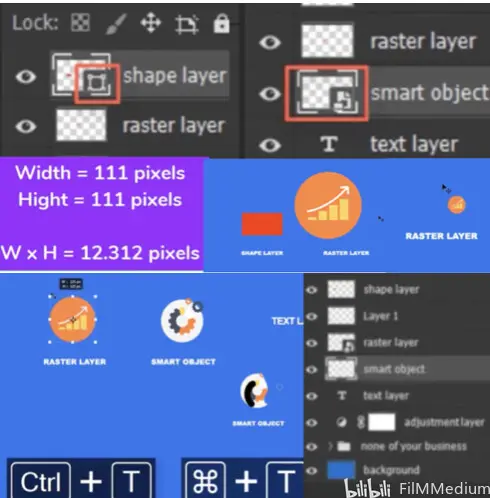
Let's move over to the next one.Smart objects are represented by this gear icon on the canvas. And you may be wondering, hey, that looks like there are still there yet. They look similar, but that doesn't mean they're the same type.
P32 - 03:52可能你感觉类似的,但并非同类。
Check the layers panel and you'll see this has a different thumbnail.
P32 - 03:55在看图层缩略图不一样。
This symbol shows you this layer is a smart object. These are special layers that hold onto their Information.
P32 - 04:02智能图层是存储信息的。
Photoshop works with pixels. This raster layer has about 12.312 pixels, right? I got that number by multiplying its dimensions.
P32 - 04:11高宽12.312像素,多维度。
If I make it half that size with the help of controlled t, now it will only have about 6000 pixels.
P32 - 04:16T控6000像素。
The rest of them got thrown away. We can't get them back. If we try to enlarge it to its original size, you can see it now looks blurry, because photoshop had to create 6000 of those pixels that were no longer there.
P32 - 04:30再拉大模糊,高像素丢失了。
That's how the program deals with raster layers.
P32 - 04:31这就是光栅程序。
On the other side, the smart object tells photoshop. You need that Information later down the road.
P32 - 04:36智能图层说你需要这信息。
So if we shrink it to 50%, and then we scale it back to 100%, you'll see it looks fine.
P32 - 04:43缩小到50%再放大到100%。
That's because photoshop was told to keep that Information. So smart objects sound amazing, right?
P32 - 04:48智能图层保存了信息。
Actually, they're more than that. Any layer can be transformed into a smart object.
P32 - 04:54每个图层都可以转化到智能图层。
Follow me on this. If we right click the raster layer in the layers panel,
P32 - 04:59图层面板右击光栅图层。
we have the option to convert it to a smart object. You can see that here.
P32 - 05:02转化到智能图层。
Now check the thumbnail and you'll see it's a smart object. That's great. But does this mean photoshop found those 6000 pixels it threw away previously?
P32 - 05:13是找回了原来丢失的像素了吗?
Of course not. The image is still blurry, but it's now been instructed to keep these existing pixels it currently has.
P32 - 05:20图像模糊的,保留当下的像素。
So if I now shrink it down all the way to 10%, then recites it back to 100%, you'll see it looks the same as before. We didn't lose any quality through this process.
P32 - 05:30缩小50%放大100%无失真。
So again, any layer can be transformed into a smart object. And that means photoshop will hold onto all those pixels it currently has in its memory.
P32 - 05:40存储中保留所有的像素保真。
Furthermore, smart objects have a special attention from photoshop algorithms.
P32 - 05:44这就是ps算法。
So this means that when you enlarge such a layer, you'll get a better result than when you enlarge a raster layer.
P32 - 05:49放大普通图层比光栅图层效果好。
But here's the catch. Smart objects are not directly editable, not because Adobe wants to mess with you. But every layer type has its own purpose.
P32 - 05:59每个图层类型有自己目标。
If you right click it and rasterize it, you've just lost all its special properties.
P32 - 06:04光栅化后失去很多的属性。
On the other hand, now it's a raster layer. So it gladly accepts all edit it.
P32 - 06:11光栅图接纳所有编辑。
It's a big trade off, but in a few cases it might be worth it.
P32 - 06:14权衡,某种情况是值得的。
moving on. The next layer type is a text layer.
P32 - 06:17下一个是文本图层。
This is similar to shape layers where they can be re sized to any dimension without losing quality.
P32 - 06:22不失真转化到任意维度。
to make any changes to its appearance will use the character panel.
P32 - 06:28让变化展示出的面板。
You can open it by going to window character. From here, you can change just about anything from family weight, size, color, you name it. It's all here.
P32 - 06:37窗口-字体权重-大小和颜色。
What you can't do is edit it like a raster layer.
P32 - 06:42不能像编辑光栅一样编辑图层。
where you could right click and raster layer it. But this is highly discouraged.
P32 - 06:44可以右键选光栅图层,很沮丧。
The thing is this, text layer should always remain alive. That simply means editable. If you raster layer, then you will no longer be able to edit its content.
P32 - 06:55文本让编辑,光栅不让编辑。
Right now it's live. And we can see that by looking at our layers panel.
P32 - 06:59现在可看到图层面板。
See this thumbnail. That means it's a text layer, press T for the type tool, click it and you can now perform various edits.
P32 - 07:05T输入文本内容编辑。
When you're done. All you have to do is click anywhere on the canvas.
P32 - 07:11编完后,画布上任意位置点击。
This works in all photoshop versions above CC 2017.
P32 - 07:1417以及以上版本。
The last layer type is the adjustment layer. It's not represented on the canvas because it doesn't have any actual pixels.
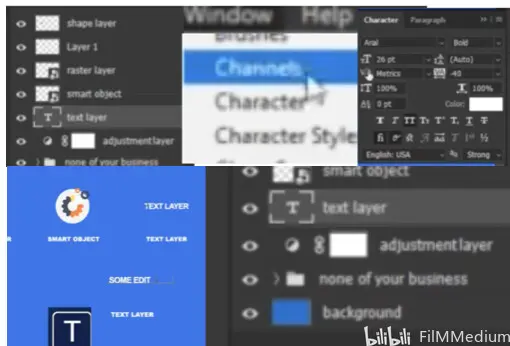
P32 - 07:21调节图层没有像素不呈现在画布。
These layers are created from this ying yang symbol.
P32 - 07:25从阴阳图标添加的图层。
And their goal is to adjust existing pixels, hence the term adjustment layers.
P32 - 07:30目标是调节存在的像素。
In my layers panel, I have just such a layer.
P32 - 07:32图层面板有调节图层。
You can see it has a vastly different thumbnail.
P32 - 07:35缩略图标与众不同。
If I double click it, we can see this is an adjustment layer that controls the vibrancy and saturation.
P32 - 07:41调节属性:频率+饱和度。
As I move these slides up and down, my background layer changes.
P32 - 07:44频率饱和度滑块调节背景变化。
All the other layers remain untouched, because the stacking order is critical.
P32 - 07:49图层顺序很重要。
here. This will affect all layers underneath it in the layers panel.
P32 - 07:54影响图层面板下面所有图层。
That's this folder that contains my text layers on the background.
P32 - 07:58文件夹包含文本图层。
This is why all the other ones remain as they are. If I drag it above them, you will now see the change.
P32 - 08:04如果我拖拽图层上面,看到变化。
Let me move it back. Ok, that about wraps it up. Attached to this lecture. You have a small cheat sheet that summarizes this lecture.
P32 - 08:14检测协助记忆的。
in case you forget anything, go check it out.
4.3. Customize the Layers Panel
P33 - 00:01
Hi, the layers panel is an essential component of your work space.
P33 - 00:04该面板是工作版重要元素。
So it makes sense to customize it to fit your needs better.
P33 - 00:07对需求私人订制。
I'll use this PSD file that's attached to this lecture. So please follow along. Here's how my layers panel initially looks. pretty standard.
P33 - 00:15最开始就是这样标准。
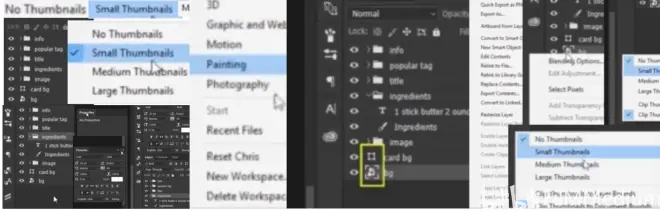
The first customization option is the thumbnail size.
P33 - 00:18私人订制选项是缩略图大小。
If you right click any of them, you'll get this following list. Here you can see I have small thumbnails selected, but I have three other choices. Let's go through them.
P33 - 00:28第一个没有缩略图的。
No thumbnails simply shows the symbols we previously talked about.
P33 - 00:31没缩略图展示标志。
This can't be BG is a shape layer, while BG is a smart object.
P33 - 00:36背景不是形状图层是形状工具。
If I open the ingredients group, we can see this as a raster layer.
P33 - 00:46展开材料组就是光栅图层。
The reasoning behind this option is the following. Space is very limited in photoshop. No matter how large your display is, you will always want more room for your canvas.
P33 - 00:51总需要足够多的空间给到画布。
Any panel whatsoever eats into its space. And that's all professional photoshop users try to compact everything as much as possible.
P33 - 00:58专业的用户尽可能的罗列面板。
If I were used to this option here is how I change my interface.
P33 - 01:03用这选项改变界面。
I'd move my character panel above it.
P33 - 01:05字体面板移动上去。
That's the first step. And you can see how it shrunk in size.
P33 - 01:09折叠上去后展示的大小。
and also move my properties panel at the Top of this column.
P33 - 01:12圆柱体顶部的属性面板。
Now I no longer have to expand them leftwards, which gives me a better view of the canvas.
P33 - 01:18没必要左侧拓展,画布看起来好。
By the way, you can resize these properties panel.
P33 - 01:20调整属性面板。
So it takes up less space. Let me reset my interface back to my previous settings.
P33 - 01:24界面调整回原来的属性。
Going back to the thumbnail size, please note you should right click in this area.
P33 - 01:31一定右键缩略图。
If you go further to the right, you'll get a completely different list of options.
P33 - 01:34再右侧右键完全不同下拉菜单。
If this is unclear, you can also right click anywhere at the bottom where there is nothing there.
P33 - 01:39还可以空白处右键选择。
Let's change it to large thumbnails.
P33 - 01:42现在换到大缩略图。
And as you can see, this is quite generous. And it makes more sense if your project only has a few layers.
P33 - 01:48如果少数几个图层可以说明问题。
here. I'd say this is the maximum amount of groups and layers for this particular setting. If you have more, you just end up scrolling way too much through your layers panel.
P33 - 01:56但是如果图层太多容易滚动过。
This is particularly helpful for beginners. Those who constantly forget to rename their layers.
P33 - 02:02对重命名图层的人比较友好。
And that's because this representation is much improved over the one from smaller thumbnails.
P33 - 02:07比小缩略图有进步的。
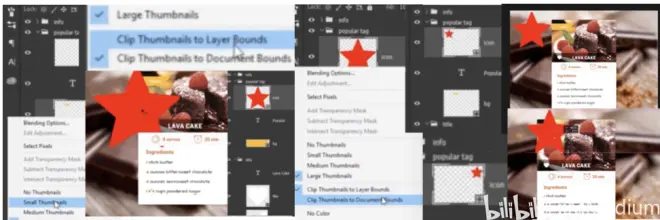
But you can further improve it with another fantastic customization option. Focus on this layer called icon.
P33 - 02:15专注在徽标的图层。
from its thumbnail. You can barely see anything at the moment.
P33 - 02:17从缩略图,目前很少能看到。
Now. I’ll right click any other one, and i'll focus on this area.
P33 - 02:22点击另外一层,右击。
here. I am currently using clip thumbnail to document bounds. Let's switch to clip thumbnails to lay abounds. Now the icon is very easy to see.
P33 - 02:32切换成层边界绑定,容易看徽标。
It's a star. And if we glance over the canvas, we can immediately spot it here in the Top left.
P33 - 02:38画布星星,聚焦在左侧。
Plus, I can also see the heart icon from the title and all the other relevant layers.
P33 - 02:44心形图标和相关图层。
So this customization is fantastic for users who work on projects that only have a few layers.
P33 - 02:50适用于少数几个图层的项目。
Let me show you why the previous setting is also helpful in certain circumstances.
P33 - 02:54为何之前的设置在这环境中适用。
I'll select this star icon and all in logic dramatic. They also make it red. So it will be easier to follow.
P33 - 03:01大红星星容易看到。
Now i'll place it somewhere in the Top left corner.
P33 - 03:05放在左上角的位置。
Noticed the thumbnail clip thumbnail to document balance.
P33 - 03:08缩略图到文件。
shows me the layers representation considering the size of my canvas,
P33 - 03:13图层代表画布大小。
because I placed it in the Top left. The thumbnail is also telling me that.
P33 - 03:17比如放到左上角,缩略图可想象。
Note that as I move it to the right side, the thumbnail updates itself.
P33 - 03:22移动右侧,缩略图更新。
Did you notice? Let me do that again. Only this time. I'll place it at the bottom of my canvas. And there you go.
P33 - 03:29画布底部,一样的展示。
Another cool option is the following. In most projects, you'll duplicate your layers a lot.
P33 - 03:36复制图层操作频繁出现。
If I do that now with CTRL j, you'll see a new layers appeared called icon copy.
P33 - 03:40J控,图层副本。
I already mentioned that photoshop allows the same name to be used multiple times.
P33 - 03:44同样名字可以出现无数次。
So why not have it called just icon. renaming each JPG areas tedious work. Here is how you disable that label.
P33 - 03:52这是让你关闭图层方式。
Go to the Top right of your layers panel and find this tiny icon. Click it and you'll get this list. Look for panel options.
P33 - 04:04右键-面板选项对话框。
From this new window, we can see the same stuff we already talked about. the thumbnail sized the thumbnail contents.
P33 - 04:07缩略图尺寸和内容。
But look at this last option and copy to copied layers and groups.
P33 - 04:13复制内容到图层和组。
By default, it's enabled. uncheck it and you're good to go.
P33 - 04:17默认勾选的。手动去勾选。
Let's test it out by selecting another layer. CTRL j to create a duplicate.
P33 - 04:22测试创建另一个图层J控。
As you see, there is no more copy at the end of its name.
P33 - 04:27名字后面不再出现副本字眼。
Okay? One last thing before we finish this lecture, in case you're working on a large projector, sometimes temporarily hide some layers.
P33 - 04:34大工程有时候隐藏很多图层。
Here's how you can keep track of things. If you right click on the eye symbol next to each layer or group, you'll get the following options. If you click on any of these colors, you will see that reflected in your layers panel.
P33 - 04:46右键选择颜色,标签上色了。
You have seven choices in total, and that's more than enough to sort everything out.
P33 - 04:51颜色标签足够归类清楚图层。
In general, I like to use these color codes when I hide some of my layers, and I don't want to delete them by accident.
P33 - 04:57颜色编码避免误删图层。
This is also helpful when you create hover states. If I want to show how this design. Would look if it were alive. You can duplicate certain groups and color code them.
P33 - 05:06设计图层并且编码。
perform various edits and hide them. This is how you can keep track of various states.

P33 - 05:12可以保存不同的状态。
Ok, that concludes this lecture. Go to your layers panel and experiment with these options.
P33 - 05:15体验图层选项。
See which ones fit you best.
