
Jama Jurabaev 63-68
6. 3D in Photoshop---4-1.Gun
P63 - 00:00
And I showed you how to do stuff with 3D postcards. And now it's time to do 3D extrusions.
P63 - 00:09上次做明信片,这次做突出。
So we will start from a very simple geometry. And remember when I was showing you different techniques, one of them was using smudge tool to make the gun designs.
P63 - 00:21用模糊工具做武器的设计。
But now we will do something from scratch. Let's just quit this painting gun design. Let's go over here. Let's say this is our gun right. A very quick, simple silhouette.
P63 - 00:57简单枪的剪影设计好了。
Now I want to take it to the next level. I want it to be not just a flat surface.
P63 - 01:09不能只是平面状态。
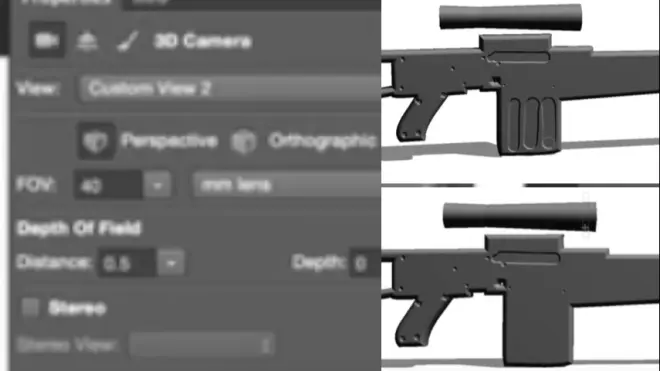
I want it to be something more complicated.let's delete this. So I will go and create 3D extrusion out of it. So I would press this button. And basically what it does for me. Keep her state creates this guy for me.
P63 - 01:28伸出:平面突出变成立体的。
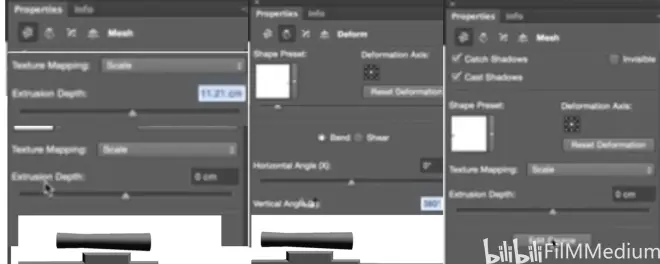
So if I double click on this will reduce the thickness. So let's see, PRO gun techniques.
P63 - 01:38调节枪的厚度。
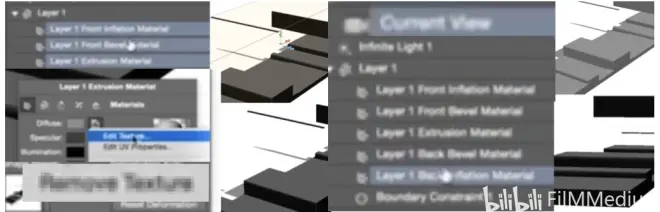
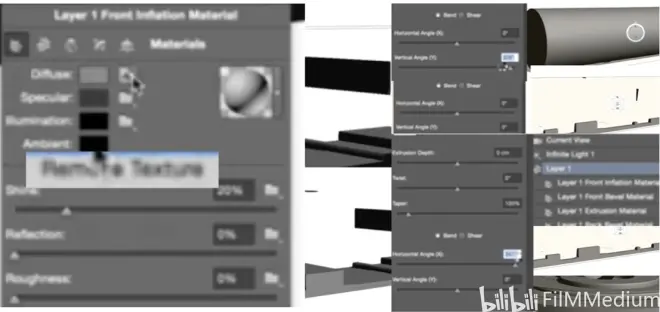
So rightly, I will get rid of this. So right click, we will get rid of the texture.
P63 - 01:44漫射-移除材质。
So you guys can see, how it looks like right. Let’s just remove this picture from everywhere. So that's well, it kind looks like. And it doesn't look like an gun at all. But the good news that we can go an added source. And start refine this place, creating a different design, right?

P63 - 02:10虽然看起来不像枪,但可以调整。
Let's say there was another hand over here. And when I press CTRL c, it changes it. It's very useful because you can have a bunch of silhouettes of a different silhouette. And all you need to do is just replace them. And your gun and your design will be completely changed. this problem with this. It's very flat. So but we will use there are a bunch of different presets,
P63 - 02:48太扁平了,用不同的预设。
for example. You can give it a little bit of beveling.
P63 - 02:53比如可以给到倒角。
Drag it over here. Decrease the thickness. You see there is a really actually very good nice bevel out there.
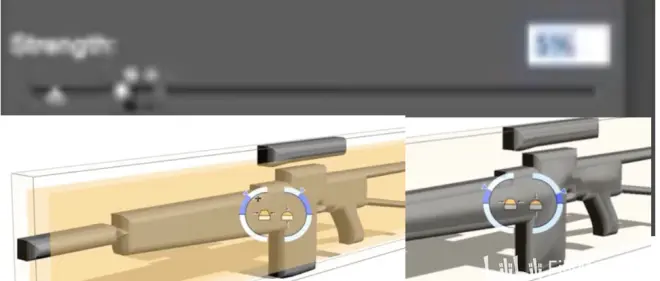
P63 - 03:03减少厚度可以看到倒角。
So all we need to do is selected textures and basically remove texture. So we see the bevel.
P63 - 03:16移除材质可以看到倒角了。
Now. It's look a little bit better. So we will go and you can change this bevel amount.
P63 - 03:23现在可以改变倒角数量。
You see like I could change the distance and also changed the way it looks over here.
P63 - 03:40可以改变外观。
This gun over here. this is the angle. And this is the width. I can introduce a very nice bevel.
P63 - 03:50调节角度,可以引入倒角。
And also I can introduce the bevel on both surfaces. It's not only. Let's phone him back as well. We have no light over there, but are these is a bevel to that side as well.
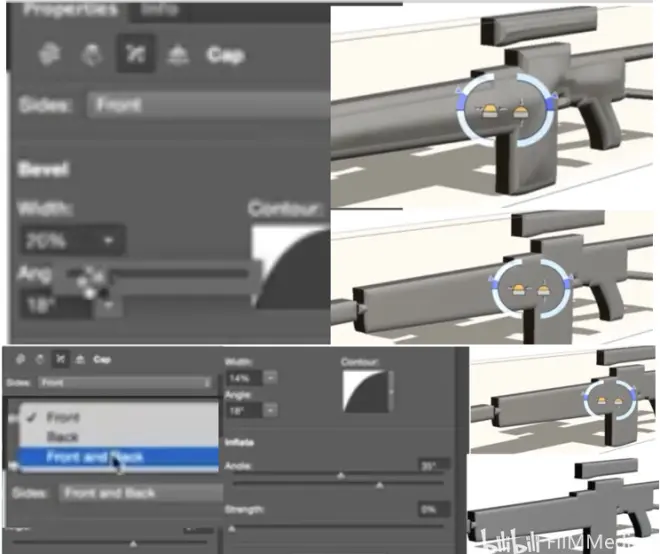
P63 - 04:16前面后面,打开灯光可见倒角。
So that's much more interesting, Because it has all these different beveling options. But still we've got like these clothes rectangular. And the reason we to do like we can go to 3D and splitting extrusion. The only thing, once you split the extrusion. you will have no control over the silhouette anymore.
P63 - 04:46分开突出,不会影响轮廓了。
But it doesn't matter. Like you establish a silhouette first, and then we will start refining it. So what you can do now you can go and make it zero. You can go over here and say, I want to make a twist. so you can refine this twist. And basically create something really cool.
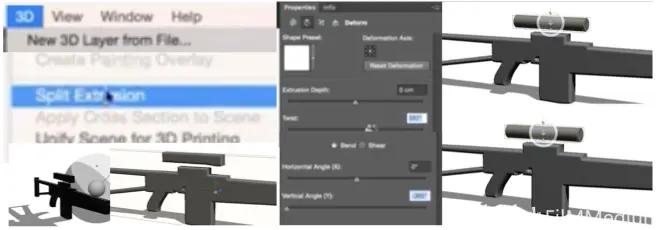
P63 - 05:21调节到想要的视角。
Let's say we want to create a primitive scope, And you need to rotate a little bit. And now we go to this one. We do the same kind of thing. So make sure you experiment with this.
P63 - 05:49做实验调节深度角度。
So what are we having right now? We are having a very cool. And I don't think it created source. You see there is no added source anymore. So it's lost.
P63 - 06:03按添加资源无效。
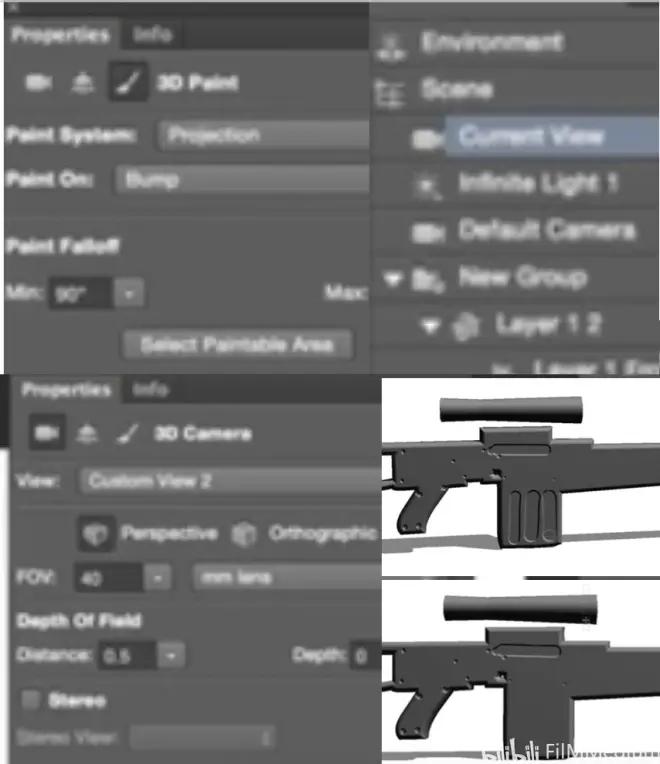
So you cannot change it anymore. But guys for two minutes is very practical, but also what you can do. Don't forget guys that we have still a lot of control overall maps. we can go and say, all right, I want to paint on bump,
P63 - 06:30靶材质-凹凸图。
It will create the bump map. Go to painting projection and then you started. basically what projection means that you’re painting from your texture but from your view over here,
P63 - 06:47绘制系统-投射。
So basically, I can go and start creating some nice thing you know, if this was handled? when you can use rivets. It just creates all. Because I removed all the textures, creates them. So let's just go back and start inserting stuff like that. Created this thing over here. I am not following the gun design anymore.
P63 - 07:41重新嵌入新的设计。
but if you had the reference, you would do really cool stuff. Same on the scope. Like for example. If they did like this. You've got a very nice detail on the scope.
P63 - 08:14现在获得这些细节了。
And guys, you can keep going. for example, you can start painting, literally properly, lecturing this guy. You can go and say painting on shininess.
P63 - 08:32绘制靶材质-闪亮。
and select like, texture brush. And once you move your light around. You will probably see sometimes it does this mean. I think it's just stuck in there. This is a bug of photoshop.

P63 - 09:25材质刷-打灯-bug.
So you saw how quickly made those that gun. So I will finish this video right now and I will jump and show you a much more complicated example.

6. 3D in Photoshop---4-2.Space Station
P64 - 00:00
Alright let’s move on with 3D extrusions. So for example, make sure that you create this layer with transparency.
P64 - 00:25确保绘制的图层是透明层。
So. Select the color. Maybe like this. but it will make sense, right now it make sense. Let's create this kind of simple silhouette.
P64 - 01:04创建简单的剪影。
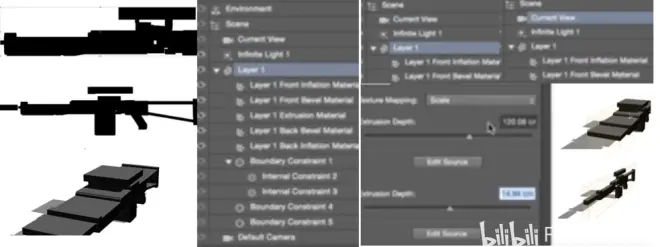
Take this one. So now what we can create, if we go to 3D and create 3D extrusion once again.
P64 - 01:28再创建拓展。
We've got this figure again. So let's just remove all the textures. So the textures are gone.
P64 - 01:37漫射-编辑材质,移除材质。
so the texture are gone. Or maybe no. And now we will go to our properties menu and make the depth zero.
P64 - 02:05属性面板-深度调节为零。
And now we will rotate. Create this rotation,
P64 - 02:16属性面板垂直水平的动态旋转。
We need to be very careful about the access. We will do this. That's fine. But then we will edit the source and just rotated like this. Say it again. So now we have this. I see what's going on. Actually, there was no need to do it because instead of using horizontal angle. We will use vertical angle. and if you create this, but it’s happening because all we need to do only need to mirror this guy.
P64 - 03:09用垂直视角而不是水平视角。
And now we've merged them together.
P64 - 03:18然后我们融合在一起。
So we've got a very nice spacecraft like space station.
P64 - 03:26像是空间站一样的形状。
So basically, whenever I introduce something new on this map, If I select this guy at its source and if I paint anything on this. And you can see it's over here. So it's like silhouette dictates how you design looks like.
P64 - 04:01剪影说明你设计的内容。
And it's very cool. For example, any time at this point, I can go back edit my source. If I see that the proportions and design is not exactly what I'm looking for. I'm just going to change it.
P64 - 04:21如果不是想要的可以随时改变。
To save you see it made a geometry. So if I combine these, for example. It is silhouette. Let's play with this one. zoom in. So I can either combine this with a postcard, or I can combine it. For example, if I go to my PSD files. Lesson six and I go to Molly pictures. go to the planet.
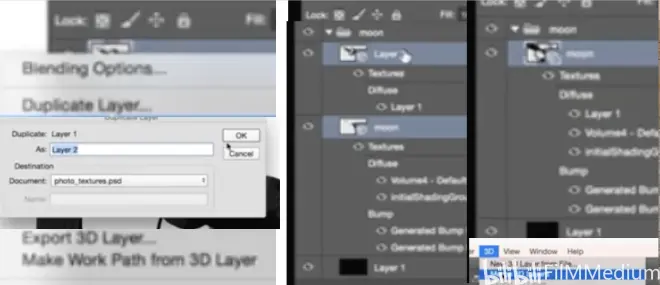
P64 - 05:34打开另一个PSD图片。
On this planet. And I basically duplicated this guy photos textures.
P64 - 05:42复制照片纹理。
And now I can merge together. And now it's one scene.
P64 - 05:57融合成一个场景。
All I need to do is to resize this guy. Let's see. If I have still have my source. So if I change, my design will change.
P64 - 06:30改变设计中小部分,整个变了。
But now it will change inside this scene. So let's, for example, switch all of this. And now i've got my station. I can control my light to creating different really cool.
P64 - 07:06调控灯光控制不同场景。
So yeah, now I can go in create different ideas. spaceship planet can change the planet by changing the texture of the planet. It will be a different planet. If I change the silhouette of that guy will be a different story.
P64 - 07:39改变不同星球改变不同故事。
I can keep going changing the view, for example, making it 200. now the planet is huge like a zoo.
P64 - 07:59摄像视角200看起来像足球场。
And we've got this guy over here. Move him around. hit render and see how it goes. So I can, as I showed you, double click. Save this environment.

P64 - 08:40移动-保存-渲染。
And switch between them any time. And because it's photo shop, I can keep going. I can start introducing some stars. In the background. Or like introduce a lens flare.
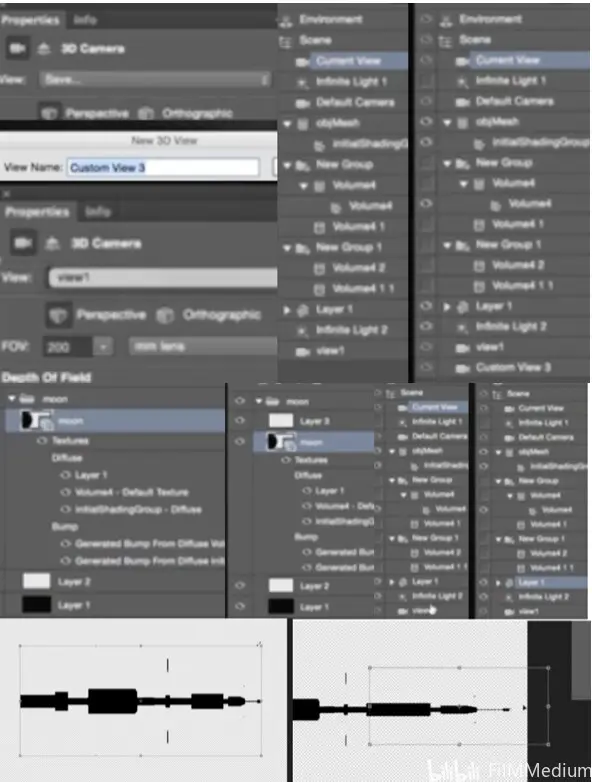
P64 - 10:02加入星星或光耀。
And I will go the part of one story, the story that I can adjust at any moment. If I don't like this spaceship.
P64 - 10:19如果不喜欢可以随时调整。
All I need to do is add its source. And as you can see, the space should be changed right now.
P64 - 10:42加入资源,可以看到飞船变化了。
Without going and remodeling is completely. I'm doing it all in photoshop. I hope guys like this one. And let's move on and do something even more complicated. Thank you very much.
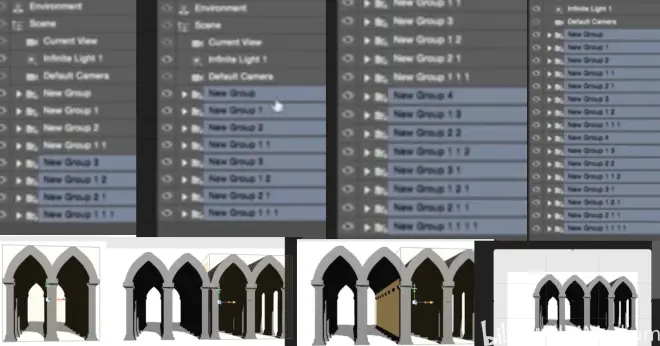
6. 3D in Photoshop---4-3.Columns
P65 - 00:00
let's do it a little bit more complicated example. So let's just quickly do something like this. it's some kind of column,
P65 - 00:24做类似光柱的。
We will do the same thing. We will go to 3D extrusion and creative extrusion. date like this. So it can be a square column,
P65 - 00:34类似长方圆柱体。
And now let's select all the textures. Just remove that.
P65 - 00:53选择材质-移除材质。
So we will go and use our instances. I will go and instance object. Put it over here,
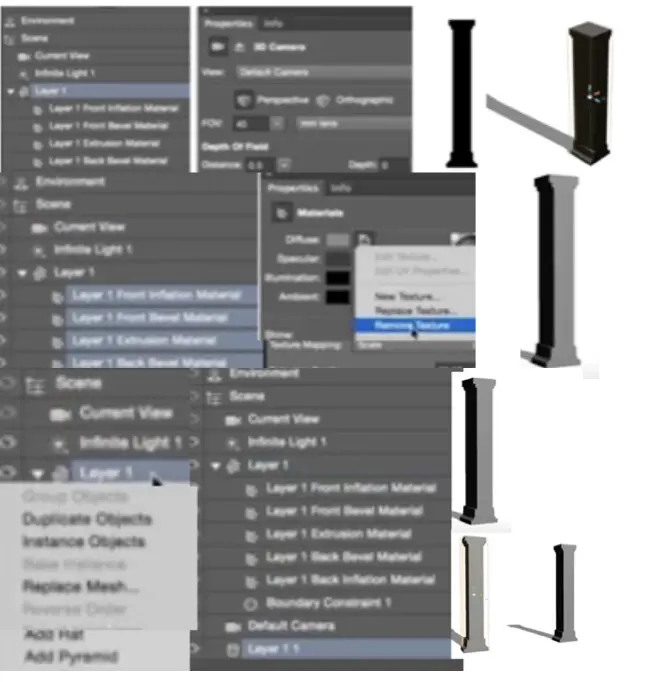
P65 - 01:04实例拷贝-拉伸。
But now what we will do, we create another layer. So now I will create something kind of decoration,
P65 - 01:39创建另一个图层,加入装饰。
To make it simple, let's just make it like this. And we will create a extrusion once again, So then we will go and combine those two guys together. Merged them together.
P65 - 02:18突出-融合在一起。
Now, as you can see, we've got then we need to Just a rotation of this. let's just position this one probably.
P65 - 02:59拖拽到正确的位置。
Let's go to its source, probably. Like this right.
P65 - 03:22再给柱子做一些修饰调整。
And now we have a really nice. I can go and combine those together. Group these objects and start instance.
P65 - 03:41打组-实例拷贝-拖拽。
Let’s zoom out. Instance this guy.
P65 - 04:00重新拖拽图层,重新拷贝。
So quickly. Ended up having something like this. And we can go start instance in. And then let's crop.
P65 - 04:59二变四变八,实例拷贝。
you probably already realized that the cropping doesn't affect 3D, because it’s a separate 3D space.
P65 - 05:19裁剪不适合3D空间。
So we have a pretty decent like maybe you'll say anything, And I can zoom in and rotate it. All towards those. But what is awesome is the fact that everything is instance. like at any time, I can go to one of these columns. And if I change. everything is changing.
P65 - 05:54对其中一个柱子做变动就都变了。
For example, I can make those horizontal columns. And it will change everything, of course. But also the overdose was not right. I can fix it just by making thickness zero. So now we got circular columns.
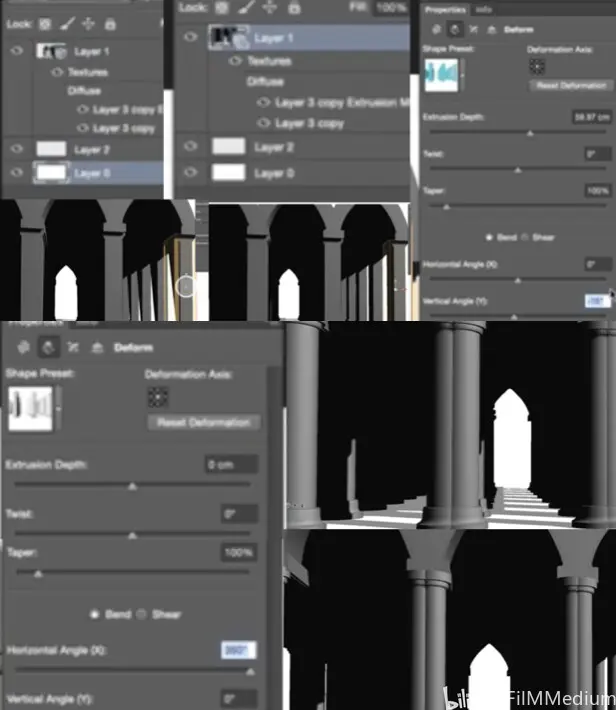
P65 - 06:24厚度变成0得到环形圆柱体。
And at any point, if I change the design of this column. Changes everything. And I still can start assembling my scene. like if it was like something from lord of the rings, let's just check the render. once you hit the render, you would get a lot of global Information over here. So it's all good, but also. Let's make it 15. So I really nice setting over here.
P65 - 07:25摄像视角变成15,效果就很好。
And same with the any kind of bump mapping. if I paint on the bump. I will ask me to create the bump. So when I paint. It will just create bump on every one of them.
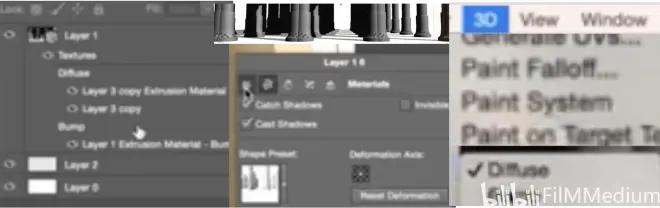
P65 - 08:21选择绘制靶点-凹凸图-百分百。
So can make carvings and stuff like that very easily. Say over here. Like for example. Let's change the bump. Likely made the bump 200. And it just creates everything. But more than that, it's so cool that you can create or design based on one of these silhouettes.
P65 - 08:29在剪影基础上雕刻出贴图来。
So if at any point, I want to change the design and changed the lighting, I can easily do it.
P65 - 08:59任何时刻改变灯光设计都可以。
Which is a really cool, same with the upper section. I can drag the slider. It will just create different options for me.
P65 - 09:17滑动滑块,给我创建不同的选择。
And now all you need to do is go back to your photo shop and start painting. combining a very cool 3D set up with some painting skills. or their people and stuff like that. All you need is already here. And imagine if you import postcards as well, you can just create some very exciting stuff.

P65 - 10:29调节拓展深度,改变隧道口宽度。
same with this one. So, it's a very design driven exercise.
P65 - 10:47类似调节水平和垂直的水平。
I hope you guys enjoyed it. And let's move on and create something even more interesting.
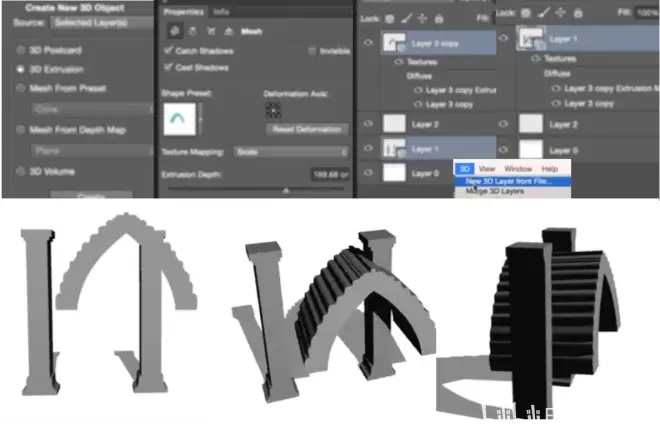
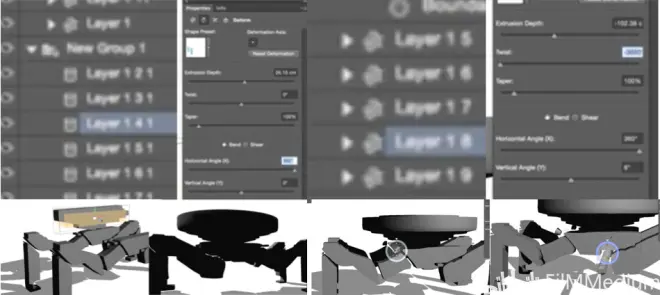
6. 3D in Photoshop---4-4.Mech
P66 - 00:01
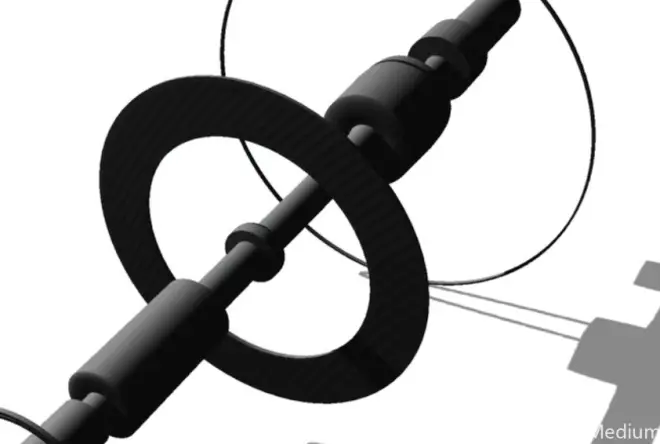
let's do in the last example for extrusion. So let’s quickly scripted sketch kind of magic design, that will be all kind of max alert.
P66 - 00:40开始做个包含M元素平面设计。
To sign up a little bit better. Just a second. So let's say this is our design, And it's very primitive. So then we will go to 3D. Create 3D extrusion,
P66 - 01:44创建平面-3D拓展。
So we all create this guy. Make extrusion of this. And now I'm going to instance. We will create an instance on this.

P66 - 02:07创建实例拷贝。
So let's go and remove the texture.
P66 - 02:14选图层-漫射-移除材质。
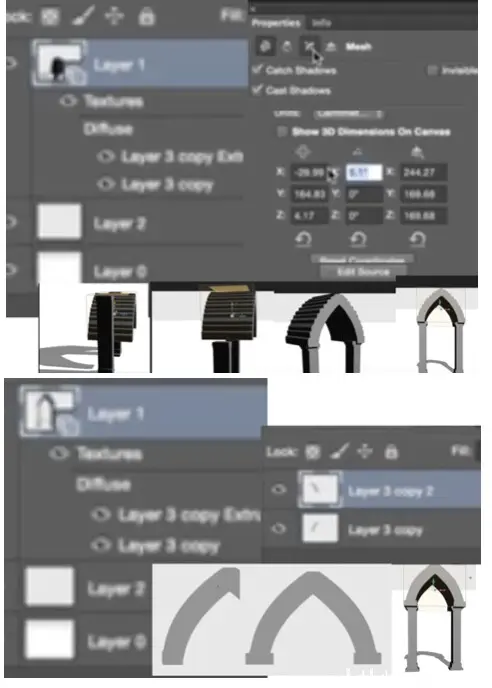
So not now what we have this kind of 3D space. So just as we did before, like at any point, I can go and arrange the tiles vertically.
P66 - 02:31窗口-平行排列。
So I can at any point, let's just correct this space over here. So I can go and start refining. Whenever I press CTRL s, it will save my design. For example, I want to tweak it, as you can see, it changes over here. It's a very powerful feature.But let's say at some point, I'm kind of happy with what's going on, Not 100%, but it's always very tricky to get everything working. I'm happy with this layout, at least.
P66 - 03:45调整材质3D随之改变。
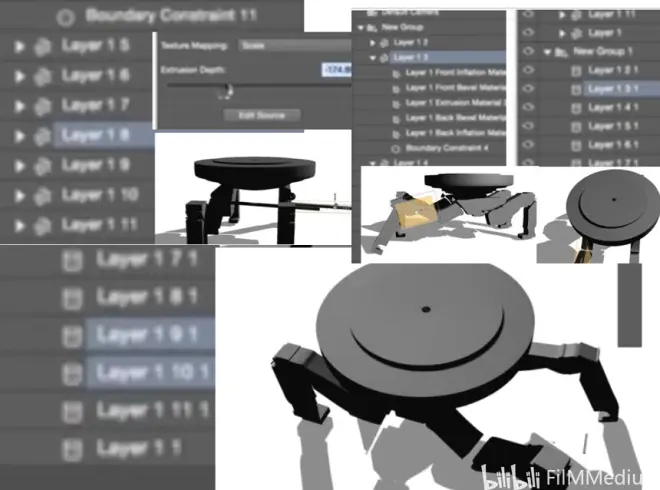
So now what I can do. now I can go and split this guy up. So I can go to the 3D. Of course, I need to have my layers selected. Save this one. Go back to a 3D view.
P66 - 04:25回到单一3D视角。
Let's change the camera lens to 25.
P66 - 04:39改变摄像视角到25。
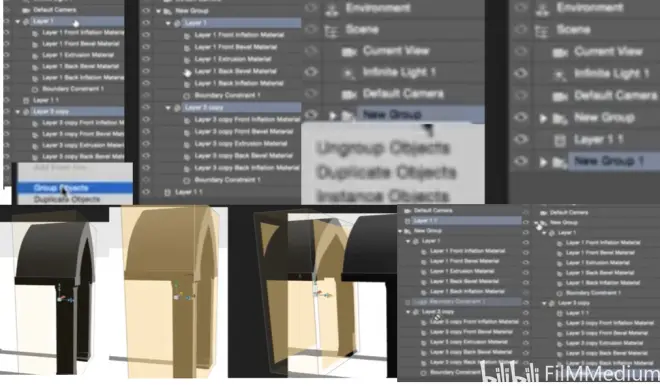
And now I will go to 3D space with the extrusion. And now all these parts. They should be separate, 3D space extrusion. First I need to get rid of the instance for now. And now I will go. And split this extrusion. So I split them all into many different spaces.
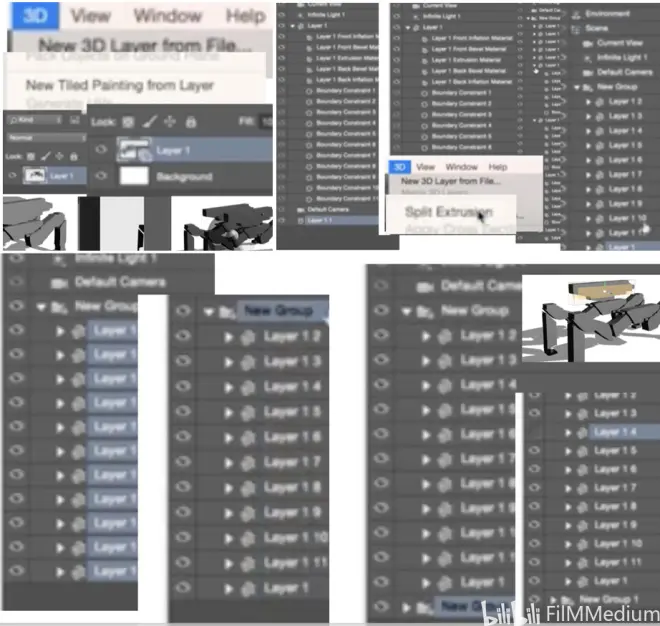
P66 - 05:29先去实例拷贝,再拓展各面向。
Now I will go. And instance this guy. I will go and get rid of a couple of these features. Some move him around.
P66 - 05:54再次做的实例拷贝,其中再微调。
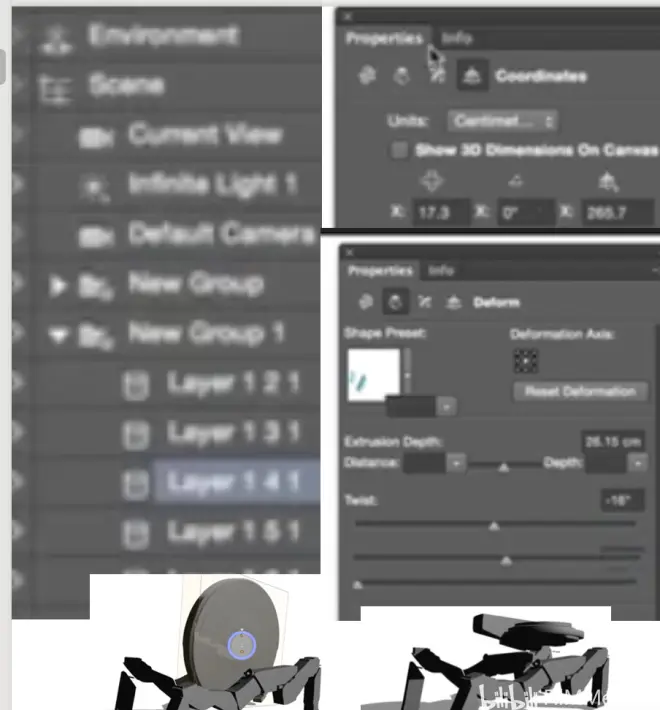
And i'll start using different. move it around. So I can go and use this one,
P66 - 06:15物质属性,调节水平视角。
for example. not horizontal. Vertical. To combine those two guys. I can create different facts. I know it's not the spring, but at least it looks like one. So I can move them around. I will keep it simple for now.
P66 - 07:19调节另一层做出类似螺丝。
what's cool about it that? So let's just go back and bring this guy back again.
P66 - 07:42调节突出的宽度,
I can start posing this. Like I can also combine those different sections together.
P66 - 08:21一伸腿一蜷腿,两个结合在一起。
select few of those. start adjusting a little bit.
P66 - 08:40选择几个姿势进行结合。
I wish they had like, keep on point also editable. So I can move these points around, but I don’t think they have it. so for now. I will do it hard way.
P66 - 09:15想通过关节点链接,但是失败了。
as you can start posing it. And actually having this very primitive geometry, it can get a very decent resolved.
P66 - 09:40最原始几何体,有像样解决方案。
You can instance these guys like create a bunch of like an army of this world. And like some of them can be doing, looking up, just giving them a little bit more character. It's very useful.
P66 - 09:57比如可以让桌面抬起头来。
Instead of having them all being in Icon default pose, which is always boring.
P66 - 10:06避免都是默认的姿势,非常无聊。
And you can change a light and stuff like that. And as I said, this is a very design driven tool because we don't care about photorealism at this point.
P66 - 10:29此刻不需要关心照片真实性。
all we need to do this to start generating ideas about how you design will look like.
P66 - 10:38此时专注设计成什么形状。
Often you can just go on screen, grab copy, paste them. Go stylize in check if it works as a line drawing,
P66 - 10:49过滤-风格化-找到线稿。
and then you can start refining it as a line drawing. And you will have everything in perspective that would make 3D photoshop very powerful,And also being able to play with these guys. Can create some very cool, interesting ideas.
P66 - 11:36如可以在属性2调节到面翻转。
So yeah, that's pretty much it about 3D extrusion. We still have two more options to go. As you remember, we had more, but this is something I will explain in lesson seven, because we will get more and more photo real as we go. For now. I hope you guys see the power of primitive 3D photo shop. And we will do so much more complicated stuff next week.
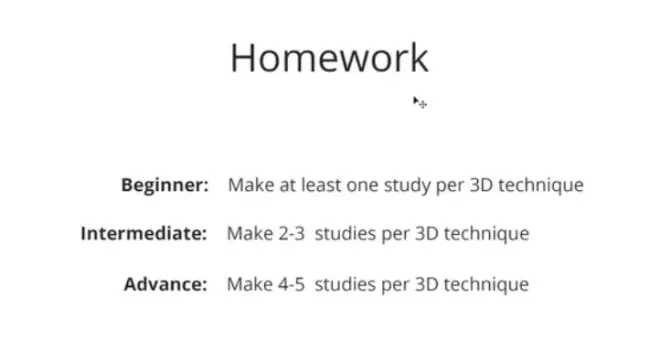
6. 3D in Photoshop---5.Homework
P67 - 00:00
So the homework for this week is pretty straightforward. Depending on how much time you have, you can do at least one study pro 3D technique. or if you have more time, I would love to see four or five studies perfect technique.
P67 - 00:19用好3D在PS中运用。
And keep in mind guys keep them very simple thing. Keep them something that you handle in. given amount of time. good luck to you guys. And see you next week.
7. Matte Painting Techniques---1-1.Lesson Overview

P68 - 00:00
And welcome to lesson number seven. this lesson. I will show you different variety of new tools. We will introduce some very obvious, but quite powerful tools like using google and stuff like that. Also I want you to show you a couple of new Adobe CC software which are very powerful to generate characters like animate them as well.
P68 - 00:26生成角色进行动画的软件。
And basically this lesson we will finalize all the tools we need to actually make a final push next week when we will produce a bunch of different cool artworks using all the tools that we sold so far. And I'm coming to my painting techniques, guys do not expect from me showing you like four or five hours long matte paintings. I always try to keep it very simple. And I just use those techniques to kind of help me in my story telling and to help me with my designs.
P68 - 00:58简单蒙版绘制讲述故事。
So I hope you guys will enjoy it. And let's get started.
