
创意编程作业——互动编程习作——表现随机行为及牛顿运动学
继上两次创意编程作业之后,此次实验采用了有代码参考的processing,对《代码本色》之中的0-4章内容进行理解。

第0章 引言
此章主要内容为随即行为与噪声函数

习作:
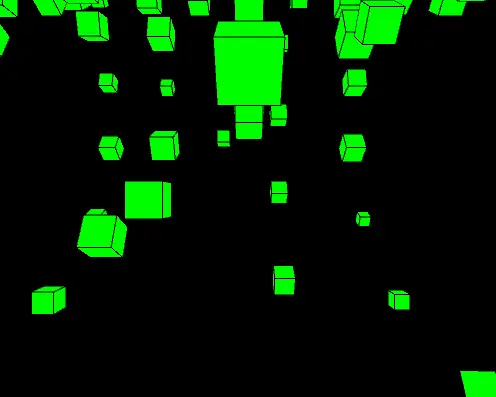
本章的习作想法是用Perlin Noise去实现一些小立方体的体积随机变化
void setup(){
size(500, 400, P3D);
background(100,100,100);
}
float t = 0;
float a=0;
void draw(){
++t;
clear();
for (int x = 0; x < width; x += 50){
for (int y = 0; y < height; y += 50){
int z=0;
float n = noise(0.05*(x), 0.05*(y), 0.05*(z+t));
translate(x,y,0);
float b;
a++;
b=0.002*a;
fill(b,255-b,0.5*b);
box(n*50);
translate(-x,-y,0);
rotateX(PI/7);
}
}
}
通过随时间变化的变量t和变量 n,接收 noise()函数的值,产生随机产生的噪声值,立方体的大小通过n来表现,以下是表现效果预览:
第一章 向量
此章主要内容为processing中向量是如何表现的,以及向量之间的加减乘除等各种计算的变现方法,和向量的运动,对物理模拟有很重要的基础作用。同时也对交互有了初步的接触
习作:
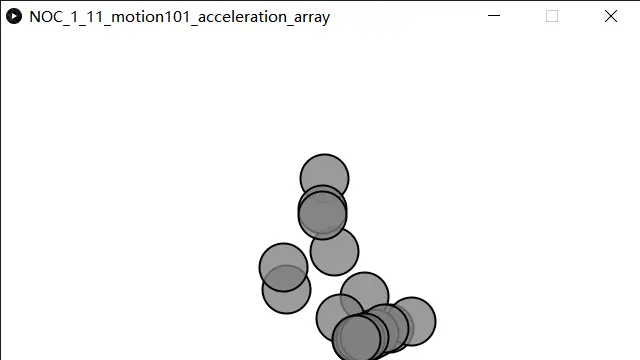
关于此章节的习作,拓展自一组同时朝着鼠标加速的运动物体。小球会朝着鼠标的位置加速前进,小球移动到目的地后不会停下来。同时,可以通过交互(w,s)改变小球行动速度
if(keyPressed){
if(key == 'w'){
topspeed =40;
}
if(key == 's'){
topspeed =0;
}
NOC_1_11_motion101_acceleration_array.pde:
Mover[] movers = new Mover[20];
void setup() {
size(640,360);
for (int i = 0; i < movers.length; i++) {
movers[i] = new Mover();
}
}
void draw() {
background(255);
for (int i = 0; i < movers.length; i++) {
movers[i].update();
movers[i].display();
}
}
Mover.pde:
class Mover {
// The Mover tracks position, velocity, and acceleration
PVector position;
PVector velocity;
PVector acceleration;
// The Mover's maximum speed
float topspeed;
Mover() {
// Start in the center
position = new PVector(random(width),random(height));
velocity = new PVector(0,0);
topspeed = 5;
}
void update() {
// Compute a vector that points from position to mouse
PVector mouse = new PVector(mouseX,mouseY);
acceleration = PVector.sub(mouse,position);
// Set magnitude of acceleration
//acceleration.setMag(0.2);
acceleration.normalize();
acceleration.mult(0.2);
// Velocity changes according to acceleration
velocity.add(acceleration);
// Limit the velocity by topspeed
if(keyPressed){
if(key == 'w'){
topspeed =40;
}
if(key == 's'){
topspeed =0;
}
}
velocity.limit(topspeed);
// position changes by velocity
position.add(velocity);
}
void display() {
stroke(0);
strokeWeight(2);
fill(127,200);
ellipse(position.x,position.y,48,48);
}
}
小球会跟随鼠标进行加速度运动,如果按下w,球体移动会更快;按下s,小球停止
第二章 力
此章节主要讲述了自然界常见重要力的在processing中的表现。包括牛顿定律的体现,引力,斥力,和摩擦力,阻力,万有引力的体现和力的计算
习作:
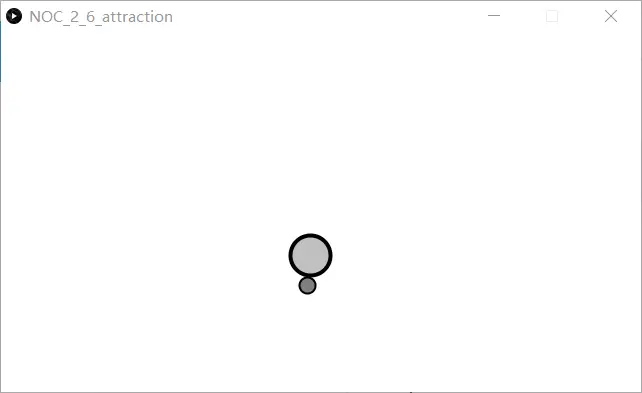
关于此次习作,基本想法是在实现引力的同时,也会在一定程度上改变为斥力,进行观察受力小球的变化
if (position.x > width) {
position.x = 0;
} else if (position.x < 0) {
position.x = width;
}
if (position.y > height) {
velocity.y *= -1;
position.y = height;
}
如此实现距离不同力的类型转换,在此处还可以调整力的大小
NOC_2_6_attraction.pde:
Mover m;
Mover m1;
Attractor a;
void setup() {
size(640,360);
for(int i=0;i<3;i++){
m = new Mover(1,300);
}
m1=new Mover(1.2,0);
a = new Attractor();
}
void draw() {
background(255);
PVector force = a.attract(m);
m.applyForce(force);
m.update();
m1.applyForce(force);
m1.update();
a.drag();
a.hover(mouseX,mouseY);
a.display();
m.display();
m1.display();
}
void mousePressed() {
a.clicked(mouseX,mouseY);
}
void mouseReleased() {
a.stopDragging();
}
Attractor.pde:
class Attractor {
float mass; // Mass, tied to size
float G; // Gravitational Constant
PVector position; // position
boolean dragging = false; // Is the object being dragged?
boolean rollover = false; // Is the mouse over the ellipse?
PVector dragOffset; // holds the offset for when object is clicked on
Attractor() {
position = new PVector(width/2,height/2);
mass = 20;
G = 1;
dragOffset = new PVector(0.0,0.0);
}
PVector attract(Mover m) {
PVector force = PVector.sub(position,m.position);
float d = force.mag();
d = constrain(d,5.0,25.0);
force.normalize();
float strength = (G * mass * m.mass) / (d * d);
if(d<10){
strength=-strength;
}
force.mult(strength);
return force;
}
void display() {
ellipseMode(CENTER);
strokeWeight(4);
stroke(0);
if (dragging) fill (50);
else if (rollover) fill(100);
else fill(175,200);
ellipse(position.x,position.y,mass*2,mass*2);
}
void clicked(int mx, int my) {
float d = dist(mx,my,position.x,position.y);
if (d < mass) {
dragging = true;
dragOffset.x = position.x-mx;
dragOffset.y = position.y-my;
}
}
void hover(int mx, int my) {
float d = dist(mx,my,position.x,position.y);
if (d < mass) {
rollover = true;
}
else {
rollover = false;
}
}
void stopDragging() {
dragging = false;
}
void drag() {
if (dragging) {
position.x = mouseX + dragOffset.x;
position.y = mouseY + dragOffset.y;
}
}
}
Mover.pde:
class Mover {
PVector position;
PVector velocity;
PVector acceleration;
float mass;
Mover(float a,float b) {
position = new PVector(b,50);
velocity = new PVector(1,0);
acceleration = new PVector(0,0);
mass = a;
}
void applyForce(PVector force) {
PVector f = PVector.div(force,mass);
acceleration.add(f);
}
void update() {
velocity.add(acceleration);
position.add(velocity);
acceleration.mult(0);
}
void display() {
stroke(0);
strokeWeight(2);
fill(127);
ellipse(position.x,position.y,16,16);
}
void checkEdges() {
if (position.x > width) {
position.x = 0;
} else if (position.x < 0) {
position.x = width;
}
if (position.y > height) {
velocity.y *= -1;
position.y = height;
}
}
}
小球在远离鼠标操控的小球时小球呈现受到引力,而靠近时会出现斥力,具体表现更是会出现“捕获小球”的现象
第三章 振荡
本章主要将讲述了由三角函数为基础的振荡运动的实现,并由此可以实现一些更加复杂的带有角度的力的计算
习作:
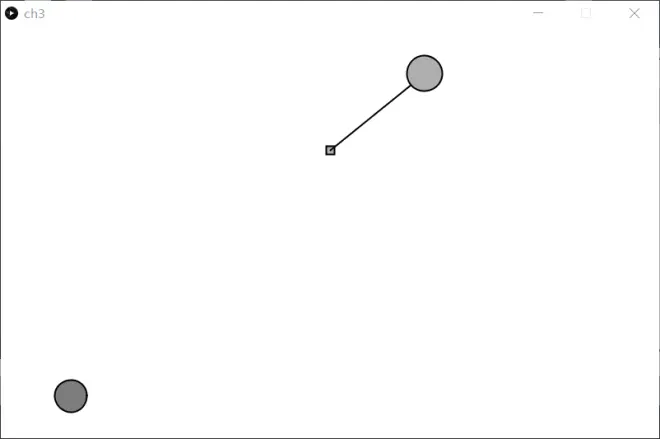
本章节的习作主要想实现小球能够实现对一个单摆的干涉,能够产对单摆的排斥力,对它的运动产生影响
ch3.pde:
Bob bob;
Spring spring;
float flag=0;
float one=0;
Mover mover;
void setup() {
size(800,500);
spring = new Spring(width/2,10,100);
bob = new Bob(width/2,100);
mover = new Mover();
}
void draw() {
background(255);
mover.update();
mover.display();
PVector gravity = new PVector(0,2);
PVector hit = new PVector(one,0);
if(mover.location.x>400){
one=random(-10,0);
}
else{
one=random(0,10);
}
if(mover.location.y>bob.location.y){
flag=random(-1,0);
}
else{
flag=random(0,10);
}
bob.applyForce(hit);
bob.applyForce(gravity);
spring.connect(bob);
spring.display();
spring.displayLine(bob);
bob.update();
bob.display();
}
Mover.pde:
class Mover {
PVector location;
PVector velocity;
PVector acceleration;
float topspeed;
float xoff,yoff;
float r = 16;
Mover() {
location = new PVector(width / 2,height / 2);
velocity = new PVector(0,0);
topspeed = 4;
xoff = 100;
yoff = 10;
}
void update() {
PVector mouse = new PVector(mouseX,mouseY);
PVector dir = mouse.get();
dir.sub(location);
dir.normalize();
dir.mult(0.5);
acceleration = dir;
velocity.add(acceleration);
velocity.limit(topspeed);
location.add(velocity);
}
void display() {
stroke(0);
strokeWeight(2);
fill(125);
pushMatrix();
rectMode(CENTER);
translate(location.x,location.y);
arc(0,0,20+0.1*mouseX,20+0.1*mouseX,0,2*PI);
popMatrix();
}
}
class PVector {
float x;
float y;
PVector(float x_,float y_) {
x = x_;
y = y_;
}
PVector get() {
PVector newVector = new PVector(x,y);
return newVector;
}
void add(PVector v) {
x = x + v.x;
y = y + v.y;
}
void sub(PVector v) {
x = x - v.x;
y = y - v.y;
}
void mult(float n) {
x = x * n;
y = y * n;
}
void div(float n) {
x = x / n;
y = y / n;
}
float mag() {
return sqrt(x * x + y * y);
}
void normalize() {
float m = mag();
if(m != 0) {
div(m);
}
}
void limit(float max) {
if(mag() > max) {
normalize();
mult(max);
}
}
float heading2D() {
return atan2(y,x);
}
}
class Bob {
PVector location;
PVector velocity;
PVector acceleration;
float mass = 24;
float damping = 0.95;
Bob(float x, float y) {
location = new PVector(x,y);
velocity = new PVector(0,0);
acceleration = new PVector(0,0);
}
void update() {
velocity.add(acceleration);
velocity.mult(damping);
location.add(velocity);
acceleration.mult(0);
}
void applyForce(PVector force) {
PVector f = force.get();
f.div(mass);
acceleration.add(f);
}
void display() {
stroke(0);
strokeWeight(2);
fill(175);
ellipse(location.x,location.y,mass+mouseX*0.1 ,mass+mouseX*0.1);
}
}
Spring.pde:
class Spring {
PVector anchor;
float len;
float k = 0.2;
Spring(float x,float y,int l) {
anchor = new PVector(x,y);
len = l;
}
void connect(Bob b) {
PVector force = b.location.get();
force.sub(anchor);
float d = force.mag();
float stretch = (d - len);
force.normalize();
force.mult(-1 * k * stretch);
b.applyForce(force);
}
void display() {
stroke(0);
fill(175);
strokeWeight(2);
rectMode(CENTER);
rect(anchor.x, 150, 10, 10);
}
void displayLine(Bob b) {
strokeWeight(2);
stroke(0);
line(b.location.x, b.location.y, anchor.x, 150);
}
}
这样,就可以实现对单摆运动的同时能够使跟随鼠标的小球对它产生斥力的效果
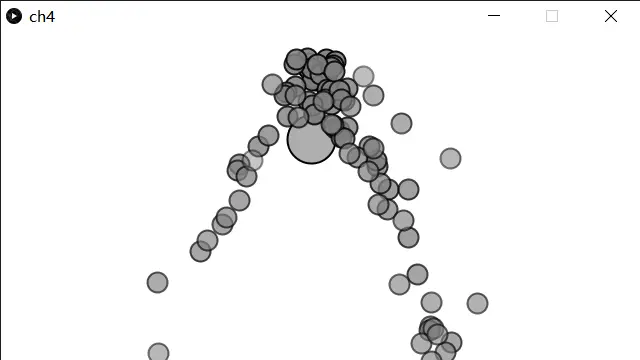
第四章 粒子系统
本章节主要讲述了粒子系统的生成与实现,多态和继承的简介与实现面向对象以及力对粒子系统的影响效果实现
习作:
此章节的习作主要是实现鼠标能产生排斥力组成实现排斥力的粒子系统
设置好力 v=new PVector(mouseX,mouseY);
ch4.pde:
ParticleSystem ps;
Repeller repeller;
void setup() {
size(640,360);
ps = new ParticleSystem(new PVector(width/2,50));
repeller = new Repeller(width/2-20,height/2);
}
void draw() {
background(255);
ps.addParticle();
// Apply gravity force to all Particles
PVector gravity = new PVector(0,0.1);
ps.applyForce(gravity);
ps.applyRepeller(repeller);
repeller.display();
ps.run();
}
Particle.pde:
class Particle {
PVector position;
PVector velocity;
PVector acceleration;
float lifespan;
float mass = 1; // Let's do something better here!
Particle(PVector l) {
acceleration = new PVector(0,0);
velocity = new PVector(random(-1,1),random(-2,0));
position = l.get();
lifespan = 255.0;
}
void run() {
update();
display();
}
void applyForce(PVector force) {
PVector f = force.get();
f.div(mass);
acceleration.add(f);
}
// Method to update position
void update() {
velocity.add(acceleration);
position.add(velocity);
acceleration.mult(0);
lifespan -= 1.0;
}
// Method to display
void display() {
stroke(0,lifespan);
strokeWeight(2);
fill(127,lifespan);
ellipse(position.x-5+random(0,5),position.y-5+random(0,5),20,20);
}
// Is the particle still useful?
boolean isDead() {
if (lifespan < 0.0) {
return true;
} else {
return false;
}
}
}
ParticleSystem.pde:
class ParticleSystem {
ArrayList<Particle> particles;
PVector origin;
ParticleSystem(PVector position) {
origin = position.get();
particles = new ArrayList<Particle>();
}
void addParticle() {
particles.add(new Particle(origin));
}
// A function to apply a force to all Particles
void applyForce(PVector f) {
for (Particle p: particles) {
p.applyForce(f);
}
}
void applyRepeller(Repeller r) {
for (Particle p: particles) {
PVector force = r.repel(p);
p.applyForce(force);
}
}
void run() {
for (int i = particles.size()-1; i >= 0; i--) {
Particle p = particles.get(i);
p.run();
if (p.isDead()) {
particles.remove(i);
}
}
}
}
Repeller.pde:
class Repeller {
// Gravitational Constant
float G = 100;
// position
PVector position;
float r = 10;
Repeller(float x, float y) {
position = new PVector(x,y);
}
void display() {
stroke(0);
strokeWeight(2);
fill(175);
ellipse(mouseX,mouseY,48,48);
}
PVector repel(Particle p) {
PVector v;
v=new PVector(mouseX,mouseY);
PVector dir = PVector.sub(v,p.position);
float d = dir.mag();
dir.normalize();
d = constrain(d,5,100);
float force = -1 * G / (d * d);
dir.mult(force);
return dir;
}
}
如此,就实现了鼠标处的小球对粒子系统的排斥效果。可以实现例子生成点的位置变化从而让小球来接也很容易实现
结语:
这几章节《代码本色》的阅读学习,我切身感受到了图像编程的神奇,但由自身编程水平所限,很多想法在经历很多次尝试后也没有完美实现,只能挑选出了简单的程序实现,借助同学的启发。但在习作过程中,自身对代码的理解也有了进步,很多想法也能够实现,也对之前的部分有了更为深入的体会。
虽然只是实现了很简单的随机与物理效果,但长足的积累肯定能够组合出复杂的效果。

