
从 Zotero 批注到Obsidian 研究笔记
https://publish.obsidian.md/history-notes/From+Zotero+Annotations+to+Obsidian+Research+Notes
Elena Razlogova
康科迪亚大学历史系,蒙特利尔
elena.razlogova[at]concordia.ca
zach绘图.png
欢迎来到 "用 Zotero 和Obsidian 做历史"! https://publish.obsidian.md/history-notes/00+About+the+Project 了解更多关于这个项目的信息,或者在这里详细阅读设置情况。你也可以从Github上下载一个Obsidian 历史库的启动库 https://github.com/erazlogo/obsidian-history-vault,其中预装了这里描述的所有Obsidian 插件。
做笔记是研究和写作的一个重要方面。特别是历史学家的笔记规模很大:他们在写书时要处理成百上千的原始资料。你可以从索引卡和软木板(corkboard)开始。但是,一旦你进入一个重要的历史项目,你可能会被各种来源和联系所淹没,而一个软木板是不够的。在这个阶段,数字工具变得至关重要。
我选择 Zotero 和 Obsidian 作为数字记事本,因为它们在入门阶段是免费的,而且其付费功能也不贵。这两个应用程序都有庞大而活跃的用户群体,支持它们的发展,所以它们不太可能消失。最后,它们的数据是可移植的。 Zotero 可以将其所有数据导出为纯文本文件,而Obsidian的数据基本上是一个用Markdown 编写的文本文件的文件夹(在应用中称为 "库"),Markdown 是一种简单的标记语言,可以在纯文本文件中创建格式化的文本。Obsidian 的功能,如局部图谱(笔记之间的连接图)和 Dataview(一个插件,它将我的笔记中的文本结构化,所以它们可以像数据库一样被查询)帮助分析我收集的信息。
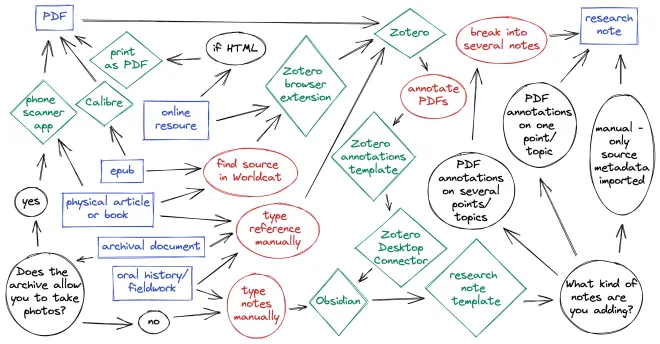
我用 Zotero 导入源元数据和批注PDF,用 Obsidian 来处理笔记。在 Obsidian 用户中,一个流行的方法是为每个来源创建一个包含所有批注的 "文献笔记"。但是,正如上面的图表(基于历史学家Zachary Schrag https://zacharyschrag.com/ 的研究过程幻灯片)所示,同一来源的不同批注实际上可能属于你的草稿中的不同位置。
为了做到这一点,我把批注分成几份研究笔记,以后再分门别类地进行写作。我把它们放在我的 Obsidian 库的最上面的文件夹里,"01 笔记",并把它们标记出来以便进一步分析。我的研究笔记看起来是这样的(在新窗口中打开以获得更好的视野)。
研究笔记示例.png
这个笔记包括一个总结该笔记的标题(它同时也是该笔记的文件名)、来源信息、文字、标签、我用自己添加的数据设置的 Dataview 字段,包括我的评论,以及与其他笔记的链接(左上角的图表中反映的蓝色文字可点击)。笔记之间的链接是 Obsidian 的一个基本功能。它们是通过将笔记的标题放在双方括号里来创建的。[[note title here]]。Obsidian 的 "实时预览"功能隐藏了这些格式化代码,以方便阅读。
在左边你可以看到我的文件夹结构,这是 Obsidian 社区推荐的:我的研究有七个文件夹,还有一个"元"文件夹。每个文件夹的编号以 "0"开头,以确保在你在根目录下有超过九个研究文件夹正确的排序。在没有编号的"元"文件夹中,我保存所有的补充文件,包括用于导入和处理 Zotero 批注的模板。(把不同种类的模板放在不同的子文件夹里是很重要的,这样才能在Obsidian偏好中正确指定这些文件夹)。
下面我将解释你需要做什么来达到这一点。
你需要安装的东西
注意:Obsidian 插件可以很容易地从 Obsidian 内部安装(见下面的说明)。这里我提供了 Github 仓库的链接,你可以在那里找到更多关于它们的信息。
Zotero 6 和 Zotero 浏览器连接器 https://www.zotero.org/download/
Better Bibtex for Zotero - Zotero 插件 https://retorque.re/zotero-Better-bibtex/
Obsidian https://obsidian.md/
Zotero Integration(之前叫 Zotero Desktop Connector)--Obsidian插件。https://github.com/mgmeyers/obsidian-zotero-integration 如果你的Obsidian安装程序版本在v0.13.24之前,你需要从 obsidian.md网站重新安装(而不是从应用程序中更新)。
Templater - Obsidian插件
Dataview - Obsidian插件
Zotero 批注
我在这里跳过 Zotero 及其插件的安装,以及将资料导入 Zotero 的基础知识,因为这些说明在网上广泛存在(例如,见这里或这里的相关部分),许多大学提供 Zotero 教程。我直接转到 Zotero 6的新功能(从2022年开始):PDF批注。
Zotero 的内置PDF阅读器 https://www.zotero.org/support/pdf_reader,在 Zotero 6中的新功能,以一种将批注与PDF分开的方式添加批注。这种设置要求你将你的PDF存储在 Zotero 文件系统中,而不是作为链接文件驻留在你的硬盘上的其他地方。我更喜欢这种设置,因为它允许我将我的文件和批注与iOS Zotero 应用程序进行同步。我可以与我的学生分享干净的PDF,或者如果需要的话,我可以导出带有批注的PDF。如果你喜欢使用链接的PDF文件,或将批注嵌入到PDF中,并在外部PDF编辑器中工作,你将N
通过www.DeepL.com/Translator(免费版)翻译
From Zotero Annotations to Obsidian Research Notes
Elena Razlogova
History Department, Concordia University, Montreal
elena.razlogova[at]concordia.ca
zach drawing.png
Welcome to Doing History with Zotero and Obsidian! Learn more about the project, or read about the setup here in detail. You can also download a starter Obsidian history vault from Github which has all Obsidian plugins described here preinstalled.
Notetaking is an essential aspect of research and writing. Historians in particular take notes on a grand scale: they process hundreds or thousands of primary sources when writing a book. You may start with index cards and a corkboard. But once you get into a major historical project you may be overwhelmed with sources and connections, and a corkboard will not be enough. Digital tools become crucial at that stage.
I chose Zotero and Obsidian for digital notetaking because they are free at the entry level, and their paid features are not expensive. Both apps have large and active user communities that support their development so they are not likely to disappear. Finally, their data is portable: Zotero can export all its data as plain-text files, and Obsidian data is basically a folder (called a "vault" in the app) of text files written in markdown, a simple markup language that creates formatted text in a plain-text file. Obsidian features such the local Graph (a map of connections Between notes) and Dataview (a plugin that structures the text in my notes so they can be queried like a database) help analyze the information I collect.
I use Zotero to import source metadata and annotate PDFs, and Obsidian to work with notes. A popular way to do that among Obsidian users is to create one "literature note" per source with all annotations. But, as the above chart (based on a research process slide by historian Zachary Schrag) shows, different annotations from the same source actually might belong in different places in your draft.
In order to make this work, I split annotations into several research notes that will be later sorted into groups for writing. I put them in the top folder in my Obsidian vault, "01 notes" and mark them up for further analysis. My research notes look like this (open in a new window for Better view):
research note example.png
This note includes a title that summarizes the note (it doubles as the file name for the note), source information, text from the source, tags, Dataview fields I set up with data added by me, including my comments, and links to other notes (clickable text in blue reflected in the graph on the top left). Links Between notes are a basic feature of Obsidian. They are created by encasing the title of the note in double square brackets: [[note title here]]. The "live preview" feature in Obsidian hides this formatting code for easier reading.
On the left you see my folder structure, recommended by the Obsidian community: seven folders for my research, and a "meta" folder. Starting each folder number with a leading "0" ensures correct sorting in case you have more than nine research folders in the root directory down the road. In the unnumbered "meta" folder, I save all supplementary files, including templates for importing and processing Zotero annotations. (It is important to keep different kinds of templates in separate subfolders, in order to specify these folders correctly in the Obsidian preferences.)
Below I explain what you need to do to get to this point.
What You Need to Install
Note: Obsidian plugins can be easily installed from within Obsidian (see directions below). Here I provide links to Github repositories where you can find out more about them.
Zotero 6 and Zotero Browser Connector
Better Bibtex for Zotero - Zotero plugin
Obsidian
Zotero Integration (formerly Zotero Desktop Connector) - Obsidian plugin. If your Obsidian installer version is before v0.13.24 you will need to reinstall from obsidian.md website (rather than updating from within the app).
Templater - Obsidian plugin
Dataview - Obsidian plugin
Zotero Annotations
I am skipping the installation of Zotero and its plugins here, as well as the basics of importing sources into Zotero, because these instructions are available widely on the web (for example, see relevant sections here or here) and many universities offer Zotero tutorials. I move on directly to the new (as of 2022) feature in Zotero 6: PDF annotations.
Zotero's built-in PDF reader, new in Zotero 6, adds annotations in a way that keeps them separate from the PDF. This setup requires you to keep your PDFs stored within the Zotero file system rather than as linked files residing elsewhere on your hard drive. I prefer this setup because it allows me to sync my files and annotations with the iOS Zotero app. I can share clean PDFs with my students, or I can export a PDF with annotations if desired. If you prefer to use linked PDF files, or to keep annotations embedded in PDFs and work in an external PDF editor you will need a different set of plugins--check out this workflow by Alexandra Phelan.
I turn as many analog and electronic sources into OCRed PDFs as I can: articles and chapters in scholarly databases, scanned ILL materials, photographed archival sources, and converted EPUB files, DjVu files, and webpages. I read PDFs in Zotero’s built-in PDF reader, make annotations--highlights and comments. Finally, in the right column I create a note that includes all annotations. To do that, select the notes view in the right pane. Then click on the plus sign next to "Item Notes" and choose "Add Item Note from Annotations":
add item note from annotations.png
Zotero provides a default export template for annotations that works if you don't want to separate your notes by category.
You can also configure Zotero to categorize your annotations, for example, to distinguish the author's ideas from references that you want to add to Zotero.
Zotero Integration Setup
The basics of installing Obsidian are also available on the web; see, for example, my guidelines. Here I am focusing on how I import annotations with Zotero Integration (requires Obsidian installer version v0.13.24 or later).
First, install Zotero Integration in the Community Plugins section. Turn "Safe mode" off. Then click on "Browse".
community plugins.png
Search for the plugin, install, and activate it in the next window:
install zotero integration.png
Set up Zotero Integration preferences:
Install PDF utility
Select database: Zotero
Note Import location: The folder where you will save annotations
zotero integration settings.png
Set up the Import format and name it. Specify your research notes output path (mine is "01 notes" folder). Specify Bibtex citekey (created by BetterBibtex in Zotero) as the file name. Set up image output path.
integrator import output path.png
Specify the template file and path, saved as an .md (markdown) file in a separate folder in your vault (mine is "meta/zotero/research note.md").
integrator import location and bibliography style.png
My template for a research note separates authors by type so I can use Dataview to search by letter recipient and interviewer. It includes a template for data entry, including fields for for page number, for my comments, and for the dates of an event described in the note. And in the very end it includes all highlights and comments I made in Zotero. (If you cut and paste this template from Safari into an Obsidian note, make sure to delete the accents before and after "---").
---
type: "{{itemType}}"{% for type, creators in creators | groupby("creatorType") -%}{% if loop.first %}
{% endif %}{{type | replace("interviewee", "author") | replace("director", "author") | replace("presenter", "author") | replace("podcaster", "author") | replace("programmer", "author") | replace("cartographer", "author") | replace("inventor", "author") | replace("sponsor", "author") | replace("performer", "author") | replace("artist", "author")}}: "{%- for creator in creators -%}{%- if creator.name %}{{creator.name}}{%- else %}{{creator.lastName}}, {{creator.firstName}}{%- endif %}{% if not loop.last %}; {% endif %}{% endfor %}"{% if not loop.last %}
{% endif %}{%- endfor %}{% if title %}
title: "{{title}}"{% endif %}{% if publicationTitle %}
publication: "{{publicationTitle}}"{% endif %}{% if date %}
date: {{date | format("YYYY-MM-DD")}}{% endif %}{% if archive %}
archive: "{{archive}}"{% endif %}{% if archiveLocation %}
archive-location: "{{archiveLocation}}"{% endif %}
citekey: {{citekey}}
---
{{bibliography}}
[online]({{uri}}) [local]({{desktopURI}}) {%- for attachment in attachments | filterby("path", "endswith", ".pdf") %} [pdf](file://{{attachment.path | replace(" ", "%20")}})
{% if loop.last %}
{% endif %}{%- endfor -%}
{% if tags.length > 0 -%}{% for t in tags -%}
#{{t.tag | lower | replace(" ", "-")}}{% if not loop.last %}
{% endif %}{% endfor %}
{%- endif %}
### Index
start-date::
end-date::
page-no::
### Connections
comment::
### Note
{% if markdownNotes %}
{{markdownNotes}}{% endif %}
The template above imports all tags attached to the Zotero item, separated by line breaks. Zotero allows for spaces in tags, but Obsidian does not, so the template replaces spaces Between words with dashes.
You may also want to import Zotero tags as nested tags. (Zotero does not allow for nested tags but Obsidian does.) I do that in order to manage them Better and to categorize notes by project and type or source.
Importing Annotations
Once you set up this system, import is easy. I set up a shortcut (Cmd-R) to call up the template, but you can also use the command palette. The command palette icon appears by default in the left-hand bar. To turn it off and on, go to Core Plugins in Settings. To call it up with a shortcut, type Cmd-P on Mac (Ctrl-P on PC).
open command palette.png
Choose "Create research note."
select zotero integration from palette.png
Then type keywords to find the source:
zotero selector.png
And Zotero Integration will add the note that already has tags (in my case, for type of source and project). It will also automatically place the source date (publication date in this case) into the "start-date" field. Change it manually if the date of the event the note describes is different from the source date. Always having the start-date field defined will help proper sorting of notes down the road. (I explain below how to search and sort your research notes.)
You will need to create a descriptive title instead of the default title based on the BibTex citekey.
imported note.png
Everything below the "Note" heading is your note made from annotations. If I did have any other notes attached to this source in Zotero they would import as well. To keep things organized, I don't keep notes of any kind in Zotero. After I import annotations, I delete "note from annotations." This way my notes are only in one place.
If you are likely to add more annotations to the PDF after the initial export, you may want to configure Zotero to categorize your annotations. That way, you can set Zotero up to export only your new annotations when you repeat the process.
The imported data I get falls into four categories:
Zotero Item metadata without annotations: If I am working with an analog source (an archival source I am not allowed to photograph, for example) and need to enter notes by hand, I just make sure there are no notes attached to the Zotero item. Then the import includes only source metadata and a template for entering the note.
Annotations relate to the same point or topic: If I have a short source that only requires one research note, after import I only have to rename the note in a way that describes its content. One note is all I need.
Annotations relate to several points or topics: If the annotations will have to be put into different parts of my draft (see Zachary Schrag's chart above), I will need several research notes. I process the data further.
Annotations are citations or bibliography entries: anything in footnotes or bibliography that belongs in my Zotero database. I need to process them as well: add them to Zotero.
Processing Imported Annotations
The Templater plugin helps to extract any selected text (one annotation or several consecutive annotations) into a new research note with one keyboard shortcut. First, install Templater from the Community plugins section in the Settings. Then, create two folders for templates and add them to Templater preferences. One folder is for Templater files:
set template folder location templater.png
The other folder is for javascript code that will be embedded into the templates:
set js folder location templater.png
In the "meta/templater" folder, place "extract research note from selection.md" file with this text:
<%*
const fileName = await tp.system.prompt("New Note Title");
tp.file.create_new(tp.user.header(tp)+tp.file.selection(), fileName, false);
await tp.file.cursor_append("[["+fileName+"]]");
%>
In the "meta/javascript" folder, place "header.js" file with this text:
function header(tp) {
content=tp.file.content;
selection=tp.file.selection();
getheader=content.substring(0, content.indexOf("### Note")+10);
pageno=selection.substring(selection.indexOf("?page=")+6, selection.indexOf("&annotation"));
headerwithpageno=getheader.replace("page-no::", "page-no:: "+pageno);
return headerwithpageno;
}
module.exports = header
(Obsidian can't open .js files and does not display them by default. If you want to see them in Obsidian, turn on "Detect all file extensions" in Settings -> Files and Links.)
Now you need to set up keyboard shortcuts in Settings. First, add the new .md file to Templater preferences:
set template hotkeys.png
Then choose the keyboard shortcut in the Hotkeys section:
hotkeys settings.png
You can choose any available key combination. I chose Cmd-Z as a hotkey.
Now, you can select any text in your note imported from Zotero and press the Cmd-Z hotkey. You will see the prompt where you can type the title for your new note. The new research note will have research metadata, tags, and the note template, the text you selected, and the page number for the annotation in the "page-no" field. You will also see the link to the new note in the original imported note, for easy navigation.
extract research note.gif
You can also use Templater to move one or several references you imported into a separate "task" note, for adding to Zotero later.
Research Note Details
My template puts source metadata on the top into the "YAML" space, denoted by three dashes on top and bottom. This data can go anywhere in a note but I like to hide it because I only need it to create Dataview searches and to connect from Zotero back to Obsidian. YAML allows it to be hidden, either with an arrow in the "editing" view, or completely in the "reading" view. I prefer to see the formatted bibliographic entry instead.
hiding yaml space.gif
I add a descriptive title to the note and my own metadata: tags, page number, events, people, or other entities (films in my case), links to other related notes, my own comments, and, if necessary, the dates of the main event the note describes. The text ending with a double column :: is a field name (in YAML you only need one :); everything to the right of :: is field data. I show below how to aggregate these fields into a table. The local graph displays the links I create:
adding links and graph.png
Each imported annotation comes with the link back to the annotation in the PDF:
obsidian to zotero.gif
Even if you entered your notes manually and don't have a pdf attached, you'll still be able to get to the Zotero item from the "local" link after your bibliographic reference:
from obsidian to zotero item.gif
You can also link from a Zotero item back to related notes in Obsidian.
Search Research Notes with Dataview
Structuring my notes allows me to keep track of my research. The regular Obsidian search (use the magnifying glass on the top left) works well for other notes, but you need to be able to search your research notes by source fields and by event dates.
First, install the Dataview plugin via Community Plugins in Settings. In Dataview preferences, turn on "Enable Javascript Queries":
dataview enable javascript.png
Then change date format for proper sorting:
dataview set date format.png
Create a separate note outside of your notes folder (in my case, "meta/dataview/Search Research Notes.md"). Add search fields and two fields for sorting. (If you paste the list from here, include the text only and omit the accent characters before and after.)
author::
recipient::
title::
publication::
date::
archive::
archive-location::
comment::
start-date::
end-date::
tag::
sortby:: start-date
sortorder:: desc
Then paste the code for the second table:
```dataviewjs
const current = dv.current();
const cdate = new Date(dv.current().date).getTime();
const cstartdate = new Date(dv.current()["start-date"]).getTime();
const cenddate = new Date(dv.current()["end-date"]).getTime();
const searchterm = dv.current().tag === null ? '"01 notes"' : '"01 notes" and '+dv.current().tag;
if (current.author || current.title || current.recipient || current.publication || current.date || current.archive || current["archive-location"] || current.comment || current["start-date"] || current["end-date"] || current.tag) {
function passes(page) {
return (!current.author || (page.author && page.author.includes(current.author)))
&& (!current.recipient || (page.recipient && page.recipient.includes(current.recipient)))
&& (!current.title || (page.title && page.title.includes(current.title)))
&& (!current.publication || (page.publication && page.publication.includes(current.publication)))
&& (!current.date || (page.date && new Date(page.date).getTime()===cdate))
&& (!current.archive || (page.archive && page.archive.includes(current.archive)))
&& (!current["archive-location"] || (page["archive-location"] && page["archive-location"].includes(current["archive-location"])))
&& (!current.comment || (page.comment && page.comment.includes(current.comment)))
&& (!current["start-date"] || (page["start-date"] && new Date(page["start-date"]).getTime()===cstartdate))
&& (!current["end-date"] || (page["end-date"] && new Date(page["end-date"]).getTime()===cenddate))
;
}
dv.table(
["Note", "Start Date", "End Date", "Author", "Recipient", "Title", "Publication", "Date", "Pages", "Archive", "Loc. in Archive", "Comment"],
dv.pages(searchterm)
.where(passes)
.sort(p => p[current.sortby], current.sortorder)
.map(p => [
p.file.link,
p["start-date"],
p["end-date"],
p.author,
p.recipient,
p.title,
p.publication,
p.date,
p["page-no"],
p.archive,
p["archive-location"],
p.comment
])
);
} else {
dv.paragraph(" Enter search terms into one or more fields to find research notes.");
}
```
Now you can search your research notes from this page, and sort the search results. Enter search terms into one or more fields to find research notes. For text fields, this is a case-sensitive phrase search. Enter dates as YYYY-MM-DD. Enter tag as #tag. Enter exact field title and asc/desc to change sort order. The default sort in my case is by start-date, descending, but you can search by any field included in the table.
search research notes.gif
From Source to Research Note at a Glance
Here is my research process in one chart:
zotero-obsidian workflow.png
Enjoy!
zotero-obsidian workflow.png
