
UdemyPSChrisBarin 38-41
4.8. Manipulate Layers in Photoshop CC 2019
P38 - 00:01
Welcome to this lecture where i'll teach you how to manipulate layers in photoshop CC 2019 and above.
P38 - 00:06如何在19版以上的调节图层。
In case you're using any other older version, please see the next lecture.
P38 - 00:10旧版的看下节。
Because these clips have conflicting hotkeys and advice.
P38 - 00:13新版有很多热键。
Ok. A few lectures ago, we talked about how this latest edition of the program constrains your layers aspect ratio by default.
P38 - 00:21默认限制图层横宽比。
This is done in order to prevent any distorting.
P38 - 00:24为了阻止变形。
The only exception is with regards to vectors IE shape layers.
P38 - 00:28唯一例外矢量图层相关。
With them, you have complete freedom. As you can see. I can do whatever I want with it. And I'm not using any hot keys,
P38 - 00:37没有热键,拖拽随意拉伸。
but here's something interesting. I’ll place this rectangle in a group by using CTRL G.
P38 - 00:41G控打组矩形。
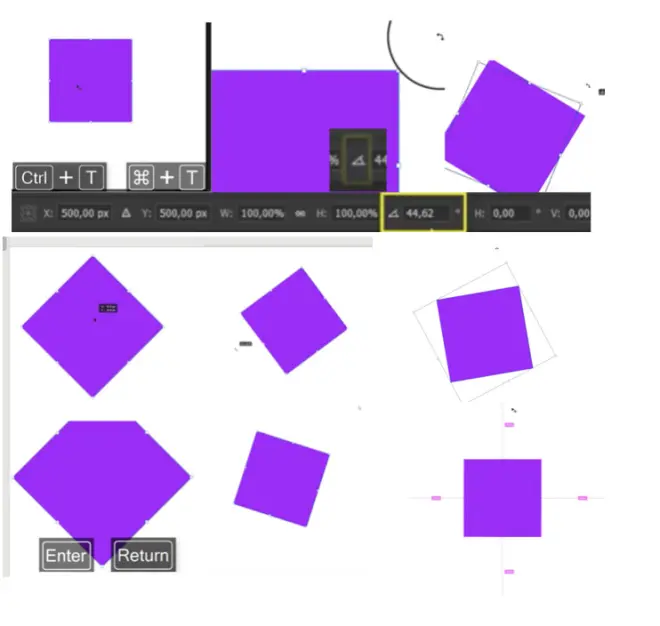
Next, i'll hit CTRL T, and i'll grab any handle.
P38 - 00:45T控,任何抓手。
As I drag. Notice my aspect ratio is constrained.
P38 - 00:49横宽比锁定的。
This is somewhat surprising, because we know shape layers should be exempt from this behavior.
P38 - 00:55形状图层不应该是个例外。
But because we included it into a group, it's now being protected by the program. So that's something to be aware of.
P38 - 01:01意识到需要被程序保护。
In most cases, you will want to re size things dramatically.
P38 - 01:05大部分情况重新调整大小。
to make your life easier. Grab a handle, but hold down ALT.
P38 - 01:09Alt加抓手。
This will recite the element on all sides,
P38 - 01:12四角元素被重新调节了。
and it's a much faster way to work, especially when you're dealing with huge photos, the likes of 5000 by 4000.
P38 - 01:18五千四千大图像处理。
And you only want them down at 700 by 600 pixels.
P38 - 01:20降低到六七百像素。
So just hold down ALT while dragging, preferably from a corner.
P38 - 01:24alt从四角拖拽。
Now let's focus on this design where we have two lovely cards.
P38 - 01:30两个可爱的卡片设计。
here the same thing happens when we try to re size through control T. Everything is adjusted proportionally.
P38 - 01:35T控按照比例调节。
The way you override it is through the shift key.
P38 - 01:39shift控手动改。
If you hold it and drag, you get complete editing capabilities.
P38 - 01:43拖拽编辑能力。
And of course, you can combine alt and shift, as you can see. Not only do I have complete freedom, but the changes are swift because the card gets re sized on all parts.
P38 - 01:52alt时,改变形状。
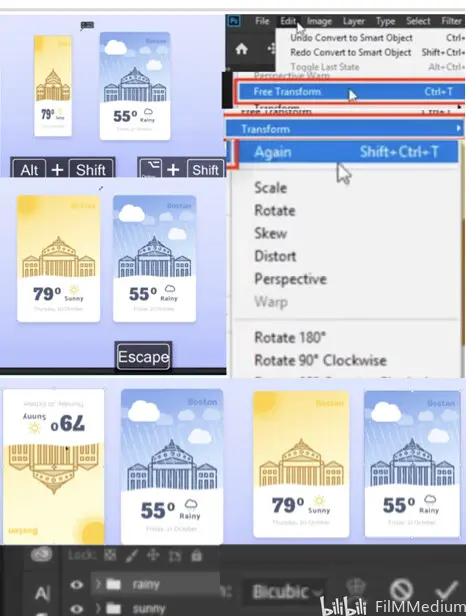
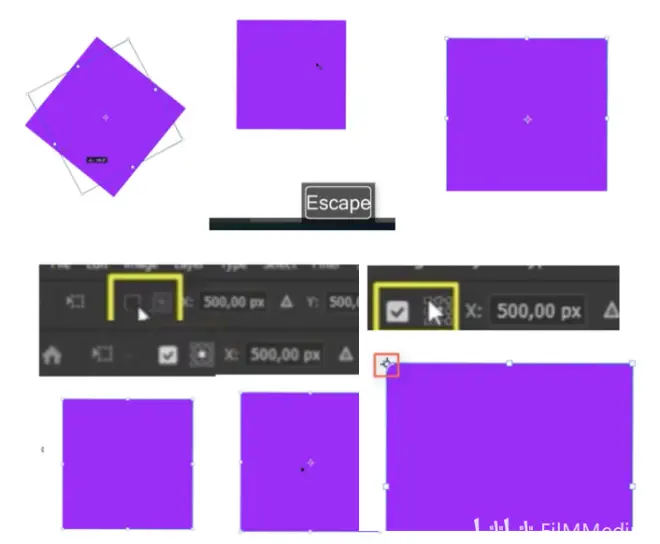
When you want to discard your changes, just hit the escape key.
P38 - 01:56删除修改-擦除键。
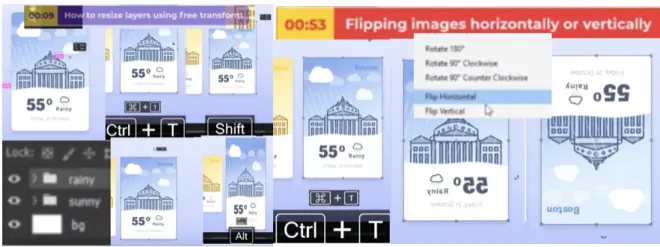
Here’s another type of manipulation. You are likely to need. flipping layers.
P38 - 02:01另一个操作的是抛层。
This is part of the transform command, which should not be confused with Free transform.
P38 - 02:07没必要被自由转化困惑。
To clear things up, go to the Top menu and hit edit. Here you can see we have two possible actions, Free transform, which has the hot key CTRL t, and transform, which has several menu items, including flip horizontal and flip vertical.
P38 - 02:22T控自由翻转V水平垂直选翻转。
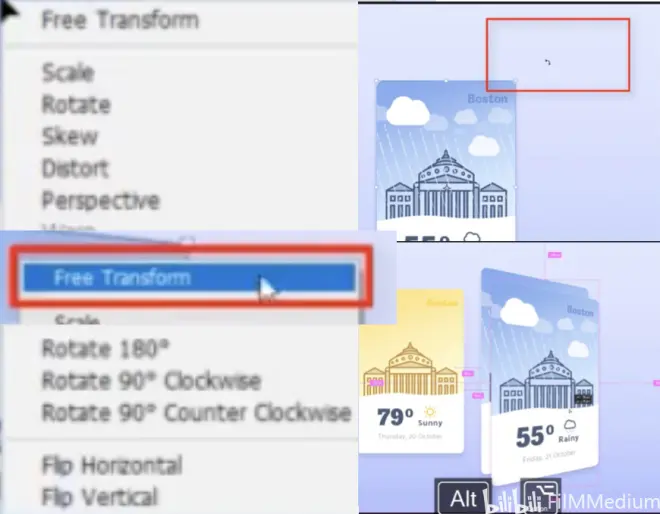
But nobody actually uses this menu. Instead, here's what I recommend. You use CTRL T as always, but then you right click. This list shows all those items that we previously saw in the edit transform menu.
P38 - 02:37T控后右键带出翻转选项。
Cheese flip vertical. And we just drop this card on its head, right click again, and this time choose flip horizontal. Now the design is mirrored.
P38 - 02:45水平翻转,对称翻转,形成镜像。
This is how you're supposed to work. Don't waste time in the edit menu. Instead use CTRL c, and then right click to access a bunch of transform commands.
P38 - 02:54右键比主菜单找省时间。
Now you might experience something strange, lost in freedom transform mode, you might go to the side and right click only to find it somehow left editing mode.
P38 - 03:06回到T探索未探索编辑模式。
You didn't hit enter by mistake, nor did you use the check Mark from the options bar.
P38 - 03:10回车键和对勾操作都对。
This isn't new behavior. Adobe introduced in photoshop CC 2019.
P38 - 03:15这是19版新特征。
When you're in Free transform mode, you can right click to obtain that list. Only in a certain radius. Your mouse cursor has to be fairly close to the element in question.
P38 - 03:25右键选工具,鼠标接近点击调取。
The full proof method is to right click inside the group. But you can also do this. to test the range simply right click a bunch of times while moving further and further away.
P38 - 03:37可以右击逐渐测试范围。
As you can see at a certain point, the list no longer appears on the handles go away,
P38 - 03:41超过一个范围右键点不出来了。
meaning we're left Free transform mode.
P38 - 03:44离开了自由转换模式阶段。
I can't say I'm in love with this change in behavior for over 10 years. I click anywhere on the canvas and the list showed up. But now this seems the new way to go.
P38 - 03:52这是让右键点击消失的方式。
Ok, let me show you some of my favourite transformer commands from that list, because some of them really don't deserve our attention.
P38 - 03:59哪些转化键可以被淘汰。
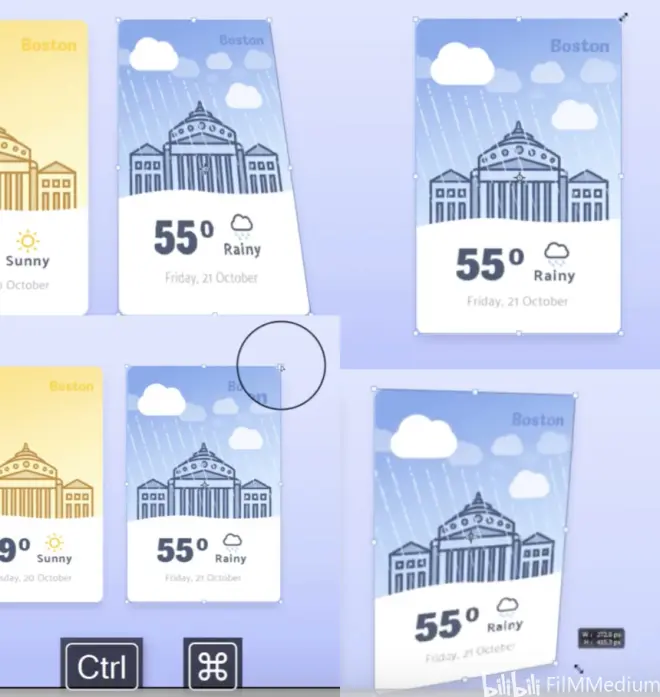
The one that I like the most is perspective. To enable it as always, use CTRL T. And then right click. Be aware that when you select any of these actions, apparently nothing happens.
P38 - 04:11T控右键选类型后,什么没发生。
What you have to do is grab any handle and start to play with it.
P38 - 04:14拖住抓手进行变形。
I’ll use this one from the bottom right side and i'll drag outwards.
P38 - 04:17比如从底部往外拖。
This will make the cards seem like it's placed on a table. We'll actually use this technique later on in the course when we design a business card, and we'll place it on the floor in a realistic way.
P38 - 04:27如同被平铺在地面上感觉。
What’s great is that each handle will perform a different type of transformation. And you can obtain all sorts of effects.
P38 - 04:33不同推手协助手动变形。
For example, i'll hit escape to reset, and i'll go through the motions again. Only this time i'll drag the bottom left handle straight down,
P38 - 04:43还可以左侧抓手开门样拖拽左侧。
hit enter, and use the old drag technique to create two other copies and place them like pieces of domino.
P38 - 04:48比如拖拽两层,排列成多米诺。
In just a few actions, you've managed to create something lovely. Let me undo a few times, because I want you to be aware of something. Here's the scenario.
P38 - 04:57撤回去,同一场景不同的操作。
You're right click and you choose perspective, right.
P38 - 04:59依旧右键,选不同视角。
You adjust a little bit, but now you want to re sign the card.
P38 - 05:03调整重新设计卡片。
If you move to another handle, you won't be able to shrink it down, because you're in perspective mode.
P38 - 05:09视角模式,不能缩小。
That's why when you right click, you get Free transform at the Top of the list.
P38 - 05:14右键自由转化。
Basically, it's there exactly for these types of situations. Click it. And now you can re size as needed.
P38 - 05:19自由切换,组合转化图形。
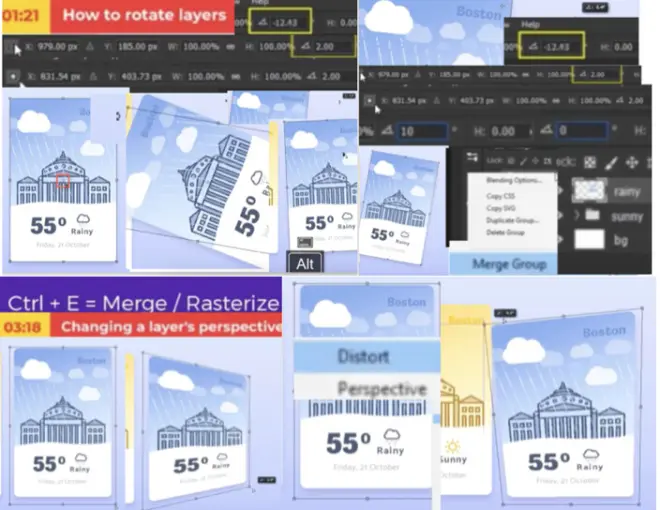
So that's how you go back and forth between various transformation modes from that list. Moving on. Another interesting action is distort. This does exactly what it says.
P38 - 05:30右键扭曲功能如字面意思。
It allows you to dramatically modify the shape with no strings attached.
P38 - 05:34像是没有骨骼一样拖拽。
This can yield some interesting effects, too. It's all a matter of knowing what you want to achieve.
P38 - 05:40拖拽出飘飘纸片形状,服务目标。
Experienced photoshop users like to use the distort command by way of a hockey. Let me show you how that works.
P38 - 05:46看看扭曲快捷键如何工作的?
First hit escape. So we can start fresh, hit CTRL t, and now move your cursor over a handle.
P38 - 05:55T控鼠标移动到抓手那。
Initially, you'll see this resize is simple, but now. Hold down the control key.
P38 - 05:59看到大小调节工具按住控。
This white arrow signifies that you've been able distort mode drag have fun when you're done with your distorting, release the CTRL key and continue to re size if that's what you want to do.
P38 - 06:10形状扭曲完释放控,调节大小。
So the control key saves you a lot of back and forth, because it enables distortion mode on the fly.
P38 - 06:16当空扭曲,省去很多徒劳步骤。
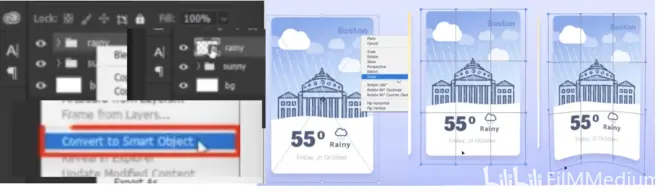
The final transformation that I want to present is warp. That's not available for groups, but you can choose the base layer to test it out. I'll do something better, though.
P38 - 06:27右键 变形功能。
I'll convert this folder into a smart object.
P38 - 06:32右键转化成智能对象。
So you can see a real world application of the world command. We’ll talk about smart objects thoroughly at a later point in the course,
P38 - 06:35单独一节课讲述“智能图层”。
CTRL t, right click and warp. A grid is going to show up. And this will allow you to bend certain parts of the design.
P38 - 06:44右键扭曲栅栏一样抓手调节。
If I pull down these two parts, you can see how the whole bottom part curves. Repeat the process for the Top side. And you can imagine this is a card that's being squeezed.
P38 - 06:56是凭空扭曲出卷曲的书页四角。
to gain more control. You can also use these handles. I can't say this comes in handy on lots of projects. But overall, these transformations are a great addition to your photoshop skills.
P38 - 07:05至少胜任大部分变形任务的需求。
Now it's your turn. Take it step by step and see how you do. Let me know if you agree. I think perspective is the best one from the lot. Have fun with it.

4.9. Manipulate Layers in CS4 - CC 2018
P39 - 00:00
Hello. In this lecture, I'm going to show you several ways through which you can manipulate your layers.
P39 - 00:05展示不同的操控图层方式。
Let's start with this PSD. I'll grab the first folder called rainy, and i'll hit CTRL T. You already know you have to hold down shift when you want to re size it.
P39 - 00:15按住shift调整图层大小。
This constrains your aspect ratio. And it prevents any if it transformation, that's great.
P39 - 00:20shift保持横宽比。
But let's add another hockey into the mix “Alt”. So now I'm holding down shift and Alt and I'm resizing it from this Top left corner.
P39 - 00:28alt时从左上角进行调整。
Notice how the group shrinks from all sides. If I no longer hold Alt, I will now recite it just from this Top left corner.
P39 - 00:35用AS四面八方缩小,S单角缩。
So that's something to keep in mind when you want to re size from all sides.
P39 - 00:41四面八方缩小用Alt➕时。
This isn't limited to your corner handles. If I grab the Top middle one, you can see how it becomes taller.
P39 - 00:48单纯顶部抓手,缩小图片变矮。
Now when I hold alt as well, it will immediately expand at the bottom of the same right.
P39 - 00:51若按Alt可以等比例扩大。
Let me press escape and will enter Free transform for another option.
P39 - 00:59擦除后退,T控自由扭曲。
Instead of going to edit transform and going through all these possibilities,
P39 - 01:04不选择主菜单文件变形过遍可能。
I suggest you click directly on the canvas after you use CTRL T. Here one of my go to options. Is this flip horizontal.
P39 - 01:12右键-水平翻转。
In this case, It doesn't make much sense, but you'll see how this will come in handy for lots of projects.
P39 - 01:18给项目加入手动操作组合的机会。
I can also flip it vertically. Great stuff.
P39 - 01:22还可以垂直翻转。
Let me press escape and enter Free transform yet again. One of the lesson known facts about this feature. is this central symbol.
P39 - 01:28图片上居中符号。
Do you see it? Let me zoom in really close. This is useful when you want to rotate your layers.
P39 - 01:34想旋转图层的时候需要知晓。
If I go anywhere outside my group, you can see I get this cursor.
P39 - 01:37看到图标转化形状不同。
If I click and drag, this card is going to rotate. But notice its behavior.
P39 - 01:42拖拽旋转,图片跟着旋转。
This acts like attack that spin to its middle point.
P39 - 01:46像是图钉一样固定中心点。
That's what this symbol does. If I drag it to the bottom left and I continue my rotation, you can see it's now moving based on that point.
P39 - 01:53若中心移动左下角,绕左下转。
So this is fantastic because it changes its behavior on the fly.
P39 - 01:58还是凭空改变图形位置。
If you don't want to drag it, hold ALT and click anywhere.
P39 - 02:02不想拖拽按住Alt点击任意点。
Now it's just moved to the Top right. as I rotate. So you can see this measurement shows up on my canvas.
P39 - 02:08旋转数据出现在画布。
This tells me to what degree I have rotated my group.
P39 - 02:11数据表明旋转程度。
The same value is displayed up in my options bar.
P39 - 02:15同样数据出现在选项栏里。
Speaking of that, if you focus on its left side, you'll notice this gray icon,
P39 - 02:22左边有个灰色的徽标。
this controls the middle symbol. If I click anywhere, you'll see how it will jump to that position.
P39 - 02:26点击任何地方,跳回到原状态。
This is particularly helpful if you want to place it in its original position, but you're not sure where that was.
P39 - 02:32帮助中心点恢复原位,不确定时。
Click here and you'll get that instantly. Going back to our rotation, maybe you want to revert as well. Instead of fiddling with it back and forth, clear this value. Now type in zero, which is what I initially had, simple and easy.
P39 - 02:47归零按钮,数据键入零。
enter any other value. And it will immediately jump to it.
P39 - 02:52键入其它数值,可以跳转过去。
I love the fact that you can I bought certain results, but you can also use specific values in case you want precision.
P39 - 02:59要更精确,键入具体数据。
Let me press escape and I rasterize this group by clicking on the layer panel,
P39 - 03:03点击面板,右键光栅化。
you won't see a rasterize option, because this is a folder.
P39 - 03:08文件夹右击,见不到光栅化选项。
So this is the command. We are looking for. merged group.
P39 - 03:10文件夹右键,融合组。
I always like to stay with my cursor on the canvas. So for the same effect, I prefer the hot key CTRL E.
P39 - 03:16E控,组融合层,光栅化。
This is the merge command. Now I can use CTRL T and right click to explore some of these other options.
P39 - 03:22T控探索其它选项。
For example, I can play around with its perspective, drag any anchor points and you'll see how it immediately transforms.
P39 - 03:30任何四角抓手改变方向。
Combine this with a realistic shadow and your new perspective is going to look on point.
P39 - 03:36实际阴影,新视角看不同的。
Another option is distort. This gives you complete freedom.
P39 - 03:41扭曲给出更多自由。
Regarding this layers manipulation, you can obtain an interesting effect through it. I highly recommend you open this PSD and explore all these settings, because unless you play around with each one, you won't get the full experience.
P39 - 03:52上机操作才会体验。
The last effect I want to cover from this list is warp. This allows for individual modification of each corner.
P39 - 04:00接下来角落卷曲。
click and drag. And you can do all sorts of crazy things with it. Imagine this is a label, and you want to place it on a bottle. This will allow you to do that with ease.
P39 - 04:11比如这是瓶子上标签被扭曲。
But say you can't get pixel perfect settings. Not a problem. You can go to the options bar and use this drop down.
P39 - 04:17左上,扭曲-扇形结构。
here You have a substantial list of pre defined settings.
P39 - 04:21菜单有很多精准定位。
for my bottle example. Bulge might work best,
P39 - 04:24针对瓶底,凸起效果最好。
but you can also click one and scroll through several options.
P39 - 04:27可以选择一个,滚动看不同效果。
If you see one that fits your needs, you can further customize it by adjusting its settings from this right side.
P39 - 04:32满足需求可以再次定制。
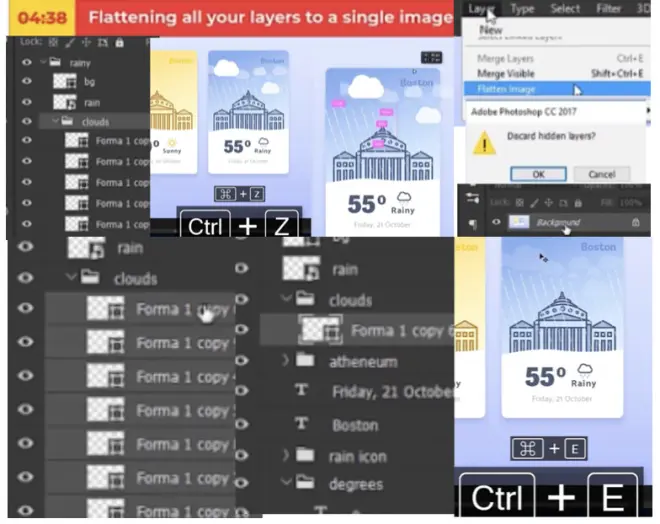
All in all great stuff. Let me show you two more techniques. then we can continue with our photoshop journey. In case you have a large PSD, and you have too many layers, you can flatten them by using the same merge command.

P39 - 04:46可以用两个融合组。
In this rainy group, I have another folder called clouds.
P39 - 04:50雨和云的两个文件夹。
As you can see, it features several layers,
P39 - 04:52如你所见的云朵。
but say I have no interest in editing them individually.
P39 - 04:56很难一个个图层的编辑。
Not a problem. Select all of them and hit CTRL E. You've just merged them together.
P39 - 05:00全选后E控融合在一起。
Let me undo, because I could have done that with its group. control E. And there you go. But if you want to flatten your PSD completely, you can go to the Top menu system and click on layer. from this list, choose flatten image from the bottom. Now we have one single layer. And it's also locked.
P39 - 05:22文件-图层-平整图层。
This may come in handy from time to time, but it's not a recommended method.
P39 - 05:27非推荐方案,太多手写。
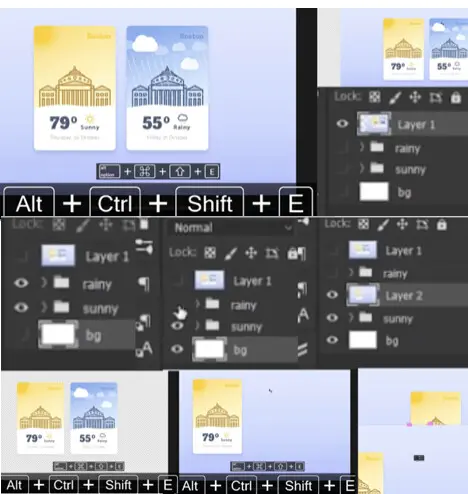
Here's what I prefer Instead, whenever I want to create one single layer that contains everything in my project, I do the following.
P39 - 05:33若是项目想做一个图层的话。
I select the highest level group from my layers panel,
P39 - 05:36图层面板选择最高组。
and I use ALT CTRL shift E. This long hockey tells photoshop to look at every single layer and group and merge them all together, including the selected one.
P39 - 05:47时空奥E组一个组。
Please note that it only works if you're on a visible layer. If I disable my background and try the hockey, nothing is going to happen.
P39 - 05:56但是背景不可见,热键不起作用。
Furthermore, if I enable this layer, but I hide this one, once I hit CTRL shift E, i'll get a new layer that contains everything except that hidden one.
P39 - 06:07若是隐藏非背景图层,新融合层。
So that's something to be aware of. Ok. I hope you found all these useful. Try them out for yourself on this PSD and see how you do. If you have any questions. Just let me know in the comments section have fun.
4.10. Rotate layers in CC 2020
P40 - 00:01
Hi, let's see how we can rotate layers or groups in photoshop. The best way to go about it is to use CTRL t.
P40 - 00:08旋转图层和组最好方案T控。
To rotate any element. You have to move your cursor away from the group until your arrow changes to this symbol.
P40 - 00:14直到鼠标转变成弧形。
Please don't confuse it with this one, which allows you to re size the card.
P40 - 00:19并不是拉伸抓手的鼠标形状。
Though both cases have two arrows, they do different things. Okay. Now you click and hold on. As you move side to side. You can see the elements angle show up in this rectangle.
P40 - 00:30你可以看到角度元素展示在矩形。
In most cases, you'll need something specific, like 45 degrees.
P40 - 00:34一般旋转45度。
You never want to fiddle with it on the canvas, because we have a better way.
P40 - 00:38有比在画布上更好的方式。
Focus on the options bar. This is the box that controls the angle. And you can tell by looking at this icon,
P40 - 00:44选项栏控制角度,分辨的徽标。
select the existing value and delete it with the backspace key.
P40 - 00:48删除掉已经存在的数据。
Now put in 45 degrees or whatever value you want. Hit enter.
P40 - 00:52填入任何想要的数据,回车。
Then I prefer to use tab and you're done with it. You can also use negative values. So the sky is the limit.
P40 - 00:59还可以用负值。所以这有限的。
not all projects require this level of precision. So from time to time, you may want to work on the canvas directly. Here's the thing you have to be aware of. We still in Free transform mode, right.
P40 - 01:11还在自由转化模式中。
We know that in order to rotate our element, the cursor has to be placed outside it.
P40 - 01:15光标需要放在旋转区外面。
As you can see if I hover over it and get another symbol.
P40 - 01:19区域内光标变成另一形状。
And if I click and drag and repositioning the entire thing,
P40 - 01:22点击拖拽重置整个物体。
so i'll move outside it, and we can see these two arrows that allow us to perform the rotation. But here's the twist, starting with photoshop CC 2019.
P40 - 01:33从19版本有个复捻。
If I move too far away from the item, i'll lose it.
P40 - 01:37若是离开物体太远,鼠标变正常。
The cursor is going to change to a simple arrow.
P40 - 01:38光标变成简单的箭头。
Let me move back and forth so you can see the change.
P40 - 01:42来回移动让你看清楚变化。
Notice the cursor, but in case you're not getting the correct symbol, you need to have a closer to your layer.
P40 - 01:48离图层近点,获得弓形鼠标。
We saw this behavior in a previous lecture, where we got a list of transformation modes when we right click close to the item.
P40 - 01:56靠近右键-转化模式。
But as we strayed away, the list no longer showed up.
P40 - 01:58若是太偏离,展示不出鼠标。
It's the same thing here. Closely related to this topic. When in Free transform mode, if you want to commit your changes, you have various options.
P40 - 02:07好几个选择。
You have the standard enter key, which is pretty obvious. You can use the check Mark from the options bar,
P40 - 02:11选项栏选择对勾。
but you can also right or left click anywhere else on the canvas. As long as you're outside that specific rotating range.
P40 - 02:18点击屏幕外任意点,旋转范围。
If I move further away and I click, i'll commit to this change.
P40 - 02:23进一步移动,因变而变。
Otherwise, put all exit Free transform mode.
P40 - 02:26额外的自由转化模式。
Let me know in the comments section, if you like this change, if you're using an older photo shop version, this doesn't apply to you, but i'd still love to know your input.
P40 - 02:36若是旧版本,这操作不适合。
back to the topic of rotating elements. When you perform this action, you can imagine there's a nail placed in the middle of it, and thus the entire thing moves around it.
P40 - 02:44像是中间有个钉子,围绕其旋转。
Let me reset and show you another way to work.
P40 - 02:48给你展示另一个奏效方式。
Say I want to move that imaginary nail in the Top left side.
P40 - 02:52移动重心到左上。
So the entire thing can be rotated from that point.
P40 - 02:55整体围绕重心变化。
to do that. Enter Free transform mode and focus on the options bar.
P40 - 02:59自由转化模式,专注选项栏。
at this point seems disabled. You can actually check this box that will reveal that imaginary nail.
P40 - 03:06勾复选框,出现重心。
This is needed only in photoshop CC 2019 and above.
P40 - 03:1019版以及以上可用。
Now it's much more obvious what I'm talking about. The item rotates based on its position,
P40 - 03:15重心乃旋转心。
but of course, we can change it to discard your current transformation. Just press escape,
P40 - 03:22丢弃转化过程,按擦除键。
hit CTRL t again. Only this time. Let's check the Top left side of this grid. I know it's really tiny, but when you successfully move your so called nail, you'll see that tiny square light up.
P40 - 03:33重心形状小矩形。
Right. now let's rotate it on the canvas. As you can see. It's a totally different experience.
P40 - 03:39像是挂在墙上的展板摆动。
that we won't use this technique too often. It's important you know about it.
P40 - 03:44不常用,知道就行。
And if that tiny grid isn't doing it for you, you can always move the nail directly from the canvas.
P40 - 03:50直接从画布移动重心。
Hold down the ALT key, and your cursor is going to get an additional symbol.
P40 - 03:53按住Alt鼠标变成另一个形状。
Again, it's very small. Let me toggle back and forth so you can see it better.
P40 - 03:59来来回回开关,可以看效果好。
As long as you hold down the ALT key, you are going to be able to click anywhere inside the element and repositioned the reference point location,
P40 - 04:06重置重心位置。
which is the official name. I like to call it the nail, because it's a good metaphor that best describes how it works,
P40 - 04:13图钉比喻较形象,订在哪围绕转。
as you can see with each click and relocating it. all while holding down ALT.
P40 - 04:18按住Alt移动图钉旋转心位置。
The reference point has always been shown in all versions of photoshop up until CC 2019, in case you always want to see it without having to check that box in the options bar. Here's what you need to do.
P40 - 04:30不勾选框如何看到呢。
Open your preferences with CTRL k. Alternatively, you can go to edit preferences. alternatively, you can go through edit preference. from this list. Choose tools. from the left column.
P40 - 04:41编辑 偏好 工具。或k控。
You are looking to enable the last option, show reference point when using transform.
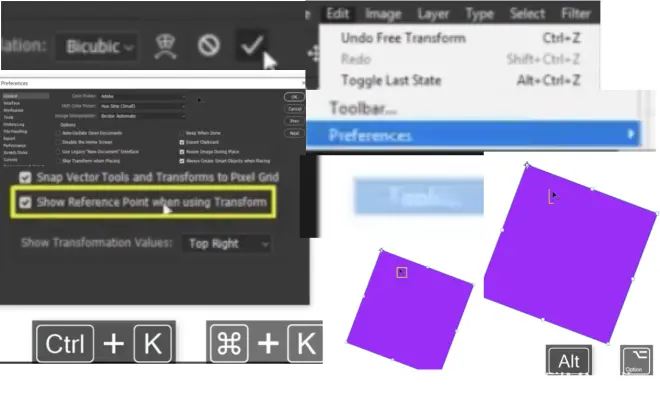
P40 - 04:45用转化工具用偏好重心。
This should be enabled at this point. If you've been following along. still, its good to know where you can find it. And that's how you rotate layers or groups in photoshop. have fun.
4.11. Use Blending Modes
P41 - 00:01
Blending modes explained. Hey, there. Let's talk about blending modes in photoshop.
P41 - 00:06谈PS中的混合模式。
I've already mentioned them, but let's take it step by step and explore how you can use them to improve your projects.
P41 - 00:12探索如何用此来优化项目。
First blending modes refer to the way pixels from separate layers interact with each other.
P41 - 00:18混合模式不同分离图层一起影响。
The first way to adjust the blend mode is from the layers panel here. By default, it's set as normal.
P41 - 00:24图层面板默认的为正常的。
And that means this layer won't interact with the one underneath.
P41 - 00:27图层和下面图层绝缘的。
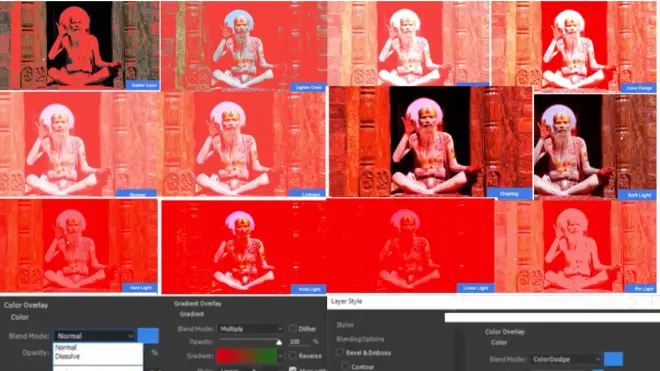
You have this project attached. And here you can see how every one of these blending modes changes in image.
P41 - 00:33可以看到混合模式如何改变的。
Here's the original one with nothing added to it.
P41 - 00:37原始没有混合的图。
For all the other ones. I added a red rectangle above them,
P41 - 00:40红色矩形在上层。
and I changed the blend mode.
P41 - 00:42改变混合模式。
The rectangle of pixels will interact with the ones from the image.
P41 - 00:46像素矩形和图像相关。
Our first blend mode doesn't work. If we leave the opacity at 100%,
P41 - 00:50不透明度百分百第一模式不奏效。
it shows us the layer above, and that's it. But if we lower the opacity, notice how the image dissolves.
P41 - 00:56降低不透明度,红色图像溶解。
I grouped these on the canvas based on how they're separated in this list.
P41 - 01:01画布展示图层如何分开展示的。
as a general guideline. This second row tends to darken an image.
P41 - 01:05第二列是暗黑模式。
You can predict that based on their names as well. Dark and multiply burn. All those imply a darker outcome.
P41 - 01:12增黑 多层 灼烧。
The next set of five blending modes, light and image. Again, their names suggest that too.
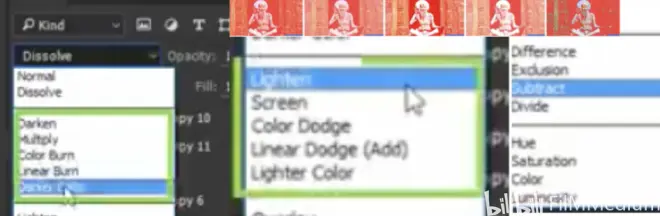
P41 - 01:19锃亮 颜色 线性 减淡。
The rest can't be grouped in a certain way. Maybe the fourth group can be called the weird kids on the block. Due to the extreme results we're getting.
P41 - 01:30变异 除外 减法 划分。
as you use this more, you will get more used to them. But frankly, it's hard to predict the outcome by simply seeing the images side by side.
P41 - 01:34效果并排看很难预测效果。
Most designers click once in this dropdown and then scroll through them pretty quickly.
P41 - 01:39点下拉菜单,往下滚动。
Then you narrow it down to one or two blending modes, and you decide which is best.
P41 - 01:45自己挑选哪一种是最佳的。
And again, remember, this is a showcase of these effects.
P41 - 01:48这是效果展示栏。
When you combine an image with a solid color, if you combine two images, the results are very different.
P41 - 01:56若是两种颜色结合,结果不同。
This group will still provide a darker effect, and these ones will lighten things up.
P41 - 02:00增黑效果,锃亮效果的。
But overall, it's hard to predict the outcome.
P41 - 02:02很难预测结果。
And to make things even more complicated, by adjusting the opacity,
P41 - 02:08调节不透明度变复杂。
you add yet another variable into the mix.
P41 - 02:09加入另一种变异混合进去。
It's truly something that requires experimentation.
P41 - 02:14需要反复试验。
The same can be said about layer styles.
P41 - 02:16同样的图层类型。
I mentioned these three don't work well with each other on their default setting,
P41 - 02:20默认状态下图层合作不好。
but let me show you how I played around with them. Here. I already have these three preset.
P41 - 02:29比如这已经有三种预设了。
that temporarily disabled, which is why these eyes are grade out. If we click to the left of effects, you will see these styles become active.
P41 - 02:35点击左侧效果,看效果如何激活。
Let's see what's what. first we have a color overlay set on color dodge with blue set as the color.
P41 - 02:41首先颜色重叠-颜色减淡。
If this was set as normal, we wouldn't be able to see anything else.
P41 - 02:44若是颜色重叠-常规,看不到啥。
Next, the gradient, this one is set to multiply with a radical color set from red to green.
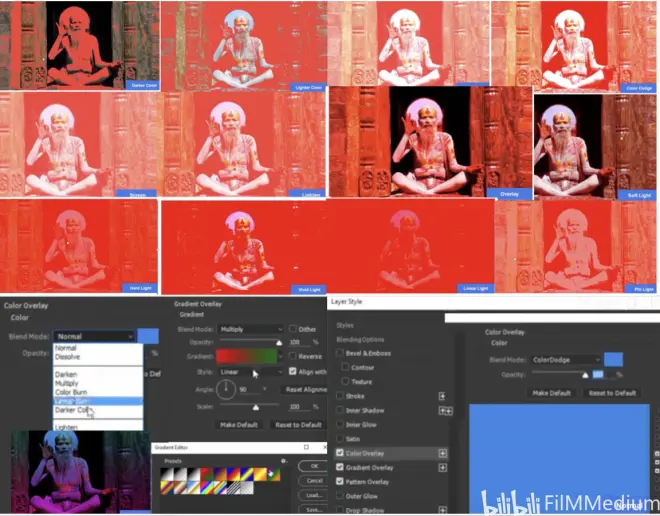
P41 - 02:52接下来红色到绿色梯度重叠。
Finally, we have a pattern overlay with color burn and diagonal lines going across the entire image.
P41 - 02:58格式重叠,颜色加深+对角线。
The outcome is very interesting. And it took me a few moments of experimentation. So remember that blending modes are powerful, even though they are hard to predict, but still worth it. Let's continue.
