
创建令人惊叹的 AI 图像,使用 SDXL 1.0 和 ComfyUI:一步一步详细指导
Create STUNNING 🏆 AI Images with SDXL 1.0 & ComfyUI: Step-by-Step Guide
视频网址:
https://www.youtube.com/watch?v=aoD5WnEldJ8
LINKS:
(02:50) 好的,我会尽可能简单地完成这些步骤。不要不知所措。我保证这非常非常简单,任何人都可以做到。有几种不同的方法,所以如果你甚至没有GPU,你可以用CPU来完成,当然会慢得多,但你仍然可以完成。 (02:50) Okay, so I'm going to make these steps as simple as possible. Do not get overwhelmed. I promise this is very, very easy, and anybody can do it. There's a couple of different methods, so if you don't have even a GPU, you can do this with even a CPU. It's of course going to be a lot slower, but you can still get it done.
(03:05) 无论如何,我会在描述中提供所有链接,这样你就可以跟着我操作,非常简单地完成一切。 好的,我们将直接进入主场景。 首先,我们将进入ComfyUI的GitHub。 如果在过去你试图安装像A1111这样的东西来使用稳定扩散,那需要更多的技术性工作。 (03:05) Anyway, I'm going to have all the links in the description so you can follow along with me and do everything very, very simply. All right, so right here, we're going to jump into the main scene.
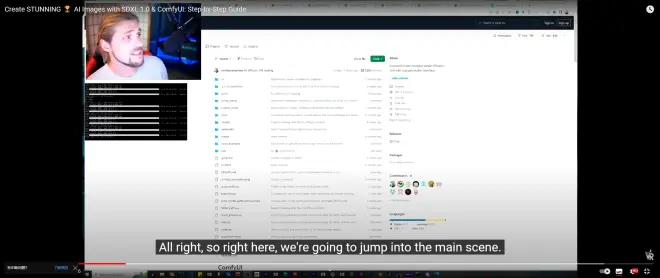
First we're going to go into the GitHub of ComfyUI. If in the past, you've tried to install things like A1111 to use stable diffusion, that's a lot more technicality.
(03:26) 这将非常非常简单,因此一旦您到达ComfyUI GitHub页面,我们将向下滚动直到看到一个小链接,其中说直接链接下载,并说简单下载,使用7-zip提取,然后运行。您实际上不需要7-zip。你可以使用WinRAR等提取程序,或者如果你有其他一些提取程序,它可能也可以工作。 (03:26) This is going to be very, very simple, so once you get to the ComfyUI GitHub page, we're going to scroll down until we see a little link here that says direct link to download,

and it says simply download, extract with 7-zip, and run. You don't actually have to have 7-zip. You can use things like WinRAR, or if you have some other kind of extraction program, it'll probably work.
(03:45) 如果不行,7-zip是免费的,可以使用。所以首先,点击直接链接下载按钮,它实际上会下载到你的电脑上,你可以看到它说1.4GB,对我来说需要4分钟。 好的,一旦下载完成,你将把它提取出来,最好是放在主驱动器的某个地方。 (03:45) If it doesn't, 7-zip is free and it does work. So first, you click the direct link to download button, and it's going to actually go down here on your computer, you can see it says 1.4 gigabytes, four minutes for me. Okay, so once that's done downloading, you're going to extract it, preferably somewhere on your main drive.
(04:02) 对我来说,我有一个叫AI Master的文件夹,我在里面提取了它,在这里,我们有所有内部内容,从这里,如果你看,我点击ComfyUI,我们有一个叫Models的文件夹,那就是你要放入所有要下载的模型的地方。 (04:02) For me, I've got a folder called AI Master, and inside that folder, I've extracted it, and right here, we have all of the inside contents, and from here, if you see, I click into ComfyUI, we have a folder called Models, and that's where you're going to put all of the models that you're going to be downloading.
(04:18) 然后我们有一个输出文件夹,当然,那是你提示的所有图片在渲染完成后输出的地方。 所以我现在要点击Models,在里面,我们有Loras,那是放Loras的地方,然后在这里你有一个小地方叫检查点,那就是实际放入模型的地方。 (04:18) And then we have an output folder, and that's, of course, where all the pictures that you prompt are going to be output as soon as they actually get finished rendering. So I'm going to go ahead and click on Models right here, and inside here, we have the Loras, which is where you'll put your Loras, and then up here, you have a little spot called Checkpoints, and that is where you're going to actually put inside the models.
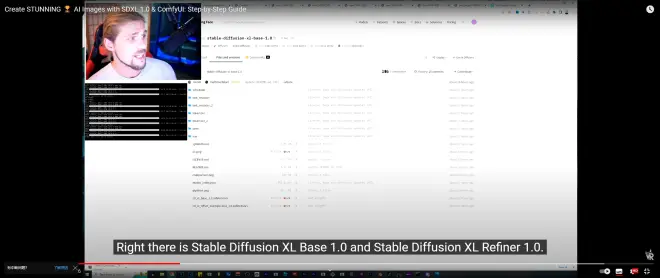
(04:36) 这就是我们现在需要的。我们需要模型。所以让我们继续点击我下面也列出的其他链接。就在这里是稳定扩散XL基础1.0和稳定扩散XL精炼器1.0。所以对于每个页面,都非常简单。你可以直接进入这里并下载SDXL精炼器1.0
安全张量,只需点击此按钮。
(04:36) And that's what we need now. We need the models. So let's go ahead and click on the other links that I have also listed below. Right there is Stable Diffusion XL Base 1.0 and Stable Diffusion XL Refiner 1.0. So for each of these pages, they're very simple. You can just go right in here and download the SDXL Refiner 1.0 Safe Tensors by just clicking on this button right here.
(04:56) 一旦点击,你会看到它开始在左下角下载,同样这里也是,你要点击这个6.94 XL 1.0,这些可能会改变大小,但你会想继续获取最新的一个,并确保它们都匹配。 (04:56) Once you click on that, you're going to see it start downloading there in the bottom left, and then same thing over here, you're going to want to click on this 6.94 XL 1.0, and these can be updated. They might change their size, but you're going to want to go ahead and get the most recent one and make sure that they both match.
(05:13) 这里还有一个Laura,如果你想尝试并使用那个Laura,你也可以下载Laura。 所以一旦你下载了每个,你会进入下载文件夹,让我们进入这里。 你要把这些东西移动到这些区域。(05:13) And then there is a Laura in here, so if you want to go ahead and experiment and play with that Laura, you can also download the Laura as well. So once you download each of these, you're going to go into your Download Folder, and let's go ahead and go in here. You're going to want to move those things into these areas.
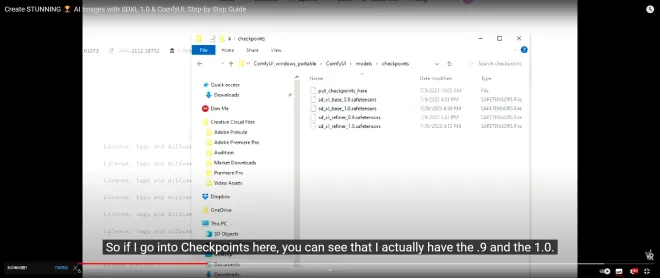
(05:27) 所以如果我进入检查点这里,你可以看到我实际上有.9和1.0。 .9不再需要因为已经有1.0了,所以我要删除它们因为我不需要它们。 在这里,在Laura里,你可以看到我有那个实验Laura。 (05:27) So if I go into Checkpoints here, you can see that I actually have the .9 and the 1.0. The .9 are no longer needed because the 1.0 exists now, so actually I'm going to go ahead and delete those because I don't need them. And then over here, inside the Laura, as you can see, I have that experimental Laura.
(05:44) 我还没有实际玩过它,但为什么不呢?让我们把它放进去。 好的,所以一旦你在检查点里有了模型,它们都在那里,每个大约6GB,5GB,将有11GB,或者大约12GB只是模型。 (05:44) I haven't actually played with it yet, but why not? Let's get it in there. Okay, so once you have your models inside the checkpoint, and they are both there, which it looks like each one, six gigabytes, five, it's going to be, you know, 11 gigabytes right there, or about 12 gigabytes just for the models.
(06:00) 然后一旦完成,我们将回到Comfy UI的主文件夹。 如果你有GPU,点击这个。如果你有CPU,你将点击这个。以防万一,它说非常重要,非常重要,读我。让我们确保阅读它,对吧? 正如它在这里所说,如果你有GPU,请使用GPU运行它。
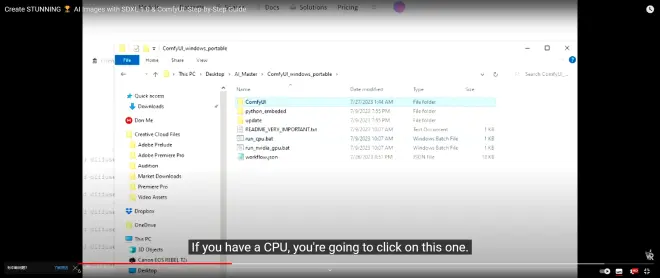
(06:00) And then once that's done, we're going to go back here to the main folder for your Comfy UI. If you have a GPU, you click on this one. If you have a CPU, you're going to click on this one. And just in case, it says, very important, very important, read me. Let's go ahead and read it, right? As it says here, if you have a GPU, run it with the GPU.
(06:17) 好的,在那里你去。然后如果你遇到一些错误,它会告诉你为什么你可能会遇到这些错误。 但是你这里要的最后一部分是我要包括这个工作流JSON文件。这只是给你一些在网上流传的基本设置。 (06:17) Okay, there you go. And then of course, if you have some errors, it's going to tell you why you might have such errors. But the last part that you're going to want here is I'm going to include this workflow JSON file. What this is, is this is just going to give you the basic setup that was kind of floating around on the internet.
(06:34) 当然,它在这里和那里被一些不同的人调整过。我不确定这个来自哪里,但它不是我的。无论如何,我要双击运行Nvidia GPU。 (06:34) And of course, it's been tweaked here and there by a few different people, but I think there's going to be a new workflow or this workflow needs to be updated. So I'm not exactly sure where this one originated from, but it was not for me. Anyway, I'm going to go ahead and double click run Nvidia GPU.
(06:49) 在我这样做之前,我需要关闭我的旧的。 好的,现在我要双击运行Nvidia GPU.bat。它将启动。第一次可能需要一段时间来下载一些不同的东西,特别是如果这是你第一次运行它。 (06:49) And before I do that, I need to close my old one. Okay, so now I'm going to go ahead and double click run Nvidia GPU dot bat. And it's going to go ahead and start up. And this might take a little while to download a few different things for you, especially
(07:04) 但一旦它完成下载所有内容,它会打开一个浏览器,那里就是实际的UI呈现的地方。从那里您可以输入提示和否定提示,然后进行所有设置。所以砰,它就在我们面前设置好了。 (07:04) But once it finishes downloading everything, it's going to open up a browser and inside that browser is where the actual UI is going to be represented. And from there you can put your prompts in your negative prompts and then do all your settings. So boom, there it goes. It sets up right in front of us.
(07:19) 是的,这里你去。你的可能什么也没有。当你回到文件时,让我来,我们将详细了解我在描述中提供的那个工作流JSON文件,并将其拖放到那里。
(07:19) And yeah, here you go. If we go ahead and click clear, which is what yours is going to look like, you'll probably have nothing here. And when you go back to the file, let me we're going to go over to that workflow JSON that I've got in the description, and we're going to drag and drop that right there.
(07:36) 一旦我们这样做,它会在这里给你一个精炼器的位置,一个基础的位置。然后它会给你图像结果的空间。所以我现在要做的是,我要做一个快速的测试图像,以确保一切正常工作。 (07:36) And once we do, it's going to give you right here, which is your refiner spot and a spot for your base. And then it's going to give you spaces for your image results. So what I'm going to do right now is I'm going to go ahead and do a quick test image to make sure that everything's working.
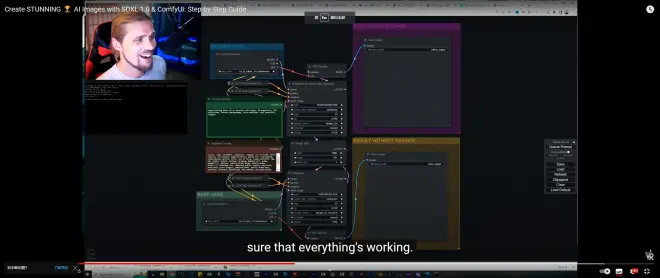
(07:51) 为此,我们首先要确保检查点已正确加载。我们正确进入这里,如果我们在这里说精炼器,它说Excel精炼器1.0,没错。 然后在这里,它说加载检查点基础。所以就在这里,我们点击基础1.0,很好。并从那个检查点文件夹中检查它们。 (07:51) And in order for us to do that, we're going to first make sure our checkpoints are properly loaded. And we go right in here, if we say refiner here, it says Excel refiner at 1.0, right? So simple. And then down here, it says loaded checkpoint base. So right in here, we click base 1.0, great. And it checks those from that checkpoint folder.
(08:12) 现在在否定提示中,你不需要任何内容。否定提示中的任何内容,如果你不熟悉,都是你不想在照片中看到的东西。 有时你通过看到事物才认识到应该在里面的东西。所以如果你试图在海滩上拍摄某人,突然出现了一个沙滩球,但你不想要沙滩球,你可以在否定提示中字面输入沙滩球,然后你仍然会得到没有沙滩球的海滩,对吧? (08:12) Now in the negative prompt, you don't have to have anything in here. Anything in the negative prompt, if you're not familiar, these are things that you don't want in your photo. And sometimes you recognize what should be in there by seeing the things. So if you are trying to get a photo of somebody on the beach and all of a sudden a beach ball keeps popping up, but you don't want the beach ball, you can literally type beach ball in the negative prompt and then you'll still get the beach without the beach balls, right?
(08:34) 然后在积极的提示中,你要写下你想要的。 对于这个测试,我将写下获奖照片,我会放大一点,这样你们就可以看得更清楚。美国白头海雕的获奖照片。不,我们要改一下。 (08:34) And then in the positive prompt, you're going to go ahead and write what you do want. And for this test, I'm going to go ahead and write award-winning photo, and I'll zoom in just so you guys can see it a little bit. Award-winning photo of an American bald eagle. No, we're going to switch that.
(08:46) 一张艾维斯的获奖照片,艾维斯。 然后写20兆像素,32K定义,时尚摄影,超详细,非常漂亮,优雅。我们将保留所有这些,因为它们是一般性的。 然后在这里否定,我们基本上排除了任何有点CGI的东西,半真实的东西。 (08:46) That's what I did already. So an award-winning photo of, let's say, Elvis, Elvis. And then it says 20 megapixels, 32K definition, fashion photography, ultra detailed, very beautiful, elegant. And we'll go ahead and keep all that stuff, just because it's kind of generic. And then down here in the negative, we're basically keeping out anything that's kind of CGI, the semi-realistic stuff.
(09:06) 我们正试图创建逼真的图片,用这个否定提示排除任何这些其他东西。 美妙之处在于这个新的SDXL实际上在处理手和文字方面具有非常非常好的能力,脸部效果也很惊人。 所以继续尝试它。 (09:06) We're trying to create realistic pictures with this negative prompt down here. The beautiful thing about this new SDXL is that it actually has very, very good ability to do hands and text even, and faces are phenomenal so far. So just keep experimenting with it.
(09:26) 如果我们向下看,我们可以看到我们的种子数字,我们的CFG,当然,数字越高,它会更多地坚持您的提示,数字越低,它会有更多的艺术自由度。 所以去玩这些不同的东西。 (09:26) And if we go down here, we can see we have our seed numbers, we have our CFG, which of course, the higher number, it's going to be the more, it's going to stick more to your prompt and the lower the number, it's going to have more artistic freedom. And so go ahead and play around those different things.
(09:41) 当然,在这里你的CFG和采样器的步骤也一样。所以现在我们有了精炼器,我们可以玩的东西多了,因为它首先会创建你的图像并在没有精炼器的情况下放入。 然后它会取出它创建的图像,并通过精炼器进行精炼,然后输出一个更好的版本。 (09:41) And of course, down here, same thing at your CFG and your steps for your sampler. So there's a whole bunch of different things that we can play with now that we have the refiner, because what it first does is it's going to create your image and put it without the refiner. Then it's going to put that image that it created and put it through a refinement, which is the other model, and then spit out a better version.
(10:01) 这有点像之前的图像生成器做的两项工作。所以当我准备好时,我有我的积极提示在这里,我的否定提示在里面。 由于这一点,我可以点击Q提示按钮。 (10:01) This is kind of double doing what those previous image generators were doing before. So when I'm ready, I've got my positive prompt over here, my negative prompt in there. Because of it, I can go ahead and click the Q prompt button.
(10:21) 现在请记住,当你第一次点击Q提示按钮时,它需要几分钟时间加载一切。 第一次图像生成后,事情往往会快一些。 但即使如此,我们已经起步了,一切似乎都在正常工作。 如果你看这里的命令,我们可以看里面,我们实际上可以看到它已经开始经历一切,并准备好了。 (10:21) Now keep in mind, when you first hit that Q prompt button, it's going to take a few minutes to load everything. After the first image generation, things tend to be a little bit quicker. But even so, we're off to the races right now, everything seems to be working. If you can look over here at the command, we can look in here, we can actually see that it has started going through everything and it is getting prepared.
(10:42) 如果我实际上把它带进来,让我把我的NZT或NZXT cam带进来。 从这里我可以跟踪我的CPU和GPU以及它们的运行情况,以及我的前端流程以及它们使用的RAM量。 现在你可以看到Python正在使用10.5GB,它在上升。 (10:42) And if I actually bring in over here, let me, let me bring in my, I use this thing called NZT or NZXT cam. And from here I can keep track of my CPU and my GPU and how they're running, as well as my top processes and how much RAM they're using. And right now you can see the Python is using 10 and a half gigabytes and it is climbing.
(11:01) 无论如何,我们现在要加速,直到图像出现在里面。我马上回来。 (11:01) Anyway, we're going to go ahead and speed up right now until we get the image in there. And I'll see you right in a second.
(11:17) 不错。我们有一张艾维斯的获奖照片就在这里。我不得不写艾维斯之王,因为当我没有这样做时,它实际上制作了一张汽车的照片,就像这样。你可以看到就在那里,有一个有趣的小漂浮玻璃门就在那里。 (11:17) Not bad. We've got an award-winning photo of Elvis right there. And I had to put Elvis the king because it actually made a photo of a car when I didn't do that. As you can see right there. There's an interesting little glass floating door over there.
(11:32) 也许这是我不明白的东西。 但不,房子的其余部分看起来很酷,有点像加州的房子。 好的。如你所见,进入comfy UI并开始生成你自己的照片非常简单,只需在里面输入你能想到的任何提示。 (11:32) Maybe it's just something I don't, I don't understand. But no, the rest of the house looks pretty cool here. Something like a California house. Okay. So as you can see, it's very easy to jump into come to UI and to start generating your own photos simply by just putting whatever prompt you can possibly think of right in there.
(11:55) 当然,否定提示由你决定放什么进去。如果有的话,你实际上不需要否定提示就可以创建图像。 但你确实需要一个积极的提示来开始某些东西。显然,如果你没有放任何东西,让我们把什么都不放。 我要向你展示如果你没有放任何东西并点击Q提示按钮会发生什么,看这个。 (11:55) And of course, the negative prompts, you decide what goes in there. If anything, you don't actually have to have a negative prompt to create an image. But you do need a positive prompt to start something. Obviously, if you just put nothing in, let's go ahead and just put nothing. I'm going to go ahead and show you what if you put nothing in and you go ahead and hit the Q prompt button, watch this.
(12:11) 所以当你输入无提示时,你最终会得到的是告诉你所有UFO基地位置的秘密地图。 当你没有输入任何提示时,这就是你最终得到的。 所以随意玩它。我要把它放在那里,以防任何顶级秘密黑衣人想要的那一个。 (12:11) So that's just it. You get a secret map that tells you the location of all the UFO bases. That's what you end up getting when you type in no prompt. So feel free to play around with that. I'm going to go ahead and put that just over there in case any of the top secret black suit people want to show up for that one.
(12:27) 不管怎样,我们得到的是非常非常有趣、简单易用的程序。 这是开源的。 任何人都可以免费使用。 任何人现在都可以马上开始使用它。 在我们做房子之前,我们做了埃尔维斯。 我们做了很酷的埃尔维斯汽车,你们可以看到。 (12:27) Anyway, we've got going right here is a very, very fun, simple, easy to use program. It's open source. It's free to use. Anybody can jump on and start playing with this right away. But before we did the house, we did Elvis. We did the cool Elvis car that you guys can quite see.
(12:43) 小事情看起来很伟大。这里有一个奇怪的细节,显然不太正确。 但你知道,对于汽车的其余部分,它看起来非常令人惊叹。 当我们经历ufo,然后当然还有这个我很喜欢的。 我真的很喜欢这个。四周的玻璃窗看起来超级时尚。 (12:43) And little things look great. There is this weird detail right there that's obviously not quite correct. But you know, for the rest of the car, it looks freaking amazing. And as we go through the UFOs, and then of course there's this very interesting, I like this one a lot. This one's really cool. The glass windows all the way around it looks super stylization.
(13:06) 然后当然,我们跳过那一个,我们有一些奥本海默。 没错。非常主题化。什么东西现在很流行?芭比和肯。所以我只是在测试它会如何建模它。我的意思是,这个模型真的很惊人。它真的做到了,我的意思是,他有那里的小关节,甚至芭比都有。 (13:06) And then of course, we skip through that one, we've got some Oppenheimer. That's right. Very topical. And what else is popular right now? Barbie and Ken. So I was just testing out to see how this modeled it. I mean, this model is amazing. It really did the, I mean, he's got the little joints right there, even on the Barbies.
(13:23) 你可以看到它看起来就像芭比的头发。所以它知道这么多不同的风格。我对它非常惊讶。然后当然,我输入海绵宝宝就是为了看它会怎么做。是的,这是它的作品。但所以其中一个我想向你们展示的其他有趣的东西是只是为了吸引你。 (13:23) It's got the Barbie hair. You can see it looks just like Barbie hair. So it knows so many different styles so well. I'm very surprised with it. And then of course, I typed in SpongeBob just to see how it would do with that. And yeah, here we go. But so one of these other things I wanted to show you guys is just to tease you.
(13:33) 有这么多有趣的东西你可以用这些照片做。例如,你知道,我拿了这些我认为看起来很棒的白头海雕照片,并对其进行了上采样。 当你对这些照片进行上采样时,它变成了这样的东西,对吧?我使用了Topaz Gigapixel。 (13:33) There are so many fun things you can do with these photos. For example, you know, I took these bald eagle photos, which I thought looked phenomenal, and I sat there and upscaled them. And when you upscale these photos, it turns into something like this, right? I used Topaz Gigapixel.
