
ESP32使用旋转电位器实验
1.1 介绍:
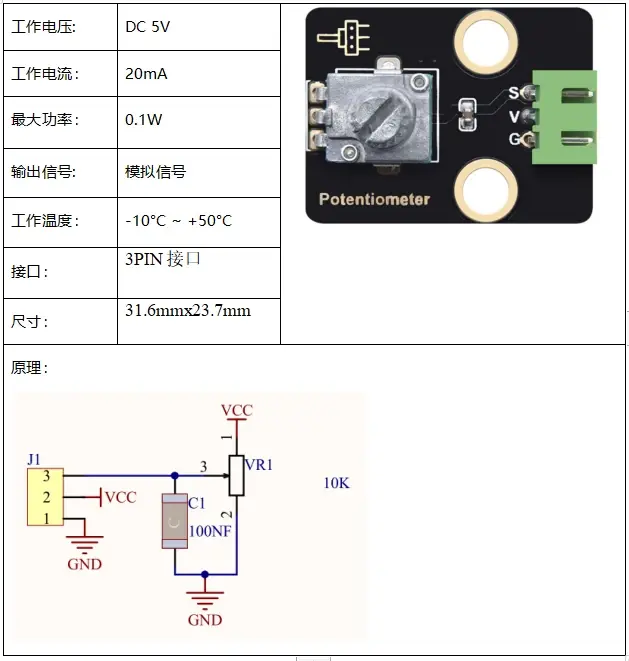
旋转电位器模块通过旋转电位旋钮输出0~5V的模拟电压,通过单片机的ADC读取器数值进行控制其他设备,常用于调光灯、电机速度调节等。
1.2 模块相关资料:
相关资料前往下载链接:https://sourl.cn/aGShAV
1.3连接图

1.4测试代码
Arduino IDE测试程序
#define PIN_ANALOG_IN 34 //the pin of the Potentiometer
void setup() {
Serial.begin(9600);
}
//In loop(),the analogRead() function is used to obtain the ADC value,
//and then the map() function is used to convert the value into an 8-bit precision DAC value.
//The input and output voltage are calculated according to the previous formula,
//and the information is finally printed out.
void loop() {
int adcVal = analogRead(PIN_ANALOG_IN);
int dacVal = map(adcVal, 0, 4095, 0, 255);
double voltage = adcVal / 4095.0 * 3.3;
Serial.printf("ADC Val: %d, \t DAC Val: %d, \t Voltage: %.2fV\n", adcVal, dacVal, voltage);
delay(200);
}
//**********************************************************************************
1.5测试结果
按照实验接线图连接好线,编译并上传代码到ESP32,代码上传成功后,利用USB线上电后,打开串口监视器,设置波特率为9600,串口监视器显示电位器的ADC值,DAC值和电压值。转动电位器手柄时,ADC值,DAC值和电压值发生变化。

