
UdemyPSChrisBarin 16-18
2.9. ACTIVITY Resize an Image
P16 - 00:01
Hello. In this activity, you will resign as an image quickly and seamlessly.
P16 - 00:05迅速无缝隙的操作。
I'll start with the tutorial. And then it'll be your turn. We’ll discuss shrinking images at the beginning and will finish with enlarging some photos.
P16 - 00:12开头裁剪图片,末尾放大图片。
First. Open up any image, or you can use this one that is attached to this lecture.
P16 - 00:17打开相关图像。
It's a great looking picture, but it's also way too big for my taste.
P16 - 00:21很大高清但是太大了。
Here's what we're going to do to re size it.
P16 - 00:24就这样重新调整。
First i'll unlock my layer by double clicking it.
P16 - 00:27双击图层解锁。
in this new window. That shows up. You can enter any name, but I like to keep everything as is.
P16 - 00:33新图层命名。
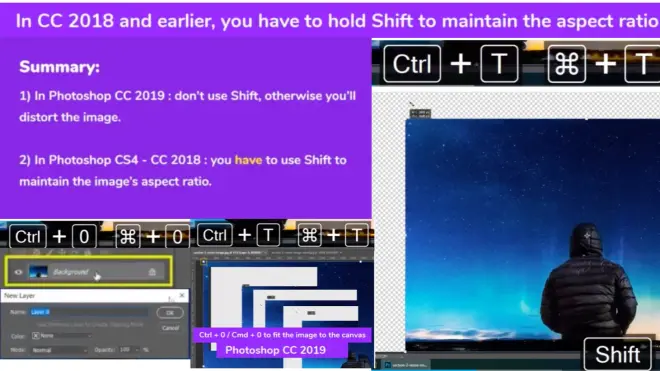
great. Now we can start resizing it. Here is the most popular technique. Use CTRL t to enter Free transform mode.
P16 - 00:42T控转化模式。
Now you'll notice the image has a stroke of sorts, as well as some handles.
P16 - 00:48四角中分8粗点抓手。
If you don't see them, please use CTRL zero to fit the image to the canvas to zoom away. So you can see the photos edges.
P16 - 00:55零控在边界内看到照片边缘。
If I go and drag from the Top left corner, you can see how the image immediately changes.
P16 - 00:59左上角斜对拖拽,图像变了。
bear with me with the following. If you have photoshop CC 2019 or newer version, your aspect ratio is going to be maintained automatically.
P16 - 01:0819更新版本维持比率。
This means you can resize quickly without worrying your distort the image.
P16 - 01:12不用担心扭曲图片。
Are you making it too tall or too wide? As you can see, even if I try to mess up the program doesn't allow me to destroy the image.
P16 - 01:20系统不让你毁坏图片。
But let me change to any other previous photo shop version. It doesn't matter if it's a recent one like CC 2018, or an old version like CS 6.
P16 - 01:30对比旧版本。
here all use the same photo, the same hockey control t, but notice the outcome. The image gets distorted.
P16 - 01:35同样操作,旧版本的图像扭曲。
And that's because in all versions before photoshop CC 2019, you have to hold shift to protect the images proportions.
P16 - 01:43s保持比例不变。
As you can see now that I'm holding shift things spot on. the photo is no longer distorted and I can shrink it down with the help of that hot key.
P16 - 01:52用热键帮助缩小。
So please be aware that your photoshop version is very important in this case.
P16 - 01:56所以PS版本很重要。
And let me show you why.going back to CC 2019 and I’ll resize it a bit more just so you can see the images being properly modified.
P16 - 02:05重新调整,图像被重塑。
No hotkeys used at the moment, right? But now if I hold shift, look what happens. again, complete freedom. And I can modify the layer in any shape or form. Chances are you won't want to work like that.
P16 - 02:17S可以畸变。
But no, that's an option. to sum it up. If you are using CC 2019, don't use shift unless you want to distort the image?
P16 - 02:2419用S畸变。
If you are using an older version, you have to use shift to maintain its aspect ratio.
P16 - 02:30老版用S维持图片比率。
All right, let's keep going. Sometimes you want to eye bought it, but maybe you want to be precise. Well, we have a couple of options.
P16 - 02:38肉眼衡量和精确之间选择。
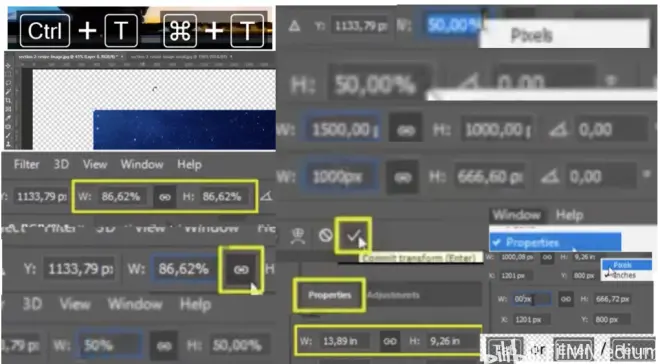
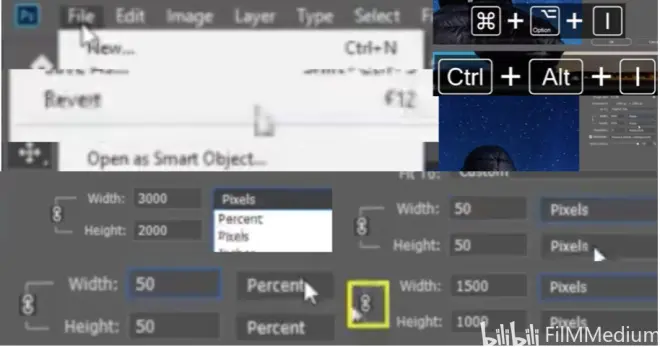
First focus on the options bar. In this region, you can see a W, and an H goes down for width and height. And by default, these values are shown in percentages.
P16 - 02:50宽度高度用百分数表示。
If you want to manually type something in, make sure you first click on this chain icon.
P16 - 02:53手动输入,打破锁链。
in photoshop CC 2019. This is enabled by default, so you don't have to do anything.
P16 - 02:5919版本的是默认。
Once that's done, I can write something like 50%. And the height will change as well.
P16 - 03:05输入50%随之改变。
But say you don't know what percentage you're looking for. Instead, you need its width to be 1000 pixels.
P16 - 03:10宽度1000像素。
No problem. Simply right clicking this box and change percent to pixels. Now you can do the same for the other box. Let's take it down to 1000 pixels. I recommend you double click and replace the existing value with your own.
P16 - 03:28手动输入1000像素来替代。
Trying to type it in manually is a bit tricky. Press enter or click on this check Mark from the options bar to continue with your edits.
P16 - 03:35点击确认标记。
In case you don't want to use CTRL t, you can open your properties panel. If you're not sure which one it is, go to window properties from it. You gain access to the same width and height boxes, but without entering Free transform mode.
P16 - 03:50面板属性,窗口属性,不能切换。
So i'll drop the size down to 801.once I pressed tab or enter, the new size is going to come in.
P16 - 03:55输入数据,回车,新大小。
good stuff. As a side note, x and y stands for the images position on the horizontal and vertical axis, starting from the Top left. So if you replace the current x value with zero pixels,
P16 - 04:12如果X为0图像贴附左侧。
the image will touch the left edge of our canvas, increase that to 100 pixels, and it will move 100 pixels to the right.
P16 - 04:16增加100像素,向右移动。
Same thing applies for the vertical axis. Zero makes it touch the Top edge of our work area.
P16 - 04:22垂直0贴附顶部工作区。
And if I replace that with 200, it will move down. Good stuff.
P16 - 04:26如果垂直200则下移。
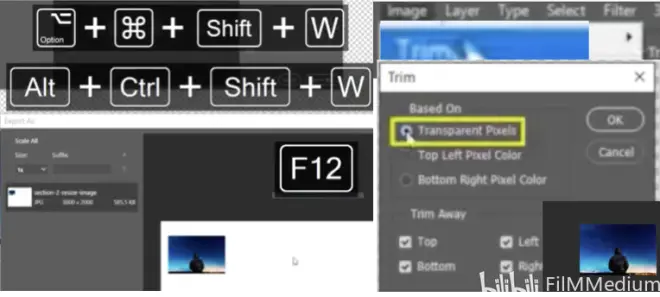
So you want to export your work so you can share it with your friends. Trouble is, if you save it with the alt CTRL shift w, you can see all this excess space all around your photo.
P16 - 04:37ASW控保存照片周边有边缘。
That's not good. So how can you easily get rid of it? Well, I'm going to show you the easiest and fastest way to do that. Let's hit cancel.
P16 - 04:46展示简单的去除方案。
We’ll go to image trip. from this new window on select transparent pixels.
P16 - 04:52裁剪 选择透明像素。
Once I hit OK, you'll now see all that extra space is gone away.
P16 - 04:57你发现周边透明部分消失了。
Fantastic. Let me show you another way of shrinking image. Press f 12 to revert back to its original state.
P16 - 05:04F12回到最初的状态。
If the hockey doesn't work, go to the Top menu and click on file. from here. Choose revert. If you're on a MAC, the tab is called photoshop.
P16 - 05:14文件-反转/PS。
Okay? Now, without doing anything else, we'll use CTRL ALT I. This will bring up the image size dialog.
P16 - 05:21AI控大小调节对话框。
Here. You can see its current dimensions, 3000 by 2000 pixels.
P16 - 05:27三千乘以两千像素。
Here it's a repeat of what we just talked about. We can put in 50%, and this will instantly re size the image to 1500 by 1000.
P16 - 05:35输入50%图片大小随之变化。
Or we can switch these values to pixels. by default. The chain icon is already pressed. Once you hit okay. You're good to go.
P16 - 05:44切换到像素,自动关联。
Let's talk about enlarging an image or what is referred to as up sampling.
P16 - 05:50拓展图片,样板图。
In general, you don't want to do that. It's highly discouraged. Even though photoshop engine has advanced in recent years.
P16 - 05:58没必要这样做。
If you want a high quality image, your best bet is to recapture that photo with a better camera.
P16 - 06:02高质量照片重新拍摄。
Since that's usually not a reasonable option, i'll show you the best way to do it, even though you won't get crystal clear results.
P16 - 06:10聊聊结果不太满意,办法中办法。
First let me open my image or I’ll hit control alt I.
P16 - 06:15热键AI控。
But if you don't want to use that hockey, you can go to image, image size. Here you can see this has been taken down to 750 by 500 pixels.
P16 - 06:24图像-大小,宽7百高5百像素。
So it's not tiny, but it's also not high quality. That's my first piece of advice.
P16 - 06:30质量不高,很小。
Try and enlarge images that are at least medium in size.
P16 - 06:32尽量拓展中等大小图片。
If you are planning on blowing up something that's 400 by 300 pixels, you're not gonna have a good result.
P16 - 06:39三四百像素大小效果不好。
here. I'll crank it up to 300 percent. So I can explain what's going on.
P16 - 06:44调节到百分之三百。
I’ll also enlarge this window. So you can see more of this preview. 300 percent is an exaggerated value. I wouldn't recommend you go this high, because this command means that for each existing pixel photo shop has to create three additional ones.
P16 - 06:58如果这样大,创建3不同版本。
Now let's play around with these options, though. My advice is to leave it set automatic. Photoshop usually does a good job by itself.
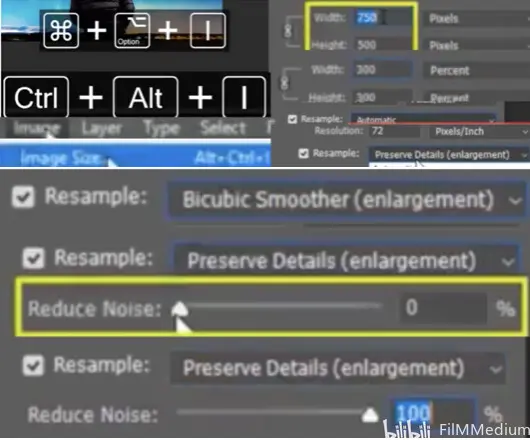
P16 - 07:06重新取样-自动。
In case your preview shows you, something isn't right. You can go through these other options. You'll see no difference between automatic and preserve details,
P16 - 07:15自动和保留细节没区别。
because that's the new default value that photo shop uses for enlarging images.
P16 - 07:18拓展图像的默认值。
If we switch to bicubic smoother, the image becomes blurry. I don't think this is a viable option.
P16 - 07:26图片模糊,这方案不可行。
The only real change you may want to make in your day to day work is this, switch to preserve details. And you can use this reduce noise slider to tone down all the harshness in the sky.
P16 - 07:36保留细节-降噪/粗糙度。
If I bring it all the way up to 100%, you can see the difference. That's the easiest way of enlarging an image.
P16 - 07:44降噪百分百,这是拓展图片方案。
You can also use CTRL t. And i'll show you how that's done later in this course. But this is simple and effective.
P16 - 07:50T控非常有效的。
And that wraps up our lecture. Now it's your turn to test out these methods with a fresh new image of your own. Try out these steps we just practiced on your own and see which one you like best. Is it the Free transform method? Or do you prefer the image size command or control alt I?
P16 - 08:08喜欢哪一种方案?
I let me know in the comments section, i'll see you soon.

2.10. Review
P17 - 00:00
Hello, I hope you enjoyed this section. We learned a lot about photoshop interface, as well as how you can open and save your work in various ways.
P17 - 00:08界面和各种保存方式。
The most important thing is that you work along and you try these features out.
P17 - 00:12边操作边找自己喜欢的。
Please don't sit around and watch me work, because you won't get the most out of this course.
P17 - 00:17自己动手操作才晓得。
I know you understand everything that's going on, but get active. Post your work in the comments section, write about your favorite method of exporting your work. And of course, let me know what photos you straightened or cropped.
P17 - 00:29让我知道你照片如何裁剪。
We are at the beginning of our journey, but I want you to know that I'm here to help, post a question in the comments area. And i'll be sure to answer as fast as possible.
P17 - 00:37答疑解惑。
But I want my commitment matched by yours. Show me you were just as involved as I am. And I promise you this entire process will become a breeze.
P17 - 00:46教程变的轻松很多。
Also feel Free to leave a rating on this course. And what I can specifically do to help make this course a 5 star experience for you.
P17 - 00:51打个高分。
Okay, let's move onto the next section.
3.1. Introduction
P18 - 00:01
Welcome to this new section where we'll talk about layers.
P18 - 00:03探讨图层。
This is one of my favorite topics, because I cover a lot of tips, tricks, and techniques that completely changed the way you work.
P18 - 00:09技巧改变你工作方式。
I know you may already know a thing or two about layers, but in this section will show you fantastic ways to improve your workflow.
P18 - 00:17技巧改善你的工作流。
I'll show you how you can make your life easier by approaching tasks the right way.
P18 - 00:21正确省力方式完成任务。
I'm also going to explain a subject that most photoshop designers that have applied for a job at my company utterly fail.
P18 - 00:28有些失败教训。
I'll spare you any potential embarrassment. If you stick with me until the end, we also have some fun exercises that will test your knowledge so far.
P18 - 00:36学到底的欲望。
So without further ado, let's get going.
