
UdemyPSChrisBarin 12-15
2.5. Get around Photoshop Fast
P12 - 00:01
Let me show you how you can get around photoshop with just a few commands.
P12 - 00:05几个控件可以玩转PS。
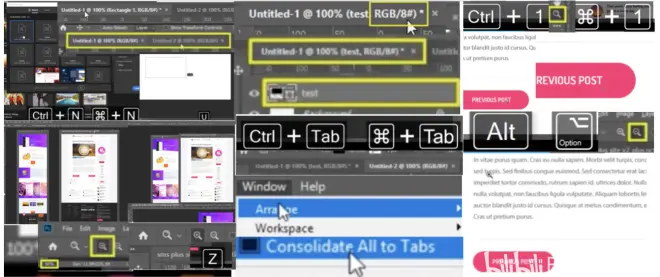
First. We’ll open to new blank projects with control N.
P12 - 00:09用N控打开项目。
That settings don't matter. At this point. These are called untitled one and untitled two.
P12 - 00:13出现两个未命名的标题。
And that's because they are not yet saved anywhere on my drive.
P12 - 00:16是因为我还没在硬盘保存的。
I'll place a rectangle on my canvas, but watch the tab. As I'm doing it. noticed the title just changed to untitled one at 100%, where 100% is my zoom level. And in parenthesis we can see the layers name. In this case, it's rectangle one.
P12 - 00:33矩形百分放大,括弧内名字。
If I change its name to something else, that's going to be updated here.
P12 - 00:38如果改变,标题体现改变。
Let's write test. And there you go. It instantly updated.
P12 - 00:41比如文本,体现在标题里。
next to the layer name. We have the color mode and bit depth, which should be set RGB and 8 bits.
P12 - 00:49颜色模式RGB比特8深度。
If we move to the other project, you'll notice the layers panel has only one layer, the background.
P12 - 00:54另一个标签项目,只有背景图层。
So as you move between these two tabs with the hot key CTRL tab, you can clearly identify each project.
P12 - 01:01Tab控切换项目标签。
That's easy to understand. But let me complicate things.
P12 - 01:05接下来难度加大。
Detach both tabs and I’ll float them around. Give me a minute while I set these up.
P12 - 01:11可以让标签来回悬浮状态。
Now, it's more difficult to understand what's going on in my layers panel. I can easily get confused.
P12 - 01:19不清楚哪个图层发生什么容易混。
So here's what I suggest you do. Go to window, arrange, consolidate all into tabs.
P12 - 01:24窗口-管理-合并到便签。
Now we're back to normal.
P12 - 01:26这样恢复正常状态了。
And this is how I suggest you work at all times. Once you're in a document, she may want to zoom in and out.
P12 - 01:33文件需要近看远看。Z控。
to do Z for the zoom to look at the Top left and see your default.
P12 - 01:38Z控左上角默认放大镜图标。
mindset on zooming in.
P12 - 01:42近观是放大镜➕。
I can tell that by seeing the plus symbol. Now, if I click once, I’ll zoom in easy.
P12 - 01:46按一次就可以近观了。
check the bottom left to see your actual zoom level in percentages.
P12 - 01:49左下角放大倍数。
I recommend you always come back to 100%,
P12 - 01:53个人建议放大百分百。
because this way you won't get a distorted view.
P12 - 01:56避免视角扭曲。
If you work 30 minutes at 300 percent, your perspective gets out of balance.
P12 - 02:00如果300倍工作30分失衡了。
So you should always come back to 100% to check your progress.
P12 - 02:03回到百分百检查下进度。
How do you do that? First. My favorite control one. This is what I strongly suggest you use.
P12 - 02:101控缩小。
Let's zoom in again. But this time i'll click and drag to the right. This does the same thing, but it's more precise this way.
P12 - 02:18右拽放大更精确。
If you feel you've gone too deep, just drag to the left. Ok.
P12 - 02:22左拽可以远观。
Now, how can we get back to 100% easily?
P12 - 02:26如何轻易回到百分百。
Simple. Just double click the zoom tool from the toolbox. That's the second option.
P12 - 02:30单击左侧的放大镜选择。
One last thing about zooming. If we click once, having the plus symbol active will go in, right?
P12 - 02:37按加号键会近观。
But if we hold down alt or the option key on a MAC, you'll see the cursor will change to the minus symbol.
P12 - 02:44alt选择缩小减号。
Are these your major options regarding zooming in and out.
P12 - 02:48以上放大缩小选择了。
What about if you want to go up, down, or side to side?
P12 - 02:52上下左右如何处理?
Well, don't be tempted to use your arrow keys on the keyboard. Those won't work.
P12 - 02:55不要用箭头,不管用。
The most basic way is to use the scroll bars.
P12 - 02:59最简单方式用滚动条。
As you can see, I click and drag.
P12 - 03:01点击 拖动。
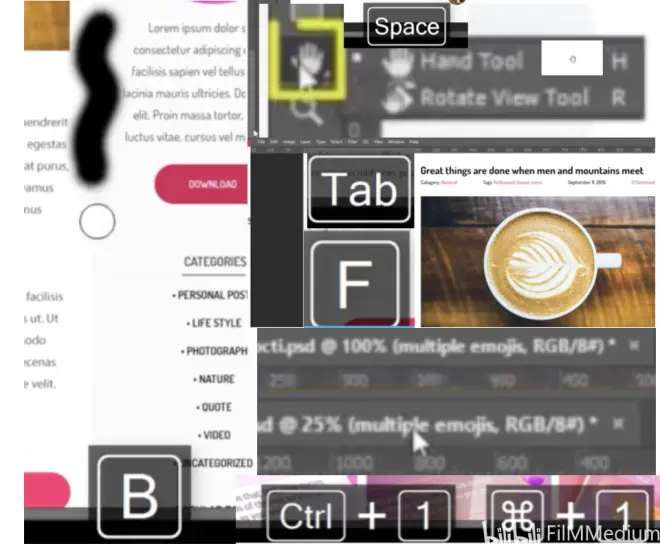
But that's not what I call efficient. What I recommend instead is that you hold down the space bar,
P12 - 03:08建议按住空格键。
this transforms your cursor into a little hand.
P12 - 03:10鼠标就变成小手了。
Now you can move freely in any direction with any speed.
P12 - 03:15不同方式不同速度移动。
This is what I use in my workflow, and I strongly recommend it.
P12 - 03:17工作流用到的,强烈推荐。
So again, hold down space, click and drag in any direction.
P12 - 03:23按空格键不同方向拖拽。
If holding down the space bar is an issue, you can go to the tools panel and click on this hand icon. With that active, you can simply click and drag.
P12 - 03:31手状态下,点击拖拽。
One is holding space better though, because once you let go, you'll revert back to your initial tool.
P12 - 03:38释放掉空格,恢复普通鼠标状态。
So let's say I'm painting with a brush, but I need to move around a bit. I can hold space, do exactly that, let go. And i'll still have my brush selected.
P12 - 03:48空格B刷子同时移动。
This means less back and forth. I know it seems like we're saving a mere half second, but I promise you these little bits make all the difference down the road.
P12 - 03:58节省少时间全程节省时间很多。
So we've learned to arrange our tabs to zoom in and out and move freely. Let's continue with another few tips.
P12 - 04:05继续剩下的技巧。
If you press the tab, all the panels go away.
P12 - 04:10Tab所有的面板消失了。
What's the point? Less distractions? If that's not enough? And I don't think it is, you can press the f key to get into full screen mode.
P12 - 04:17F全屏模式。
You have to press it twice, by the way, this makes it easy for you to observe everything on your canvas, especially If your work is fairly large and you don't have a humongous monitor,
P12 - 04:27文件不大,显示器很大,F两次。
even so, you might still not see things right, because your project may be very big.
P12 - 04:30项目很大全屏看起来不对。
Let’s jump over into another tab to see that.
P12 - 04:33另一个Tab去看。
As you can see, I'm a 25% initially. And now i'll go to 100% by pressing CTRL one.
P12 - 04:411控从缩放到百分百放。
Now I can work on all the fine details.
P12 - 04:44处理具体细节。
After I'm done. I need a fast way to see the entire thing. I'm already at 100%. And that's too close in. because the document is very big.
P12 - 04:52百分百能看清,但文件太大了。
I could zoom out manually with the techniques I showed you.
P12 - 04:56Alt选项退出。
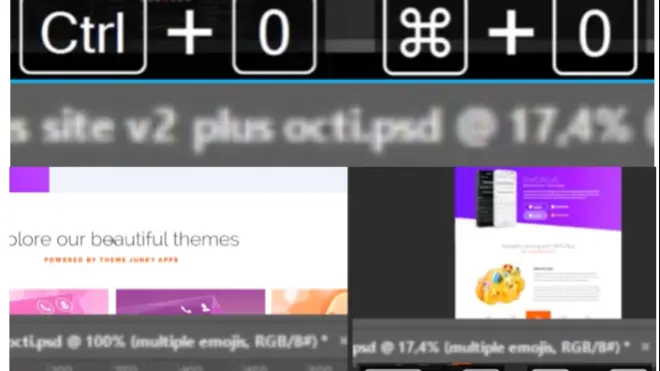
But I want an even faster way. And that's control zero.
P12 - 04:59零控迅速退一步到位。
This makes the campus fit my screen. It doesn't matter how big it is. This command will make sure you can see the entire canvas.
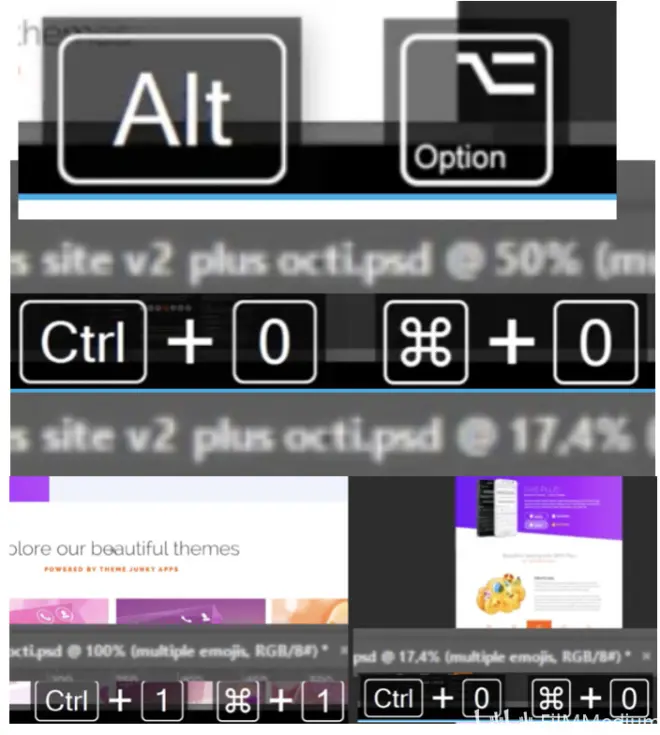
P12 - 05:06俯瞰全景。
Try it out on different tabs. So to recap control one. gives 100% all the time.
P12 - 05:131控百分百。
Control zero fits the image to your screen.
P12 - 05:15零控全景图。
That's the beginning of what you need to know to move around freely in photoshop.
P12 - 05:20这就是开头自由移动PS。
We will learn more as we progress. So let's get to.

2.6. ACTIVITY Crop and Straighten Photos
P13 - 00:00
Hey, there in this activity, you'll crop and straighten your first photo.
P13 - 00:04裁剪第一个照片。
Here is what I prepared for this lecture. You have this file attached, so please work alongside me.
P13 - 00:10手里这个文件夹,跟我一起操作。
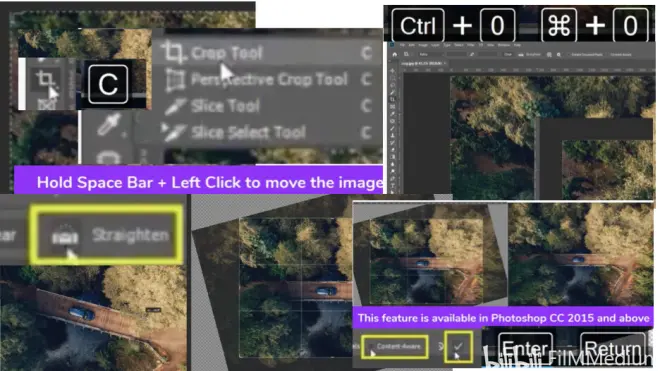
The first thing I want to do is straighten the image, because I'm not in love with its perspective.
P13 - 00:14我不喜欢这个视角。
To do that, I will enable the crop tool by pressing c.
P13 - 00:18C裁剪。
If you want to make sure you've selected it, check your tool bar on the left side. Immediately you will get this dotted stroke on the edge of your image.
P13 - 00:27左侧裁剪按钮,画布圆点画框。
This shows you the crop tool is active. In case you are tool zoomed in. You can use CTRL zero to fit the image to your screen.
P13 - 00:34零控填充屏幕。
Next i'll go to the options bar, and I’ll able straight it.
P13 - 00:39选项条拉直。
Luckily this images have some straight lines via this road, and those will help me get my bearings.
P13 - 00:44还好图片高架桥公路。
Here's what you need to do. Click and drag along side its edge.
P13 - 00:48沿着高架桥边缘。
Once you are happy, let go and photoshop will show you a preview of what you're about to get.
P13 - 00:53调整合适放手,PS矫正视角。
This is fantastic stuff. The result is nearly perfect. But notice the grade out area outside this region.
P13 - 01:00注意下被裁剪掉的部分。
that's going to be thrown away by photoshop. But it's a shame because I love this forest background.
P13 - 01:05被裁掉的有喜欢的森林背景。
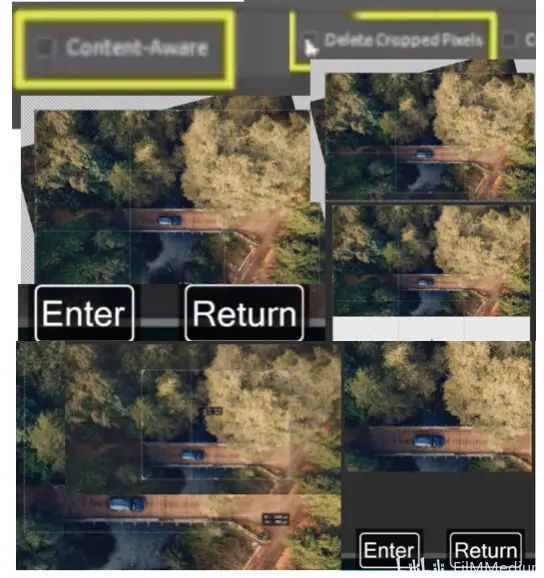
Here's what we can do. In this CC version. I can enable this feature called content aware.
P13 - 01:1215版以上内容识别功能。
By checking it. You'll immediately see my active region will enlarge significantly.
P13 - 01:18内容感知,捕捉区域变大了。
There are missing parts in all four corners,
P13 - 01:20四角空白区域。
but content aware is going to handle it. Photoshop will analyze all these existing pixels and create new ones based on them.
P13 - 01:30依据内容填补四角空白。
Hit enter or click on this small check icon and wait until the operation is completed.
P13 - 01:34回车/对勾等PS自动填充。
And here's the result. It's like magic. The photo is not only straightened, but photoshop also added new pixels in all four corners, that content aware in action.
P13 - 01:45四角填补上的像素。
The bigger the photo, the better the result. Honestly, it would be very difficult to notice this image has been edited. Let's see what else we can do with the crop tool.
P13 - 01:54裁剪工具应用还有什么?
Say we want to remove the bottom part, not a problem. Just grab them. Metal handle and drag up.
P13 - 02:00抓住金属拉手拖拽。
Once you are handle press enter.
P13 - 02:02满意敲回车。
If you're not satisfied with the result, you can drag it back down and you'll still get those pixels.
P13 - 02:08往下拖拽自动填充像素。
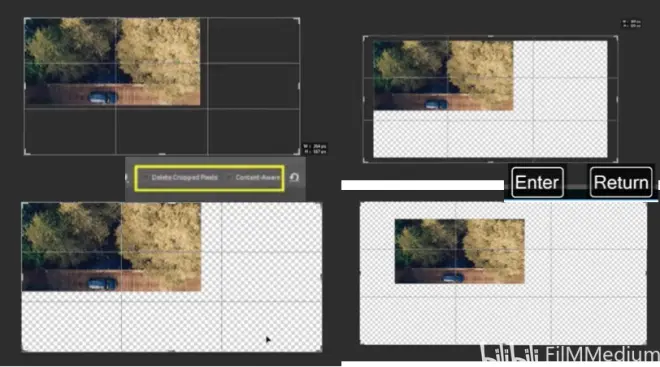
That's because I have this option unchecked.
P13 - 02:15没选择内容感知。
If I enable delete cropped pixels and I remove part of my image, those will be permanently lost.
P13 - 02:18选中内容感知,裁剪内容消失。
Let me drag and hit enter. Okay. Now let's get the crop tool again and expand the photo in that area.
P13 - 02:24再次拖拽填充空隙。
As you can see, we're getting transparent pixels.
P13 - 02:28填补的是透明像素。
So enable this feature only if you're sure you want to permanently remove an area.
P13 - 02:33如果你确定永久裁剪再勾选。
In case you don't want to use those handles. You can also click and drag anywhere on the canvas.
P13 - 02:38选中,在画布上拖拽。
Initially, photoshop will show you a preview of your selection, and you can refine it by moving around.
P13 - 02:44ps透视口,图片在透视口移动。
I'm just holding down my mouse clicking and dragging. Nothing else is being pressed.
P13 - 02:48按住鼠标拖拽。
Once you are happy, hit enter.
P13 - 02:52选中后点回车。
Sometimes you want precision in your cropping. So let's focus on the options bar.
P13 - 02:58精确裁剪到选项工具栏。
In the Top left. You can change this ratio value to width, height, and resolution.
P13 - 03:02比率-宽高分辨率。
Now you can put something like 200 by 100 pixels.
P13 - 03:09输入像素数据,得到精确裁剪。
And that's exactly what you're going to get. Finally, most photoshop users prefer to re size their canvas with the crop tool. That's because it's so easy to use.
P13 - 03:16Z裁剪工具非常容易用的。
Simply activated and make sure you disabled content aware.
P13 - 03:20激活方式是关闭内容感知。
Now grab a corner handle and drag outwards.
P13 - 03:23抓住一角,向外拖拽。
If you want to enlarge the entire canvas equally on all four sides,
P13 - 03:28如果四角均匀的拓展。
hold down ALT or option as you drag.
P13 - 03:30Alt/选项+拖拽。
As you do that, photoshop will also tell you your measurements, so you can decide when it's best to stop.
P13 - 03:37拖拽PS提供大小决定释放。
When you are happy, hit enter. And that's how you can easily make your canvas bigger.
P13 - 03:41这样就是你如何把画布变大。
And that wraps up the crop tool. Remember, you have this image attached.
P13 - 03:47学会裁剪工具去尝试吧。
Go for it and see how well you do have fun.
2.7. Open Images in 6 Ways
P14 - 00:00
Hello, let's talk about how you can open images in photoshop. We have a bunch of ways of doing the same thing. And I attached a file to this lecture where you can get the short version.
P14 - 00:09简短高效率介绍。
Each method has its own strengths. So let's take them one at a time.
P14 - 00:13各有千秋,逐一认识。
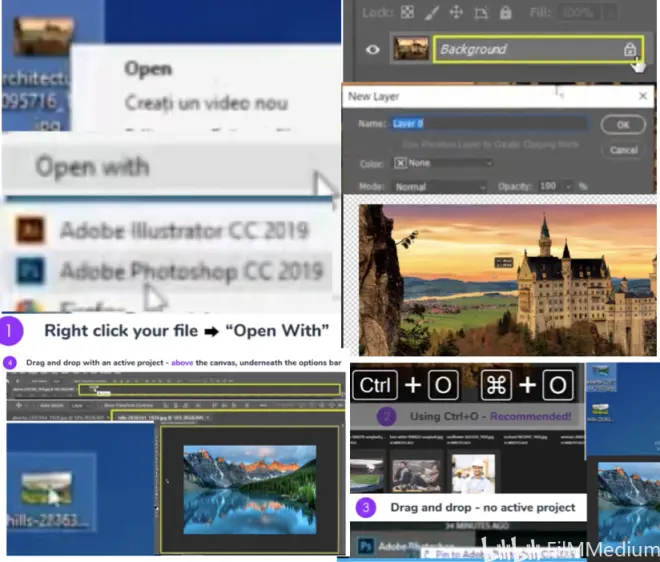
The first way is to right click your file and choose open with. from this list. Choose photoshop. In case it's not there, you'll have to browse your computer for your photo shop dot exe file.
P14 - 00:25打开方式右键PSEXE文件。
Once I click it, the photo will load up immediately. And it's going to be the only layer in my project.
P14 - 00:31背景是唯一的图层。
You can see it's called background, and it's locked.
P14 - 00:34被锁住的名为背景。
to unlock it. We have to double click it. from this new window. hit okay.
P14 - 00:39双击开新图层,按确认。
Now we can move it onto a canvas. The second method is what I personally use the most. And I strongly recommend it control O. where the o stands for open. Now we don't have anything open.
P14 - 00:54O控打开。
This brings us to the 3rd way of opening an image, dragging it into photoshop.
P14 - 00:58第三种方案拖拽。
I'll go to my desktop and i'll select my file,
P14 - 01:01桌面选择文件。
click and hold, and i'll drop it anywhere.
P14 - 01:05点击-拖拽-释放到任意。
As you can see, this is similar to the first method where I have my layer locked by default.
P14 - 01:09背景一图层,锁定。
But what happens if you have an active project and you want to start a new one by dragging a photo inside the program? That's method number four.
P14 - 01:19方法四拖拽到选项条和画布中间。
I'll go to my desktop and select another image. when photoshop pops up. I won't let go inside my canvas area.
P14 - 01:26不走画布内部。
As you can see. There's a highlight around it.
P14 - 01:28画布周边高亮的。
Instead. I'll go above it just underneath the options bar. This is where i'll drop it. And now it stands on its own tab.
P14 - 01:34释放到选项区,成为新标签。
You might be wondering what happens if you drag an image above an active project.
P14 - 01:41你会思考图像拖拽到活动项目上。
That's method number five. Let me select and drag several photos from my desktop. Now, when photoshop comes up, I won't go above my canvas instead of release them here. As you can see, the first image is placed on the canvas.
P14 - 01:56第一个图像放在画布上。
It features these diagonal lines in order to show me the layers in transform mode.
P14 - 02:00四角代表转化模式。
This means I can re size it, but we'll talk more about that later.
P14 - 02:05可以重新调整大小。
The drawback is that I selected three photos, and each of them will ask me if I want to transform them before I place them on the canvas.
P14 - 02:11缺点是放在画布都要问变形与否。
That means I have to press enter three times.
P14 - 02:15三幅图按三次回车。
Now that place is a different type, a smart object.
P14 - 02:21图层出现三幅图。
That is an advantage. But we will cover that later in the course.
P14 - 02:23该优点稍后探讨。
Finally, option number six covers the case where I want to open these four photos in photoshop, but in separate tabs,
P14 - 02:304个照片一个照片一个标签。
that's easy to do. In case there are no active projects, I can just drag them inside the program, and then immediately below it up into individual tabs.
P14 - 02:39没新建时候,拖拽。
In case you have an active project, i'll drag them above my canvas area and i'll release them in this position. And we'll get the same thing. Each image will have its own tab.
P14 - 02:51拖拽活动标签旁,依次排开。
And that's it. I suggest you stick with control, O, but some of these options might come in handy, depending on what you're trying to accomplish.

P14 - 02:59建议O控手动打开。
Try each method out and let me know your favorite in the comments section. Have fun.
2.8. Save & Share Your Work 5 Ways
P15 - 00:01
Hello, let's see how we can save and share our work easily.
P15 - 00:04如何保存分享工作。
The first step is to make sure your project is saved on your hard drive.
P15 - 00:07确保保存本地硬盘。
Let's create a new blank document and get to work.
P15 - 00:10创建新文件准备工作。
The settings don't matter for the purposes of this lecture.
P15 - 00:13设置和本节课宗旨无关。
Now i'll drag an image inside it and hit enter to place it on my canvas.
P15 - 00:18拖拽到画布-回车。
another way is adjustment there from the bottom of my layers panel.
P15 - 00:22阴阳-照片滤镜。
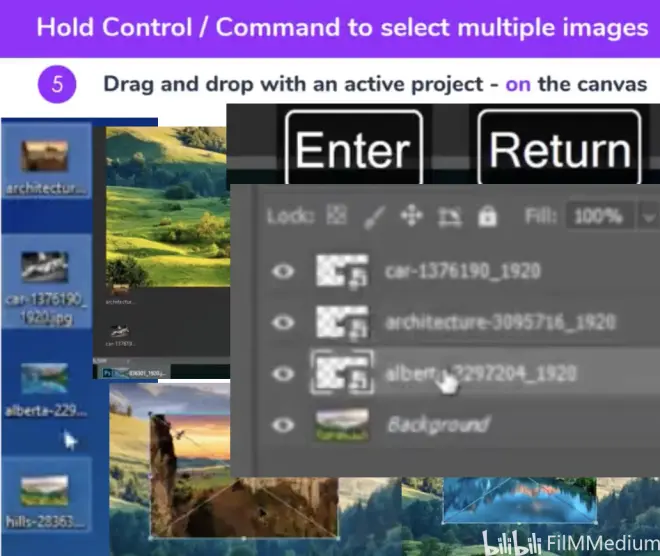
Okay. Say I'm happy with my progress. Let's save this project with CTRL s.
P15 - 00:28s控保存。
Alternatively, you can use file save s, i'll be asked to give it a name. But notice the layer type dot PSD.
P15 - 00:36保存为PSD的文件名。
That's because we're saving the source file. That's an important distinction.
P15 - 00:41明显的差异。
So we are not exporting our work in a format that can be uploaded on Facebook or whatever other platform.
P15 - 00:45可以在其它媒体平台下载。
when your progress is saved. This is how your project tab is going to look.
P15 - 00:51保存好的标签命名变了。
It's not going to be called untitled anymore, but pay attention to the close icon.
P15 - 00:56不再叫未命名了。
Once you make any change, any edit, no matter how small it is. The asterisk is going to show up near the x symbol.
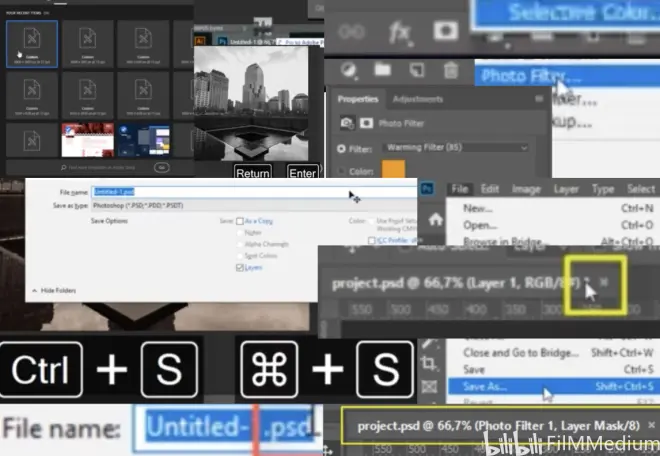
P15 - 01:03星号旁边挨着关闭叉号。
That's a subtle warning that tells you you have unsaved progress.
P15 - 01:07星号旁边叉号提示没保存的文件。
If I use CTRL s, this new state of the project will be saved.
P15 - 01:11S控保存。
But again, if I perform another action, this asterisk will show up. So this is a gentle reminder that says, hey, your work isn't saved.
P15 - 01:19标题星号出现提示工作没保存。
Now let's see how you can share your design with the world. Let's start with the old way of exporting.
P15 - 01:26老式输出方式。
Alt control shifts A.
P15 - 01:27A双S控。
This will bring up this window. You may be familiar with. Here you have a few settings. You want to pay close attention to. first, the file format.
P15 - 01:37首先,保存格式。
You can go with PNG 24 for maximum quality. Or if you need transparency,
P15 - 01:41PNG24透明。
the other viable option is JPEG. And from here, you can adjust its quality setting.
P15 - 01:46JEG选择质量。
You can either choose a preset very high is what I recommend you use.
P15 - 01:50JEG非常高质量。
Or you can fiddle around with the settings, though i'd advise against that.
P15 - 01:54或者微调质量滑块。
Another thing you may want to adjust is the image size. If you have something in mind. Feel Free to type it in. by default. This chain icon is active,
P15 - 02:05输入大小,默认链接代表活跃。
and that means photoshop will maintain your designs aspect ratio.
P15 - 02:08保持恒定长宽比。
If you put in another width value, the height will immediately update itself. And that's very helpful.
P15 - 02:14输入宽度,高度自动更新。
Personally, I like to use the percent field from the right side. Something like 50% is always easy to understand.
P15 - 02:21个人喜欢预设50百分数。
And you can appreciate your new size that much better. So this is the first way of exporting your work through Alt CTRL shift s. If you want to use it from the menu up Top, go to file export save for web legacy.
P15 - 02:36文件 输出 保存 网络资源。
And it's labeled legacy because it's been replaced by a second way of exporting.
P15 - 02:40标签资产被第二种输出方式替代。
Alt CTRL shift w.
P15 - 02:43ASW控。
So we swap the s with a w at the end.This window is fairly similar.
P15 - 02:48新版保存对话框非常类似。
You have your file format at the Top four options to choose from, though. In general, you won't use gift and SVG.
P15 - 02:56主要用前两个PNG GEP。
Underneath. You have your image sizes. That's exactly like it was in the previous window.
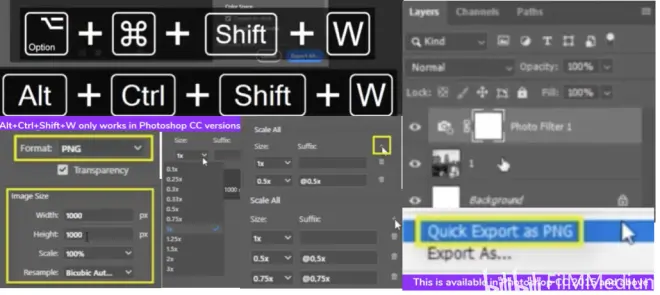
P15 - 03:01照片大小和旧版类似。
From the left side, you can export this design in multiple sizes in one go.
P15 - 03:07大小一般选择一倍。
This is a big improvement. Just hit this small plus icon,
P15 - 03:11保存所有的加号按钮。
and you'll see you can export the same file at multiple sizes.
P15 - 03:15多种大小的形式。
Are there no point five times 0.75 times. Or you can go for two or three times, because it saves you the trouble of repeating this process.
P15 - 03:25避免重复下拉菜单的步骤。
Let's move on to number three, which is one of my favorites. Go to your layers panel and right click. here. You'll have quick export as PNG.
P15 - 03:37图层面板-右键-保存为PNG。
When you click it, you will be asked for a location. And that's it.
P15 - 03:40问保存地址。
This is fantastic because it's very fast. And it doesn't ask you 100 questions before you do it.
P15 - 03:46迅速节省时间。
In case you want to export as a JPEG instead of PNG. Here's how you do it.
P15 - 03:52保存JEP方法。
Open your preferences with CTRL k, select export from the list on the left side.
P15 - 03:58K控-偏好-输出。
From this drop down, you can change your preferred file type. In my case, that's PNG.
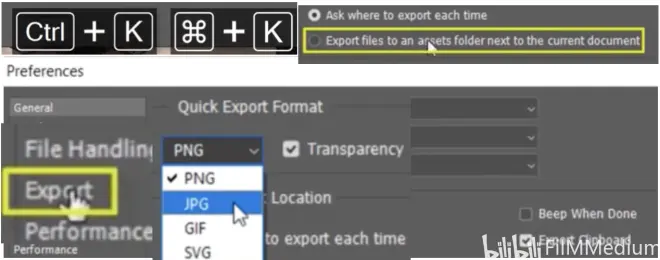
P15 - 04:03偏好输出格式可以改。
You can also export even faster. If you check this second option.
P15 - 04:09勾选第二个圆圈,效率更高。
this way, you will immediately get your file in the same directory as your project.
P15 - 04:13和项目同目录。
Okay, good stuff. Let's see the fourth way of exporting your project.
P15 - 04:18第4种输出方法。
Go to your layer and right click it. from this huge list, select export as and this will launch the same window as the hot key, ALT CTRL shift w.
P15 - 04:29图层右键-输出为AWSC。
You may ask, how is this different. with that big hockey allows you to export your entire canvas.
P15 - 04:35热键允许输出整个画布。
While these last two methods help you export individual layers or groups.
P15 - 04:40最后两个方法输出单个图层。
Let me show you what I mean. I'll add a black rectangle to my project.
P15 - 04:44U加入矩形框。
If I use the long hockey, look at this preview. This is what you'll end up with. Once you save. On the other hand, if I right click on this rectangle in my layers panel to export it, look at what happens. You can see the preview just shows this layer and not the Complete canvas.
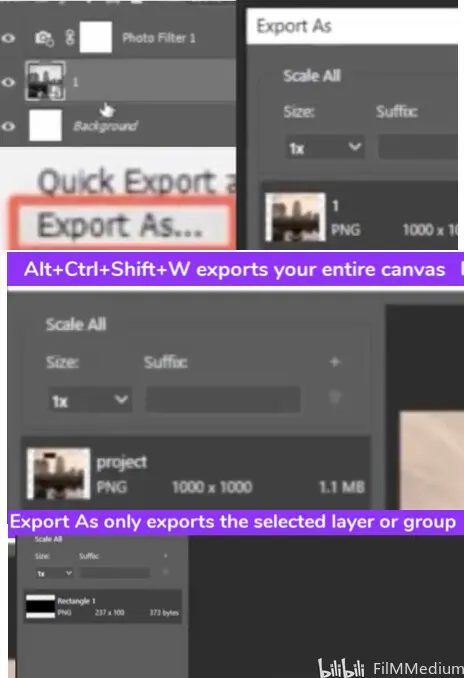
P15 - 05:02ASWC整个画布,右键单矩形。
So that's the difference between the two. Finally, the last method Adobe generate.
P15 - 05:10最后一方案Adobe生成。
Let me open up a new PSD that is in a folder called example.
P15 - 05:14打开案例文件夹里的PSD。
Here it is. And as you can see, I only have the project inside it.
P15 - 05:18里面仅仅有项目。
You have this file attached, by the way. The first step is to activate Adobe generator, go to file, generate image assets.
P15 - 05:29文件-生成-图像资源。
Did you see what happened? Photoshop just created a folder with my projects name and assets at the end.
P15 - 05:34项目资源名称结尾。
Inside we can find a file called errors dot txt.
P15 - 05:39里面有错误记事本。
Let's open it up and see what's what. I know this scene is confusing, but let me space it out. All that's happening here is photoshop is warning us some layers are not properly labeled.
P15 - 05:49警告某些图层不适当标签。
That's how Adobe generator works. It looks for an extension at the end of the layers’ name.
P15 - 05:57寻找结尾图层拓展名。
Here we have a layer called name at mail dot com. That dot com part is throwing photoshop off because it thinks that's an extension.
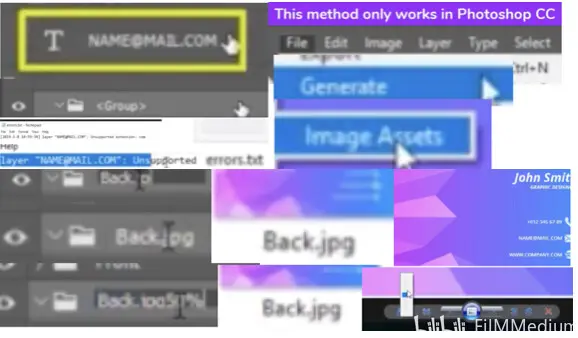
P15 - 06:04PS认为.com是拓展名。
What we have to do is rename it to something else. Now the error went away.
P15 - 06:10重命名后,错误消失了。
Let’s see generator in action. I’ll rename this group to back dot JPEG. Let's check our folder. Yep. Here it is.
P15 - 06:18比如改为JPEG拓展名,错误。
You can replace JPEG with PNG gear for SVG. You can also adjust the quality of the JPEG file by writing back dot j peg 50%. Now, if we check the file, we can see it's fuzzy. This is a fantastic feature that allows you to immediately export your work as you go along.
P15 - 06:37比如拓展名JEP50%模糊版。
to see its power or enable a layer style for this group. Don't worry about the specifics. What's important is we change how this card looks. Pretty dramatic.
P15 - 06:49右键改变图层颜色-混合红色。
Instead of exporting again for hotkeys, we immediately get the updated design.
P15 - 06:55不需要输出,可以看到迭代版。
And that's without touching a single key, great stuff.
06:58 Finally, i'll do a big combo for this group. Here's what i'll rename it too, 30 by 30 back a dot PNG. 60 by 60 back b dot PNG. 200 percent back c dot PNG. 300 percent back d dot PNG. back e dot JPEG two.

P15 - 07:22记事本总结。
in total. I should end up with five different files in my folder. Let's see if that happens. Yes, here they are. First the very tiny 30 by 30 pixel file.
P15 - 07:31输入五种,出现五种错误。
Next is the 60 by 60 pixels image, then 200 and 300 percent. Finally, the last one was saved at 20% quality, so it's really pixilated.
P15 - 07:43最后一个保存20%模糊。
And in case you mess up anything, these errors dot txt file will help you out.
P15 - 07:47如果搞砸了,这txt文件管用。
And that concludes our five ways of exporting your work. Please see the attached image In case you want the short version. Have fun.
