
S80/DS80跟踪定位相机使用指南(S80/DS80 User's Guide)-23.04
一,双目摄像头安装固定(Installation and fixation of binocular cameras):


搭配安装购买建议(Suggestion for purchasing with installation)


Typec-Usb3.0,5-10m

布置标记点,增加精度和稳定性(Arrange marking points to increase accuracy and stability)
准备二维码等标记纸(Prepare QR code and other marking paper)
软件文件夹也有,用A4纸打印,工作期间保持双目摄像头照到二维码
(The software folder is also available, printed on A4 paper, and maintained with a binocular camera to capture the QR code during work)

二,DS80/S80 to Axi界面功能说明(Interface Function Description)
使用Typec-Usb3.0线连接(Connect using Typec usb3.0)
下载软件文件夹(Download Software Folder)
打开程序【DS80/S80 to Axi】,如果打不开则安装驱动
Open the program [DS80/S80 to Axi], and if it cannot be opened, install the driver
第一次打开需要绑定设备
将设备串码发给我们,然后将返回的注册码输入即可
可以更换电脑使用,将整一个文件夹复制到另外一台电脑,或者再次输入注册码
The first time opening requires binding the device
Send us the device serial code and enter the returned registration code
You can change the computer and copy the entire folder to another computer, or enter the registration code again

如果打开软件S80toAxi没有反应,则尝试安装驱动Zadig-2.4
If there is no response when opening software S80toAxi, try installing driver Zadig-2.4

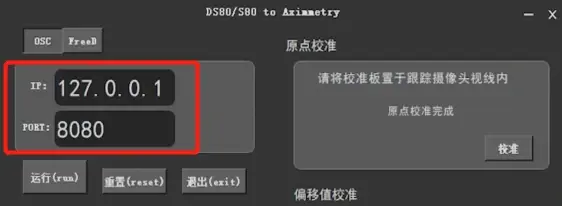
S80/DS80 to Axi

单击【OSC】/ 【FreeD】选择信号协议
【OSC】:Aximmetry免费版可以使用
【FreeD】:Aximmetry广播版使用
校准软件Aximmetry Camera Calibrator,也可以使用
数据会跳动,说明成功连接
【重置】将当前跟踪设备位置Position设为0.0.0
工作时请保持程序一直打开
(Click on 【OSC】/【FreeD]】to select the signal protocol
【OSC】Aximmetry regular version can be used
【FreeD】Aximetry broadcast version can be used)
Aximetry Camera Calibrator can be used
Data will jump, indicating successful connection
【 Reset 】 Set the current tracking device position to 0.0.0
Please keep the program open while working)
三,校准——漂移现象是因为校准偏差引起
calibration-The foot slip phenomenon is caused by calibration deviation
打开校准软件Aximmetry Camera Calibrator(Open the calibration software Aximetry Camera Calibrator)
用FreeD协议连接(Connect using FreeD)
【管理设备】-【设备映射器】-【Camera Tracking-FreeD】-【新增】
输入端口号和CameraID,与S80 to Axi的一致
(Enter the port number and CameraID, consistent with S80/DS80 to Axi)

1.镜头校准(Lens calibration)
得到摄影机镜头的水平视角,中心偏移,畸变等数据的镜头文件
用Aximmetry的校准软件【Aximmetry Camera Calibrator】,官网购买
(Obtain the lens file of the camera's horizontal angle of view, center offset, distortion, and other data
Use Aximetry's calibration software [Aximetry Camera Calibrator], purchased on the official website)


https://my.aximmetry.com/User/WebShop
镜头校准需要准备一个55X40的校准板,注意校准板需要制作精准
(A 55X40 calibration board needs to be prepared for lens calibration, please note that the calibration board needs to be made accurately)

进入【Aximmetry Camera Calibrator】
新增镜头文件并命名

【视频输入】:选择视频输入源,采集卡
【跟踪设备】:选择创建的Freed协议
然后【校准镜头】
2.设置原点(Set Origin)
将校准板的位置设置为虚拟场景的0,0,0
将Aximmetry标准的校准本平放在机位前1-2米的地上
校准板的字母需要在摄影机侧
(Set the position of the calibration board to 0, 0, 0 in the virtual scene
Place the Aximetry standard calibration book flat on the ground 1-2 meters in front of the stand
The letters on the calibration board need to be on the camera side)

然后点击【开始(Run)】(Then click on [Run])

如有红色提示,是双目摄像头无法识别校准板,摇动相机角度,直到完成
这一个是角度,就是摄影机与校准版的Y轴角度,多机位时使用
(If there is a red prompt, it indicates that the binocular camera cannot recognize the calibration board. Shake the camera angle until it is complete
This one is the angle, which is the Y-axis angle between the camera and the calibration version, used when there are multiple positions)

3.跟踪校准(Tracking calibration)
使用软件计算出跟踪设备到摄影机传感器之间的三个轴(XYZ)距离
跟踪设备可以和摄影机不同朝向,根据实际使用情况朝上或朝下
软件也是可以计算出来的
(Use software to calculate the three axis (XYZ) distance between the tracking device and the camera sensor
Tracking devices can be oriented differently from cameras, facing up or down according to actual usage
Software can also calculate)

这是朝上安装的结果,有大的角度偏移
(This is the result of installing upwards, with a large angle deviation)

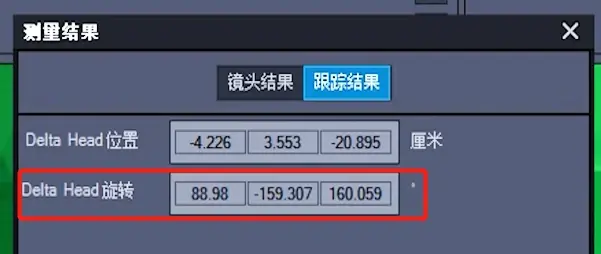
注意:在Aximmetry中加载镜头文件是会加载到跟踪校准的结果,如果加载到,画面是会移动一点或者旋转.
如果没加载到,就需要在输入窗口,原点模块的【Delta Head Tranfs】手动输入
注意!这里是以米为单位,结果填进来需要除以100
如:Delta Head位置,输入:
Note: Loading a lens file in Aximetry will result in tracking and calibration. If loaded, the screen will move or rotate slightly
If it is not loaded, you need to manually input the Delta Head Tranfs in the origin module in the input window
be careful! This is in meters, and the result needs to be divided by 100
For example, Delta Head position, enter:

说明:因为软件的校准也不是很精确的,所以会导致跟踪结果并不完美,建议镜头校准和跟踪校准都做多次,选择平均的
Explanation: Because the calibration of the software is not very accurate, it can lead to imperfect tracking results. It is recommended to perform both lens calibration and tracking calibration multiple times and choose the average one.
四,Aximmetry合成(Aximmetry Composer)
非广播版用户(Non broadcast users):
1.使用OSC连接设备(Connect devices using OSC)
社区版用户需要在【编辑】/【启动】-【设备映射器】-【管理设备】-【OSC Server】
输入和程序相同的地址,端口号,默认是127.0.0.1:8080
(Community version users need to go to [Edit]/[Start] - [Device Mapper] - [Manage Devices] - [OSC Server]
Enter the same address and port number as the program, default to 127.0.0.1:8080)

2.连接节点(Connection nodes)
在Aximmetry新建混合组,拖入提供的TrackCam节点
(Create a new hybrid group in Aximetry and drag it into the provided TrackCam node)

加载UE场景项目,按图所示完成连线
(Load the UE scene project and complete the connection as shown in the figure)

3.加载镜头文件(Load lens file)

输入窗口下,【输入1】-【校准配置文件】选择镜头文件
不要点击修改跟踪设备,否则将会无法选择镜头文件
如果灰色了,按以下操作:
【编辑】-【设备映射器】-【管理设备】-【CameraTracking-AxiBridge】
随便新增一个
(In the input window, select the lens file from [Input 1] - [Calibration Configuration File]
Do not click to modify the tracking device, otherwise you will not be able to select the lens file
If it is gray, proceed as follows:
[Edit] - [Device Mapper] - [Manage Devices] - [CameraTracking AxiBridge]
Add any new one)

【编辑】-【设备映射器】-【CameraTracking】添加AxiBridge,在校准配置文件选择当前摄影机使用的镜头
([Edit] - [Device Mapper] - [CameraTracking] Add AxiBridge and select the lens currently used by the camera in the calibration configuration file)

在输入【窗口】下的【输入1】的【跟踪设备】
选择刚刚新建的Axibridge
(Under the input window, select [Input 1] and select [Tracking Device]
Select the newly created Axibridge)

4.启用DS80/S80跟踪设备,并且调节延迟(Enable DS80/S80 tracking devices and adjust latency)
在输入窗口下,【使用DS80跟踪设备】开关按下
快速摇动相机,调节跟踪延迟,知道画面同步
(In the input window, press the [Use DS80 Tracking Device] switch
Quickly shake the camera, adjust the tracking delay, and know that the screen is synchronized)

广播版用户(Broadcast version users):
1. FreeD连接设备(FreeD connection device)
广播版用户才可以使用。
在【设备映射器】-【管理设备】-【Camera Tracking】-【Freed】添加
端口号和CameraID要与S80toAxi软件相同
参考:三.用FreeD协议连接
(Broadcast version users can only use it.
Add in [Device Mapper] - [Manage Devices] - [Camera Tracking] - [Free]
The port number and CameraID should be the same as the S80toAxi software
Reference: III. Connecting with FreeD Protocol)
2.连接节点(Connecting nodes)
广播版用户不需要用提供的节点
在节点搜索TrackedCam_Unreal,拖入即可
(Broadcast version users do not need to use the provided nodes
Searching for TrackedCam on a node_ Unreal, just drag it in)

3. 加载设备并调节延迟(Load device and adjust delay)
在【输入】窗口下【输入1】
【跟踪设备】选择对应的Freed端口号和CameraID
【跟踪延迟】调节知道画面同步
(In the [Input] window, [Input 1]
[Tracking device]Select the corresponding Free port number and CameraID
[Tracking Delay]Adjust until the screen is synchronized)

如果调节跟踪延迟没有反应,可以在外部增加节点
按照如图所示连接
(If the adjustment of tracking delay does not respond, additional nodes can be added externally
Connect as shown in the figure)

在节点【Collection Transformation】和【Set Collection Transformation】的引脚
Key输入:Cam Transform
然后在节点【Delay Transformation】的引脚Delay调整延迟
(Pins in nodes [Collection Transformation] and [Set Collection Transformation]
Key input: Cam Transform
Then adjust the delay at the pin Delay of the node [Delay Transformation])
五.优化和保存项目下一次快速设置(Optimize and Save Project Next Quick Settings)
1. .设置画面分辨率和帧率,50帧可以让画面更流畅
(Set the screen resolution and frame rate, 50 frames can make the screen smoother)


2.保存项目(Save Project)
【文档】-【保存】/【另存为】

下次工作时:【打开】/【近期的文档】
如果需要换场景,在【流】窗口直接选择场景节点
在【导入来源】输入需要更换的场景
(Next time at work: [Open]/[Recent Documents]
If you need to change the scene, directly select the scene node in the Flow window
Enter the scenario that needs to be replaced in [Import Source])

后续使用连接设备后,不用新镜头不需要再进行【镜头校准】
【设置原点】,然后打开Aximmetry保存好的项目,没有动双目摄像头和相机位置的话,不需要调整【跟踪校准】。
就可以工作了
After connecting the device in the future, there is no need to perform lens calibration without a new lens
【 Set Origin 】, then open the saved project in Aximetry. If there is no need to adjust 【 Tracking Calibration 】 without moving the binocular camera and camera position.
You can start working now
联系Email:312259592@qq.com
