使用python中pytorch库实现cnn对mnist的识别
使用python中pytorch库实现cnn对mnist的识别
1 环境:Anaconda3 64bit https://www.anaconda.com/download/
2 环境:pycharm 社区免费版 https://www.jetbrains.com/pycharm/download/#section=windows 下载安装完需要指定上面anaconda的python解释器为pycharm的python解释器
3 环境:pytorch,https://zhuanlan.zhihu.com/p/26871672 中离线安装方式(下载类似于pytorch-0.1.12-py36_0.1.12cu80.tar.bz2的文件)
4 环境:Conda install torchvision
5 下载数据,直接用代码下载太慢了,用迅雷下载了mnist
6 将数据转换成torch可用的格式
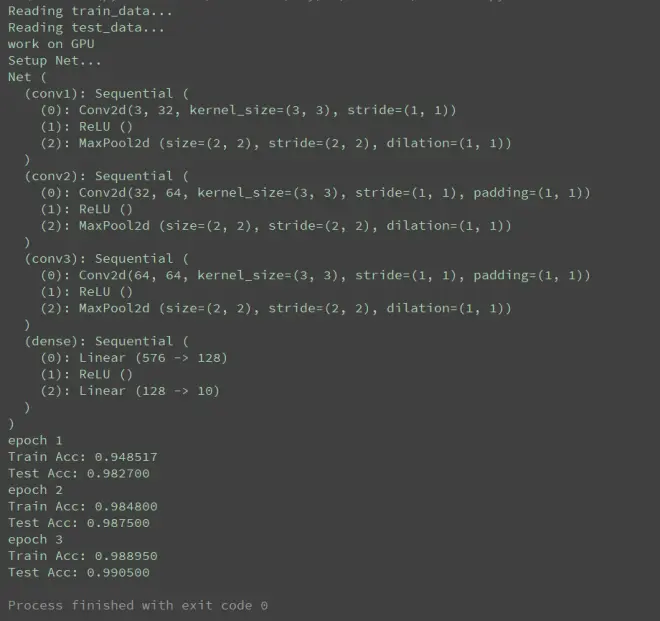
7 训练与测试
data.py
import os
from skimage import io
import torchvision.datasets.mnist as mnist
"""
数据集下载地址
http://yann.lecun.com/exdb/mnist/
手动下载数据集 解压 检查文件名和下面几行代码中的文件名是否一致
然后启动本代码
"""
# 下载的数据所在目录
# F:/!BiliBili/!Py/AI/cnn_bili/mnist_data/train-images-idx3-ubyte
# F:/!BiliBili/!Py/AI/cnn_bili/mnist_data/train-labels-idx1-ubyte
# F:/!BiliBili/!Py/AI/cnn_bili/mnist_data/t10k-images-idx3-ubyte
# F:/!BiliBili/!Py/AI/cnn_bili/mnist_data/t10k-labels-idx1-ubyte
root = "F:/!BiliBili/!Py/AI/cnn_bili/mnist_data/"
# 哪个文件是训练特征(图) 训练标号(是几)
train_set = (
mnist.read_image_file(os.path.join(root, 'train-images-idx3-ubyte')),
mnist.read_label_file(os.path.join(root, 'train-labels-idx1-ubyte'))
)
# 哪个文件是测试特征 测试标号
test_set = (
mnist.read_image_file(os.path.join(root, 't10k-images-idx3-ubyte')),
mnist.read_label_file(os.path.join(root, 't10k-labels-idx1-ubyte'))
)
# 打印出有多少训练数据 多少测试数据
print("training set :", train_set[0].size())
print("test set :", test_set[0].size())
# 从原始数据 到 jpg图片 顺便装到文件夹里面
def convert_to_img(train=True):
if train: # 如果是训练数据
# 注意这里路径的写法,对就是/符号
f = open(root+'train.txt', 'w')
data_path = root+'/train/' # 好像可以删去左边的/
# 如果不存在就新建 F:/!BiliBili/!Py/AI/cnn_bili/mnist_data//train/
if not os.path.exists(data_path):
os.makedirs(data_path)
# enumerate将可遍历对象 组合成索引 可加参数start=2 索引从2开始
for i, (img, label) in enumerate(zip(train_set[0], train_set[1])):
img_path = data_path+str(i)+'.jpg'
# 保存图片
io.imsave(img_path, img.numpy())
# 保存标号文件路径和标号
f.write(img_path+' '+str(label)+'\n')
f.close()
else: # 如果是测试数据
f = open(root + 'test.txt', 'w')
data_path = root + '/test/'
if not os.path.exists(data_path):
os.makedirs(data_path)
for i, (img, label) in enumerate(zip(test_set[0], test_set[1])):
img_path = data_path + str(i) + '.jpg'
io.imsave(img_path, img.numpy())
f.write(img_path + ' ' + str(label) + '\n')
f.close()
print("Building training set...")
convert_to_img(True)
print("Building test set...")
convert_to_img(False)
read_cnn.py
import torch
from torch.autograd import Variable
from torchvision import transforms
from torch.utils.data import Dataset, DataLoader
from PIL import Image
root = "F:/!BiliBili/!Py/AI/cnn_bili/mnist_data/"
# -----------------准备数据--------------------------
def default_loader(path):
return Image.open(path).convert('RGB')
class MyDataset(Dataset):
# txt是路径和文件名
def __init__(self, txt, transform=transforms.ToTensor(), target_transform=None, loader=default_loader):
fh = open(txt, 'r') # 只读打开
imgs = []
for line in fh:
line = line.strip('\n') # 删除 回车
line = line.rstrip() # 删除 右侧 空格
words = line.split() # 分割:就两列,0列是路径 1列是标号
imgs.append((words[0], int(words[1])))
self.imgs = imgs
self.transform = transform
self.target_transform = target_transform
self.loader = loader # 是个函数
# train_loader里面的
def __getitem__(self, index):
fn, label = self.imgs[index] # fn是完整路径 label是标号
img = self.loader(fn) # 调用上面的default_loader(path) 按照路径读取图片
if self.transform is not None:
img = self.transform(img) # 将图片转换成FloatTensor类型
return img, label
def __len__(self):
return len(self.imgs)
# -----------------创建网络并训练------------------------
class Net(torch.nn.Module):
def __init__(self):
super(Net, self).__init__()
self.conv1 = torch.nn.Sequential(
# 3通道进 32出 卷积核大小为3*3 卷积核步长1*1 (其实输入是黑白图)
# (self, in_channels, out_channels, kernel_size, stride=1, padding=0, dilation=1, groups=1, bias=True)
torch.nn.Conv2d(3, 32, kernel_size=(3, 3), stride=(1, 1)),
# 激活函数
# (self, inplace=False)
torch.nn.ReLU(),
# 2*2方形最大值 降(下)采样(池化) 步长2*2 膨胀1*1(不膨胀)
# (self, kernel_size, stride=None, padding=0, dilation=1, return_indices=False, ceil_mode=False)
torch.nn.MaxPool2d(kernel_size=(2, 2), stride=(2, 2), dilation=(1, 1)) # dilation膨胀
)
self.conv2 = torch.nn.Sequential(
torch.nn.Conv2d(32, 64, 3, 1, 1),
torch.nn.ReLU(),
torch.nn.MaxPool2d(2)
)
self.conv3 = torch.nn.Sequential(
torch.nn.Conv2d(64, 64, 3, 1, 1),
torch.nn.ReLU(),
torch.nn.MaxPool2d(2)
)
self.dense = torch.nn.Sequential(
# 线性分类器 64*3*3的输入 128的输出
torch.nn.Linear(64 * 3 * 3, 128),
torch.nn.ReLU(),
# 线性分类器 128的输入 10的输出
torch.nn.Linear(128, 10)
)
# 前向计算 输入x
def forward(self, x):
# 第一层的输出是x经过conv1的结果
conv1_out = self.conv1(x)
# 第二层的输出是 第一层的输出经过conv2的结果
conv2_out = self.conv2(conv1_out)
# 第三层的输出是 第二层的输出经过conv3的结果
conv3_out = self.conv3(conv2_out)
res = conv3_out.view(conv3_out.size(0), -1)
return self.dense(res) # dense稠密
def read_cnn():
print("Reading train_data...")
train_data = MyDataset(txt=root + 'train.txt', transform=transforms.ToTensor())
# from torch.utils.data import Dataset, DataLoader 下面的函数在这里
train_loader = DataLoader(dataset=train_data, batch_size=50, shuffle=True)
print("Reading test_data...")
test_data = MyDataset(txt=root + 'test.txt', transform=transforms.ToTensor())
test_loader = DataLoader(dataset=test_data, batch_size=50)
# GPU or CPU
if torch.cuda.is_available():
is_cuda = True
print("work on GPU")
else:
is_cuda = False
print("work on CPU")
print("Setup Net...")
# =============================cuda()=======================
if is_cuda:
model = Net().cuda()
else:
model = Net()
# 打印网络结构
print(model)
# Adam 一种随机优化方法
optimizer = torch.optim.Adam(model.parameters())
# 一种优化多类分类不平衡训练集的方法
loss_func = torch.nn.CrossEntropyLoss()
for epoch in range(3): # 训练几次停止
print('epoch {}'.format(epoch + 1))
# 训练-----------------------------
train_loss = 0.
train_acc = 0.
for batch_x, batch_y in train_loader: # 特征 标号
# =============================cuda()=======================
if is_cuda:
batch_x, batch_y = Variable(batch_x).cuda(), Variable(batch_y).cuda()
else:
batch_x, batch_y = Variable(batch_x), Variable(batch_y)
out = model(batch_x) # batch_x通过网络的结果是out
loss = loss_func(out, batch_y) # 网络结果out和实际batch_y对比的得到损失
train_loss += loss.data[0] # 累加训练损失
# =============================cuda()=======================
if is_cuda:
pred = torch.max(out, 1)[1].cuda() # 取 out和1 的最大值?
else:
pred = torch.max(out, 1)[1] # 取 out和1 的最大值?
train_correct = (pred == batch_y).sum() # 多少个对的
train_acc += train_correct.data[0] # 累加训练正确的数量?
optimizer.zero_grad() # 清除所有优化的grad
loss.backward() # 误差反向传递
optimizer.step() # 单次优化
# 数据量大的时候小数点后6位可能不够
# print('Train Loss: {:.6f}, Acc: {:.6f}'.format(train_loss / (len(train_data)), train_acc / (len(train_data))))
print('Train Acc: {:.6f}'.format(train_acc / (len(train_data))))
# 测试评估--------------------------------
model.eval() # 将网络设置到测试评估模式,会影响网络的Dropout和BatchNorm
eval_loss = 0.
eval_acc = 0.
for batch_x, batch_y in test_loader: # 特征 标号
# =============================cuda()=======================
if is_cuda:
batch_x, batch_y = Variable(batch_x, volatile=True).cuda(), Variable(batch_y, volatile=True).cuda()
else:
batch_x, batch_y = Variable(batch_x, volatile=True), Variable(batch_y, volatile=True)
out = model(batch_x)
loss = loss_func(out, batch_y)
eval_loss += loss.data[0]
# =============================cuda()=======================
if is_cuda:
pred = torch.max(out, 1)[1].cuda()
else:
pred = torch.max(out, 1)[1]
num_correct = (pred == batch_y).sum()
eval_acc += num_correct.data[0]
# print('Test Loss: {:.6f}, Acc: {:.6f}'.format(eval_loss / (len(test_data)), eval_acc / (len(test_data))))
print('Test Acc: {:.6f}'.format(eval_acc / (len(test_data))))
if __name__ == '__main__':
read_cnn()
本文说实话不适合小白来读,应该是了解了相关知识的人才能够从中获得一些帮助吧