
纪录本地安装AI绘画工具 Stable Diffusion过程
AI 绘画热闹很长一段时间了,昨天我在本地游戏本第二次安装 AI 绘画工具。上次安装已是去年8月,距今快一年时间。为什么昨天又来搞一下 AI 绘画呢?因为上次 AI 出的图总让人眼前一黑,这次也是看了又看,确认现在的版本确实比一年前有进步,刚好这周莫名其妙的手足口了,脚底起泡,喉咙疼,不便行走和言语,闲下来。
安装后一口气画了200多张图,画了卡通场景、真人、动漫人物,试验下来结果也确实不错,比农药还上瘾,画起来停不下来。边等图边下模型,挑出感觉好的图分享给亲友,引得家人围着电脑屏幕看 AI 画出来的图,打趣着要娶某张漂亮女孩给小儿子。感慨技术进步也感慨岁月易逝,曾几何时也曾活跃在技术前沿的,离开一线岗位几日,已恍如隔行。
如下记录为具体安装过程,无需外网和网盘,用的都是国内镜像加速源整体耗时不算太久,好处是安全可控可更新,坏处是没有一键整合包方便。整体步骤已在新建 WSL2 Debian 环境逐步复现,确保当下操作无坑,也是边复现边完善文档,供参考。
一、创建Debian环境
第一步就从创建WSL2环境开始吧
这段可以参考 安装WSL2和Debian的步骤 - 知乎 (zhihu.com)
wsl --set-default-version 2
wsl --install -d Debian
命令结束后会弹出一个框,设置登录用户名和密码,我这里设置用户名为 ai

例行换源,这里比较扯蛋,需要先使用默认源更新证书,耗时约3分钟,比上一步装系统都久。这段可以直接参考一篇知乎文章 [zhuanlan.zhihu.com/p/621428215]
sudo apt update && sudo apt install --reinstall ca-certificates
更新后,直接从文件资源管理器找到 \\wsl.localhost\Debian\etc\apt
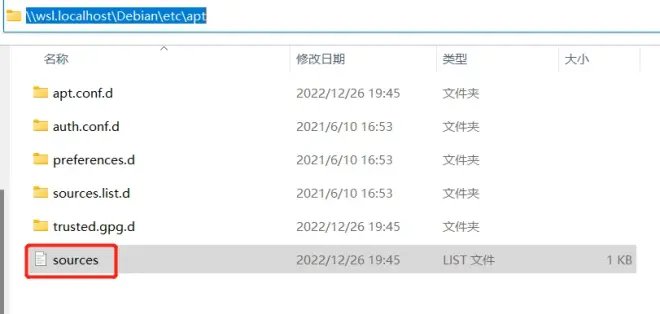
编辑换国内源
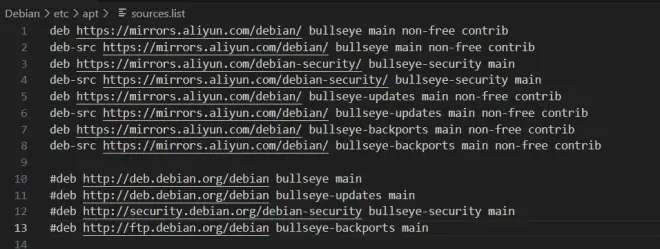
deb https://mirrors.aliyun.com/debian/ bullseye main non-free contrib
deb-src https://mirrors.aliyun.com/debian/ bullseye main non-free contrib
deb https://mirrors.aliyun.com/debian-security/ bullseye-security main
deb-src https://mirrors.aliyun.com/debian-security/ bullseye-security main
deb https://mirrors.aliyun.com/debian/ bullseye-updates main non-free contrib
deb-src https://mirrors.aliyun.com/debian/ bullseye-updates main non-free contrib
deb https://mirrors.aliyun.com/debian/ bullseye-backports main non-free contrib
deb-src https://mirrors.aliyun.com/debian/ bullseye-backports main non-free contrib
第二步是创建python环境
换好源后安装Anaconda3
sudo apt update &&sudo apt install wget git
切换回 home目录下载安装Anaconda3
cd ~ && wget https://mirrors.aliyun.com/anaconda/archive/Anaconda3-2023.03-1-Linux-x86_64.sh
chmod +x Anaconda3-2023.03-1-Linux-x86_64.sh
./Anaconda3-2023.03-1-Linux-x86_64.sh
写入配置文件
source ~/.bashrc
touch .condarc
换镜像 参考 https://developer.aliyun.com/mirror/anaconda
channels:
- defaults
show_channel_urls: true
default_channels:
- http://mirrors.aliyun.com/anaconda/pkgs/main
- http://mirrors.aliyun.com/anaconda/pkgs/r
- http://mirrors.aliyun.com/anaconda/pkgs/msys2
custom_channels:
conda-forge: http://mirrors.aliyun.com/anaconda/cloud
msys2: http://mirrors.aliyun.com/anaconda/cloud
bioconda: http://mirrors.aliyun.com/anaconda/cloud
menpo: http://mirrors.aliyun.com/anaconda/cloud
pytorch: http://mirrors.aliyun.com/anaconda/cloud
simpleitk: http://mirrors.aliyun.com/anaconda/cloud
修改pip源
mkdir ~/.pip
把镜像地址写入到pip配置文件
vi pip.conf
[global]
index-url = https://mirrors.aliyun.com/pypi/simple/
[install]
trusted-host=mirrors.aliyun.com
第三步是安装 SD webui
项目 git 地址为 https://github.com/AUTOMATIC1111/stable-diffusion-webui
直接下载可能下载不了,套个 proxy 前缀再试 https://ghproxy.com/
完整命令为:
git clone https://ghproxy.com/https://github.com/AUTOMATIC1111/stable-diffusion-webui

创建虚拟环境
conda create -n sd_webui_230628 python=3.11 anaconda
conda activate sd_webui_230628
安装依赖
pip 前加 python -m 是为了把依赖装到当前的 conda 环境里
python -m pip install --use-pep517 -r requirements.txt -i https:
//mirrors.aliyun.com/pypi/simple/
安装opencv所需依赖
sudo apt-get install ffmpeg libsm6 libxext6 -y
启动webui
这个过程是最后一步,速度快慢主要取决于网速和加速镜像稳定性
./webui.sh
这个中间因为要下载太多东西,偶尔会超时,不要紧,再执行一遍 ./webui.sh 会继续安装
如果遇到类似重复几次还是下载不了的情况,也不要慌,找到具体的包名和版本,手动安装一下
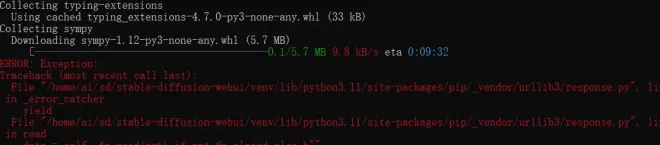
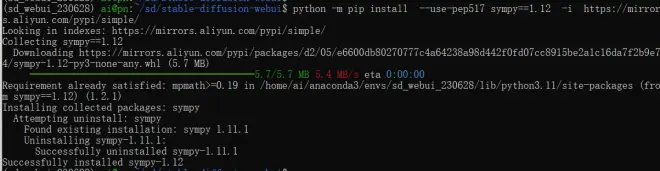
python -m pip install --use-pep517 sympy==1.12 -i https://mirror
s.aliyun.com/pypi/simple/
往下会卡在安装gfpgan这个位置,还是不要慌,手动安装一下

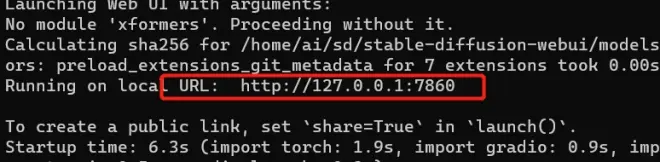
当出现这个地址时,说明已经安装成功了
下载模型
https://civitai.com/
如果打不开的话国内有个平替也很不错
liblibai.com
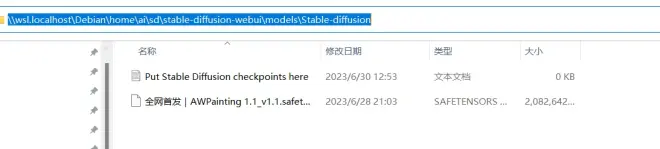
把下载好的模型放入
\\wsl.localhost\Debian\home\ai\sd\stable-diffusion-webui\models\Stable-diffusion
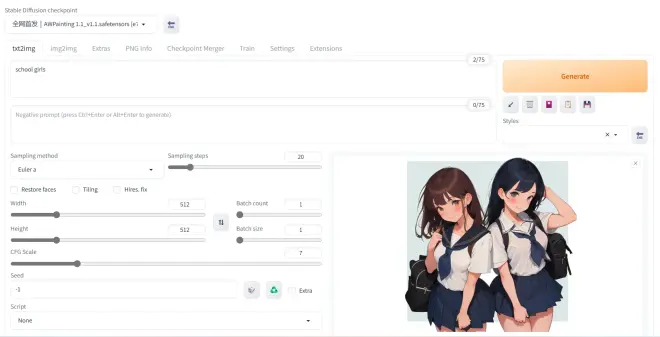
画图
在左上角选择模型,输入关键词,比如我这里输入了 school girls,等待10秒,生成的图片效果如下所示。

到此为止,以上内容是在本地 ubuntu22 子系统完成安装后,新建 debian 子系统一步步复现记录步骤,确保可行。乐趣无穷。
