
Jama Jurabaev 52-55
6. 3D in Photoshop---1-1.Lesson Overview
P52 - 00:00
Hello, everybody, and welcome to lesson number six. So this lesson is called 3D in photoshop.
P52 - 00:07课程六讲述PS里的3D。
So I will be showing you a wide range of different tools in 3D that we have in photoshop. And I will try to explain you how to use every one of those tools to make those short cuts and to help to make 3D help us in creating those stories and designs.
P52 - 00:24如何用不同3D设计故事场景。
So I'm pretty excited. And let's get started.

6. 3D in Photoshop---1-2.Basic Navigation
P53 - 00:00
in order to be able to use 3D in photoshop, you need to have photoshop CS six or above,
P53 - 00:13版本CS6以上。
So the best choice would be cc 2014.
P53 - 00:18最好版本是CC 2014。
But if you have lower versions, like I think even in CS 6, you can still do some 3D.
P53 - 00:24低版本CS6依旧可以做3D。
So my version is actually CC 2015. It's the latest one. And I hope you guys can upgrade your versions.
P53 - 00:32本课程用CC2015版本。
And because the latest version is this thought that maybe you can get the most out of photo shop 3D. So before we start, I actually I want to explain something very quick, but very important, which I keep saying throughout this course, but it's always good to repeat it.
P53 - 00:51重点的重复贯穿整个课程。
many people ask me why 3D in photoshop. I mean we have so many amazing tools like really cold three aspects the Zbrush model. why not them why photoshop?
P53 - 01:01为什么不用建模软件用PS?
And I keep saying because photoshop 3D it's very simple. It's the main reason why I'm using 3D in photoshop.
P53 - 01:11首要理由是简单。
And the second reason is because photoshop is a great an amazing 2D tool. And when you add some 3D aspects of it, it just much more powerful than when you use 3D. And you go back 2D. And you can manipulate inside photoshop and readjust your story basically have a bit more control over everything because you're staying inside this powerful 2D package, which is for the photoshop is.
P53 - 01:42平面2D立体3D在PS内转化。
That's why we are using 3D in photoshop. And because it's very simple, it's very primitive. It's not as advanced as others.
P53 - 01:49简单原始并不如其它功能多。
All you concentrate on its own design aspect of it, not the technical base.
P53 - 01:56专注设计而不是技术层面。
I hope that make sense guys. And let's just start doing something. So in order to start doing 3D in photoshop, you need this panel.

P53 - 02:06做3D需要这面板。
So you can access it from here as well. But this is like more visual representation.
P53 - 02:11这是视觉化的呈现。
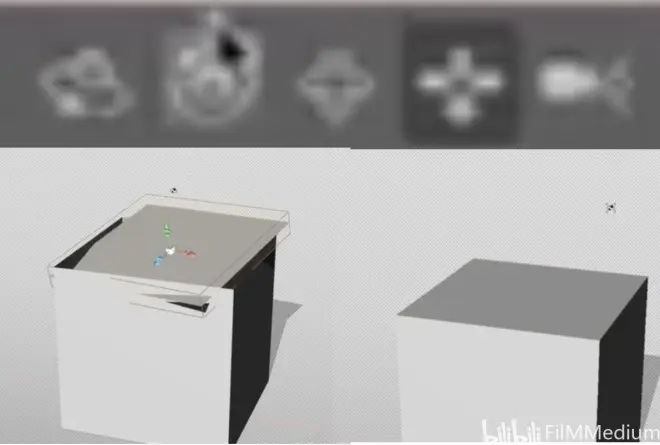
And basically, you can see there are five different ways of creating something in photoshop.
P53 - 02:185种在PS内构建的方式。
So we will start with a simple one. and create a mesh form, let's say we want to create a cylinder,
P53 - 02:31比如我们创建一个圆柱体。
Or like let's pick something more complicated. What do we have here? Now let's start with cube.
P53 - 02:40从立方体开始。
So when we press create. it is going to create this 3D space for us.
P53 - 02:50按创建按钮,创建出这3D空间。
So using this 3D space, I will show you quickly the navigation tools and stuff like that.
P53 - 02:55展示调度工具。
So this is our navigation bar, This is how we rotate around. This is how we move around. This is how we change our views and stuff like that.
P53 - 03:06旋转 移动 转化视角。
Unfortunately, it's not as advances added software. So every time you need to click, there is no way out of shape combination to click and zoom and pan.
P53 - 03:17单一的点击操作。
So you need to do it by by hand. But that's not the big deal, because we are not going to create that crazy scenes with thousands and thousands of different objects. We will have very simple stuff.
P53 - 03:30因为我们创建的简单并不复杂。
So all these us, this is panning, this is orbiting. this is painting. This is zoom, and this is orbiting around.
P53 - 03:43绘制 旋转 进退。
A different axis. very straightforward. Make sure that if you want to rotate around your object, make sure your object is not selected.
P53 - 03:52不选择对象,才可以移动。
Because if you select your object, then you rotate the selected a face or object. you're not rotating the environment.
P53 - 04:01选中一面旋转一面而不是整体。
So make sure that when you're rotating, you're not having anything selected.
P53 - 04:06确保旋转的时候,没有选择任何。
this is camera control. Basically it changes your camera lens.
P53 - 04:13改变摄像镜头的。
So we know from us 3D camera lens impacts and changes you the way you see things dramatically. So we will explore the camera setting later on. But this is how you control the camera lens.
P53 - 04:29这是改变摄像角度镜头的方式。
So very straightforward. So let's go from here to this panel. So once you create the geometry, it will give you as five different aspects.
P53 - 04:43这面板给到5个方面。
But basically its environment, you're seeing your camera control the geometry control in a new light control.
P53 - 04:48相机 构造 光的控制。
So let's start with a light control actually because it's a very important tool as well. So when you click on your light, you will have this universal control.
P53 - 04:58点亮灯光就是最常见的控制方式。
You can drag it by this handle, or you can press over here.

P53 - 05:03可以左右滑动改变光源方向。
So basically, this shows you the light direction. And this is showing you where it is facing. So to create different light situations, you can rotate this around and get a very decent results.
P53 - 05:15就这样旋转找到适合的效果。
Very straightforward. Nothing very complicated. But if you double click on this guy, it will bring you property.
P53 - 05:25双击面板打开属性对话框。
So just in general, double clicking always brings a property of the current selection.
P53 - 05:30双击都会出现当下选项对话框。
So if you're looking at the light settings. We've got a bunch of different settings, like we can change the color of the light, which is very cool.
P53 - 05:40可以选择改变灯光颜色。
All we can change the intensity of it as well. So sometimes when you dim lights, and sometimes we need a strong light.
P53 - 05:49比如灯光明暗点调节。
So it's always something you can change over here. And another vertical aspect is softness.
P53 - 05:56另一个垂直方面是柔软度。
So if your light is soft, if it's like not point like, but it's like soft box.
P53 - 06:04如果柔化盒子而不是点。
It can be easily change it. And you can see how soft the light is at the moment.
P53 - 06:09可以旋转看到立方体很柔。
And obviously make sure that the difference that stuff you see something changes once you start randomly. Like if I press render this is a render tool.
P53 - 06:19这是渲染工具。
As you see, it refines all the shadows. And you need to wait for a while to get a proper result.
P53 - 06:27比如调节阴影可以得到好结果。
when you press escape, it just stops rendering.
P53 - 06:33按ESC键可以停止渲染。
And you can go back to your real time preview.
P53 - 06:36可以回到实时预览。
Let's quickly do. I put some kind of background because we're seeing like a transparent grade.
P53 - 06:48加入白色背景。避免透明化。
let's do it like a white background. so the next thing would be the scene, we have different scene options. I rarely change any of those. But you can experiment with those that you can change the appearance of your scene change to normal map like literally create a lot of different passes that you might need to render this stuff afterwards.
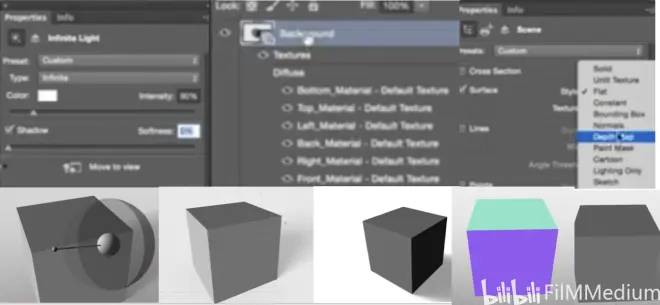
P53 - 07:24调整场景中外表选项,以备渲染。
But I rarely touch this. And there are some options for 3D printing. To be honest. This is something i've never never touch.
P53 - 07:31比如3D打印我没尝试过。
So we will escape that one for now. And we will go straight to environment.
P53 - 07:39直接进入环境。
So this is your environment. And I will show it separate lesson on the environment. But overall you can change it.
P53 - 07:45可以改变环境。
Instead of having just point light, you can change your the age environment that you have here. This is I b l. It stands for image based lighting. So whenever you plug in some a spectrum environment, that will change it accordingly.
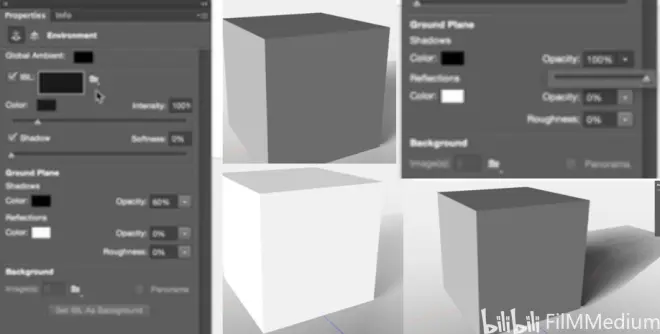
P53 - 08:04比如BIL选项变环境随之变。
and also like it's a global value of your environment and stuff like that. So a lot of different controls.
P53 - 08:12比如影响局部还是全局,可调节。
And I will be showing you all that stuff. Like for example, you can control the past if you shadow on the ground and stuff like that.
P53 - 08:17比如还控制地上阴影。
It's very, very cool. let's go just go back to lighting. There are a couple of things that I need to explain here as well.
P53 - 08:27直接回到照明几个知识点。
so let's just drop the softness or we have a crease pretty nice retraced lighting.
P53 - 08:32柔滑 追踪光线。
There are three types of light infinite light. It's basically delight with. It's like a sun.
P53 - 08:38无限是太阳光源。
Consider it as the sun, because sun soul is far away.
P53 - 08:44太阳是远远的照射。
So every rays coming parallel to each other,
P53 - 08:47太阳光束是平行的。
which is perfect representation of the sun. Another one is a point light and basic point light.
P53 - 08:53另一个是点光源。
it’s like lamp on the street,
P53 - 08:59像是街灯一样。
It's just the source that emits the light everywhere. That's why everything radiates from that point on.
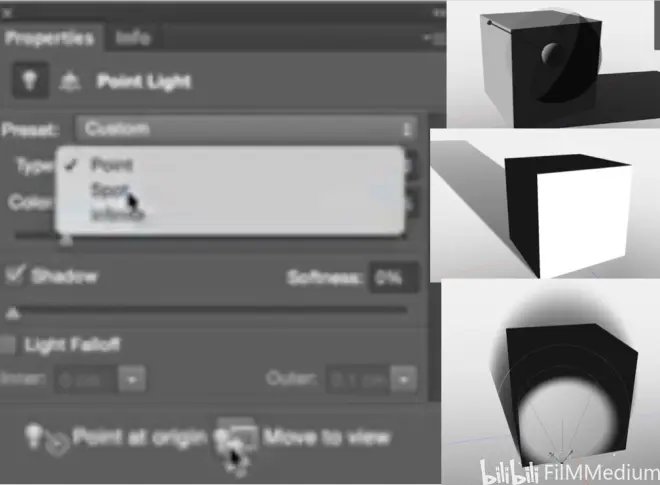
P53 - 09:10所有光束源自于那点光源。
For example, if you want to create street lamp, we definitely use point light. the other one would be spotlighted. And it's basically spotlight. Like a flashlight.
P53 - 09:23聚光灯如同手电筒光。
You can rotate and you can see the spotlight over there. But there is a very handy thing about spotlight. You see this guy over here which says move to you. It basically will move the spotlight where you're looking from,
P53 - 09:38从你观察的视角移动手电筒光源。
which is very handy because sometimes to find a way to move the spotlight around is very difficult. So just by selecting your tool and moving into view, give you more precise control.
P53 - 09:55移动到视角给精确的调控。
Now let's go to cube controls.
P53 - 09:59开始探讨立方体控制。
So your geometry control is very straightforward,
P53 - 10:04几何体的控制非常直白。
They did a very nice job. It’s like trying to find those really small manipulators. You can drag it from the side, you can rotate it,
P53 - 10:14可以拖拽一边和旋转。
you can do all that interesting stuff. And basically it's duplicated over here. So for example, if you wanna recite it like, let's say you wanna do like a plane.
P53 - 10:27立方体变成扁平盘子。
He does things like this. You see it. That's your cube control.
P53 - 10:34这就是立方体控制。
So basically, it's very universal. If you ever use 3D software, you know approximately what you're doing.
P53 - 10:42类似3D建模软件通用操作。
and This is pretty much it about like general 3D photoshop like manipulate we have camera controls. We have different tool options and stuff like that.
P53 - 10:55相机控制不同选项。
I will stop here. And in the next lesson, I will explain you how to deal with textures in photoshop.
P53 - 11:02下节课讲述纹理。
6. 3D in Photoshop---1-3.Texture
P54 - 00:00
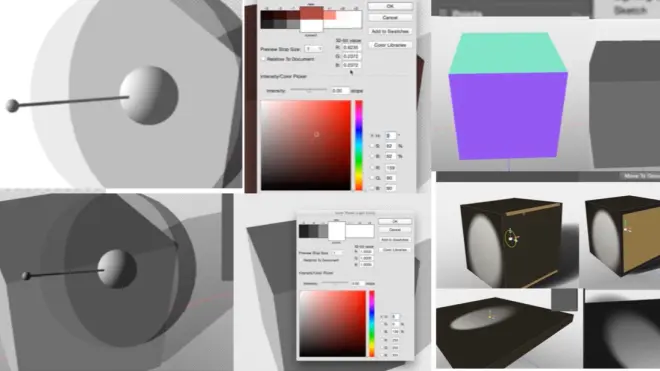
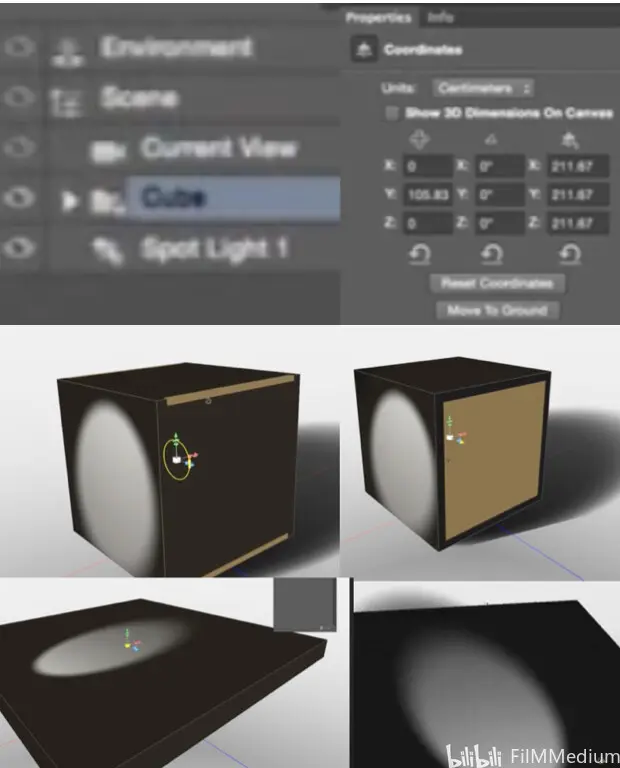
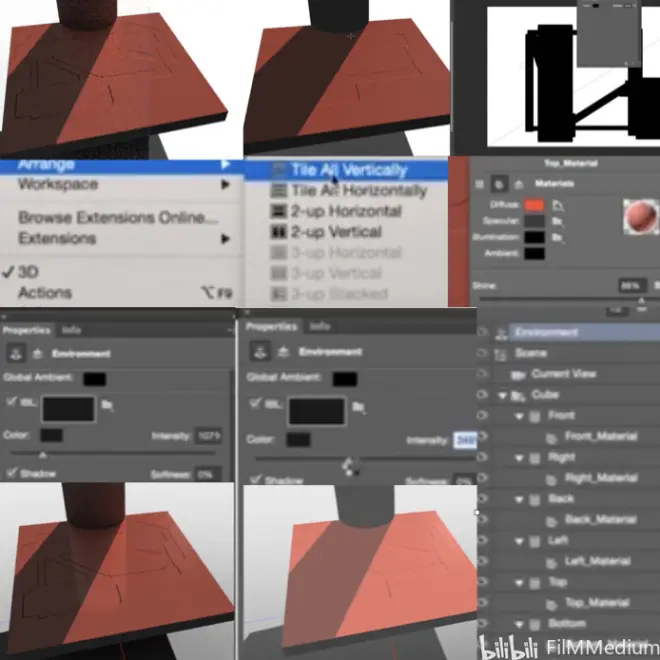
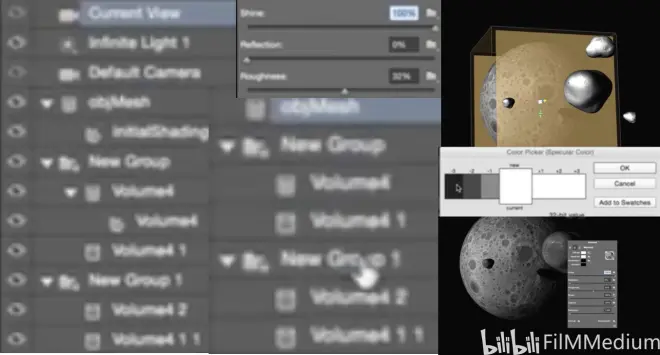
So let me quickly explain you a quick texture setup inside photoshop. So when you have your object selected.
P54 - 00:11当客体被选中的时候。
And as you can see, like this object consists of like 6 different parts.
P54 - 00:17比如这包含六块项目。
that's why, for example, I will just change the top polygon.
P54 - 00:24改变表面的多边形。
And as you consider as Top material, you can either double click on this one, and it will bring you the menu.
P54 - 00:30涉及到表面物质,双击弹对话框。
Or you see when you're right click above something. It will give you an options of this object.
P54 - 00:40客体上右键调出选项。
So I will click over here and it will bring me material menu.
P54 - 00:45点击右键弹出物质菜单。
So basically, this material is quite advanced. And you can do anything you want with it.
P54 - 00:51这物质选项菜单高级选项多。
But let's start from a simple and so diffuse map is the one that controls what color this object has.
P54 - 00:59漫射地图是可以控制颜色的。
For example, let's make a red object.
P54 - 01:04比如做一个红色的物体。
So this this is a red object. And because everything is dark, you are only seeing it where the light hits.
P54 - 01:13被光打到的地方才是红色。
So probably it's smart. It would be smart to change the light. So let's double click. And instead of having spotlight will have infinite light right.
P54 - 01:22手电筒光源改成太阳光。
For something like this, So we have a red surface. Which is lead by this infinite light over there.
P54 - 01:37红色表面源自于太阳光。
So it's not like this. So if you move things around, it will become brighter, or it will become darker.
P54 - 01:42移动光源可以变暗或者变亮。
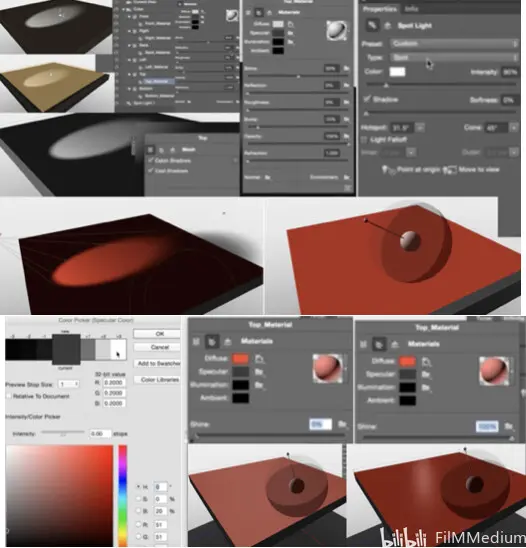
So let's go on and see what speckled us. Actually specular is the control that defines how reflective your object and the brighter this colour, the more reflective it is. The most specular it have.
P54 - 02:06镜面反射越强,颜色越亮。
this shine is basically almost the same thing. For example, if I make it very shiny object ends like I need to see the light. So for example, if there is a light reflection, and you will see how we go more matte surface. And this is more shinny.
P54 - 02:37找到反射光,越接近表面越反射。
So very cool. For example, if you're doing the ground, it's obviously not a shiny surface. It's more matte surface. But if you're doing like a metabolic, like side panel. It will obviously be a little bit more shinner.
P54 - 02:54地面不如太阳面板亮。
And let's see what reflection does. reflection basically, it shows you how much reflection you will have. And this is something that is not previewed in real time. So in order to be able to see if you need to press render. So once you start rendering, if there was something around, it would be definitely reflected.
P54 - 03:18反射 渲染 周边有物体 见效。
So let's to to show it. let's create another object. So over here you can bring different things like you can keep, let's say, at cylinder, Okay, now we have cylinder.
P54 - 03:37比如我现在创建立柱体。
So this scene now has two objects, cube and cylinder. So this is our cylinder. Let's just make it bigger.
P54 - 03:48一个立方体一个圆柱体组合。
Drag it over here. And now I think if I press render, which is this button over here or this one, it doesn't matter. they be replicated. I am seeing my reflection.
P54 - 04:05按渲染,立方体看到立柱的反射。
And as you can see already like photoshop actually has a very decent rendering system.
P54 - 04:14PS有个渲染系统。
It does have global illumination. And it just basically shows you not very photo real, but quite a good base.
P54 - 04:24全局照明 非照片质感。
If you want to paint over it, it will give you a very nice base. So I just keep skip over here and we'll just carry on with textures. So reflection. Is something like this. That's basically roughly shows how rough your object is. And the more your roughness is, the blur your reflection becomes.
P54 - 04:47越是粗糙,反射越模糊。
So let's just increase the roughness and press render again.
P54 - 04:51增加粗糙度后再渲染。
And like you can see, your surface is much more rougher right now. So for example, if I go and increased roughness even more.
P54 - 05:01比如再增加粗糙度。
And then I start rendering barely see it. Because reflection is being distorted because this service is much more rough.
P54 - 05:13粗糙到反射扭曲了。
Bump map will give you control over the bump of this like you don't need to paint all the model everything. That's in the next lesson. You will see how powerful bump mapping is.
P54 - 05:35下节课展示凹凸图。
But overall what bump does, for example, if I increase my bump and I create new texture. So it will open me this bump texture. And in this pump texture, basically what I can do. I can start painting for something. Let's say I'm doing some syphon panel,
P54 - 05:59比如绘制虹吸面板。
Press CTRL safe. And I see this design over here.
P54 - 06:21看到我绘制的就在平面上。
It is very powerful. Because imagine if I had those side by side, So if I would open bump map and go and kaskade my pile my stuff. So I will be painting over here. And as you can see, it was almost like in real time, it shows me how my bump is gonna look like.
P54 - 06:55像是实时观察绘制凹凸贴图如何。
So actually it's almost like sculpting on this surface.
P54 - 06:59像是在表面雕刻一样。
You could see it changes over here very powerful. I will show you much more appropriate examples. But for now, just so you know that this is the way this is what pump controls.
P54 - 07:15这就是凹凸贴图控制。
So when you hit the render afterwards. But it will have a very nice bump. Very nice reflection.
P54 - 07:25凹凸贴图就有反射质感。
let's go on, change your roughness a little bit, like decreased the amount of roughness we have.
P54 - 07:30改变粗糙程度。
hit the render. And now we're starting getting very nice render. one thing that you might notice that the environment is pretty dark.
P54 - 07:52会发现环境很暗。这是控制面板。
And this is which is controlled by this guy over here. So if you make it brighter, it will make it brighter and stuff like that.
P54 - 07:58调节让面板变亮一点。
we're done with bump. And now let's move on to the next one, which is a opacity.
P54 - 08:08接下来不透明度。
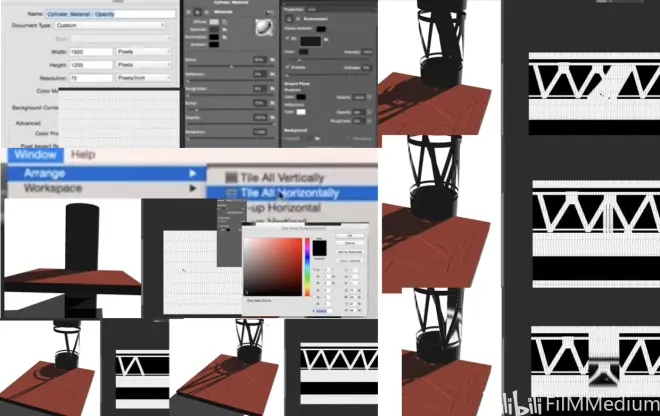
That's another very, very powerful thing. But instead of doing it on this sphere, let's do it on this song. And so we will select the material and go to a past tense, a new texture to create a new texture like this.
P54 - 08:25创建一个新纹理。
And then we will go tile all those vertical as well. So if you had a second monitor, it will be even easier for you.
P54 - 08:36窗口 管理 并排放或第二窗口。
But since we don't have a second monitor, I will just do this. And now, I will paint on this guy over here.
P54 - 08:49现在给材质上色。
So when I paint black. It will basically delete that like making opacity map at back for that place. You see. It is very, very powerful because you can start designing your stuff. It's like sculpting.
P54 - 09:19有点类似雕刻。
But inside photo shop. And we would say like, there is no thickness for it. It doesn't matter.
P54 - 09:27可能感觉雕刻无厚度。没关系。
You can paint thickness afterwards, like you can go and afterwards because he is still a photoshop.
P54 - 09:32稍后再加入厚度。
I will give you a good base. And then you're basically paint the thickness,
P54 - 09:36先画好线条,再增加厚度。
Instead of trying to do this guy from scratch or trying to model him,
P54 - 09:44不用草图建模的方式。
it’s much more difficult to because here you have full control of what you're doing.
P54 - 09:53这可控性强。
You can select any brushes you want. let's say you've got specific likes, I find syphon,
P54 - 10:06更换刷子,改变纹理。
and you want to deal with them. Well, let's say we know this smudge is very powerful design tool. So you use smudge tool. let's say we go to 99. And now with the smudge tool, we will get some different really cool looking designs.
P54 - 10:21模糊力度改为90不错的设计。
And as you do it, like you can steal it just yet. Adjust your camera angles and look at the shadow.
P54 - 10:38不影响换镜头视角观看阴影。
that there is this whiteness over here. But don't get confused by it. Because when we actually render all of those stuff. it will disappear.
P54 - 10:53渲染的时候,中镂空白色会消失。
And you see you've got a very nice geometry. Imagine if you're doing like a syphon environment differently, like columns or something like capsules or stuff like.
P54 - 10:59比如做石柱或胶囊小盒子。
that doing this is very easy. Let's just bring it back. And i'll show you how we can actually combine those together.
P54 - 11:12展示如何结合起来。
for example. Let's do something like this.so you can still give a little bit of thickness to this guy.
P54 - 11:44举例子做厚度。
How old would you like instead of having only opacity will also have a bump map.
P54 - 11:51不透明度和凹凸贴图同在。
But what we will do will copy this and passed it into a bump map. Like this. Pass that bumped map. Boom! Now there is a little bit of bump over here. Look at the edges. So it keeps it a little bit of thickness. It's not exactly that what you would have in 3D, but still it's a very cheap way of getting to have some bump.
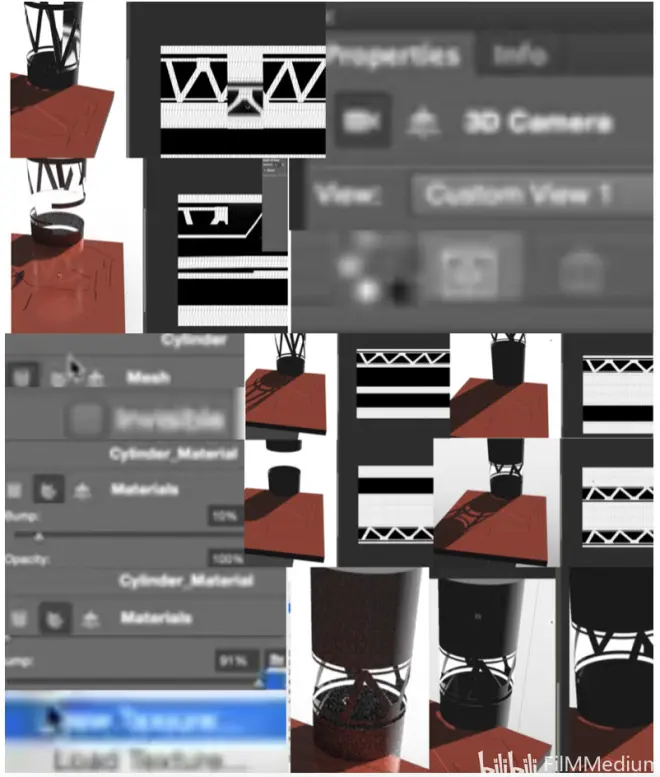
P54 - 12:30凹凸贴图做出厚度边缘。
And you can see it over there. Leave it for a few minutes and we'll give you a very nice good base.
P54 - 12:45渲染一会看到很好的基础了。
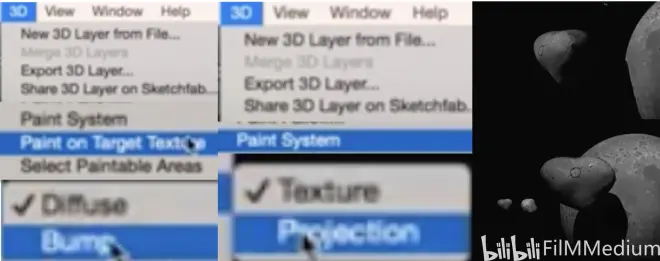
I will post it here. So now i'll show you a different way of doing things instead of having them side by side, which is sometimes not very intuitive way of working, even though it's still much more intuitive than what you would have real 3D. But also there is a much better way of doing it. If you go over here and say paint system and no paint at architecture or and we know we want to design a opacity. So you create this one.
P54 - 13:30绘制系统做的不透明度。
And basically what it does when you paint on your object, it will actually create a different opacity map. So you can design your object from a 3D view. How cool is that?
P54 - 13:38凹凸和镂空的从3维开始训练。
And you have all the control you can imagine. Like you have shift to make straight lines. I just Complete this guy over here.
P54 - 14:19有做直线条的选项。
And obviously, you can make a selection and fill it with color,
P54 - 14:47还可以选择镂空的,填充颜色。
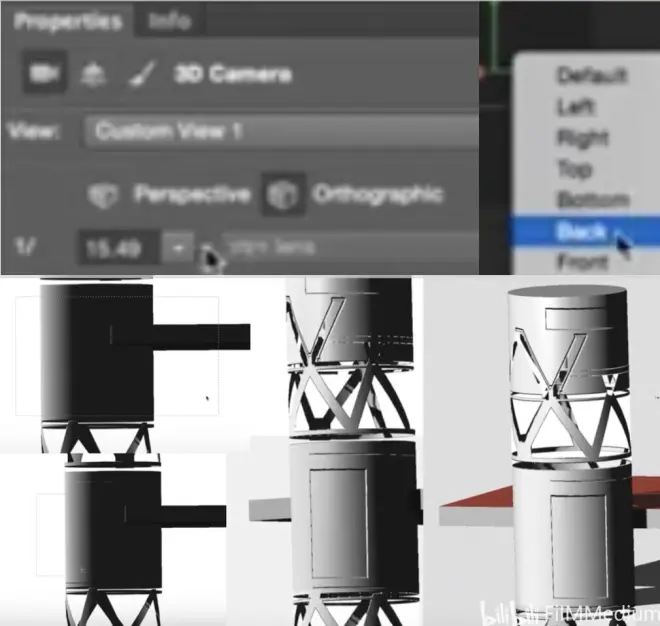
So it's guys. It's so priceless. It's very cool. if you want to make your selections, make sure that you change the orthographic views, so you don't get distortions.
P54 - 15:02改变直角视角不会出现歪曲。
So then you can go and select. For example, imagine if this was a side column that will we are trying to design.
P54 - 15:15假设这是你去设计的侧面立柱。
So you just adjust this views, use selection like this.
P54 - 15:44一半镂空一半不镂空用选择工具。
And now let's go back to perspective view.
P54 - 15:51回到视觉视角。
The other thing you can still do. Like, Just ctrl this change. That was happening when we were painting on the opacity. But imagine if we are, you can also clone those. Like you see, the bump map is not aligning with the opacity I just painted.
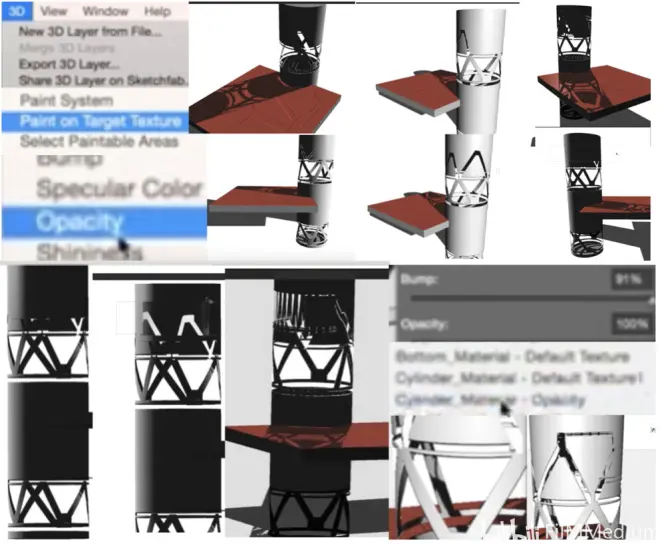
P54 - 16:22贴图和不透明度不配合,用克隆。
I think you can just like click over here and tile cylinder material opacity.
P54 - 16:28用立柱体 不透明度 物质。
and now when you paint on a passage, it will also create a bump map as well, which is very handy because it's like almost sculpting.
P54 - 16:38雕刻出凹凸贴图。
We want to change the bump map, So we will go and paint architecture bump map,
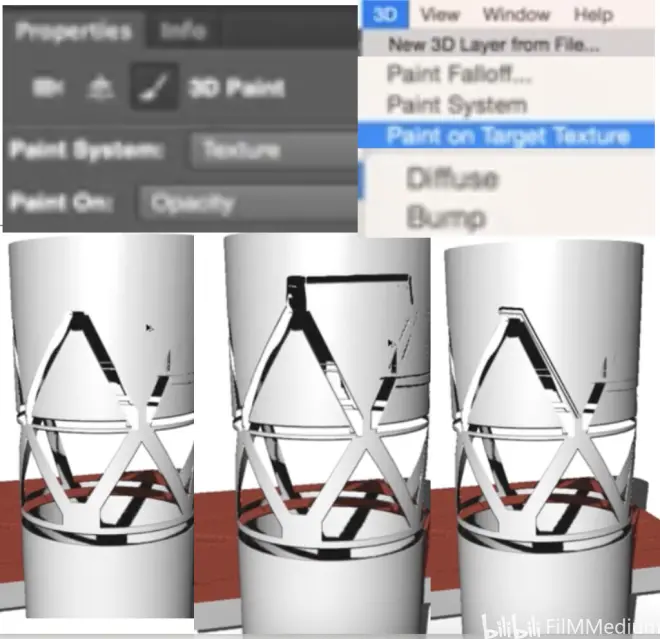
P54 - 17:043D 目标图文 贴图。
So now, but because those two guys are connected, they are painting on each other. So I will ctrl+Z those. Like this. And now we have only bump to paint on,
P54 - 17:22ctrl+Z目前只需考虑贴图。
So I will go and select 3D paint and bump map, So now it's a game changer. Now it's only painting on the bump map.
P54 - 17:34现在是针对贴图镂刻了。
And you can actually start sculpturing something really cool. let's go again to orthographic field, which is like our design view.
P54 - 17:48拼图投影=设计视角。
And I'm pretty sure you can have like front view. So now everything is line drive. now you can select the area. It's very cool, isn't it? Imagine if I was doing this on a flat plane, then you will start having very nice panel. It’s like a texture painting, but why is so powerful that you are inside like a proper 3D environment.
P54 - 18:41像是材质雕刻在3D环境里。
So you can change your lighting as you go. For example. Click on the light. And now. We will change this lighting.
P54 - 18:58图层级联 灯光属性 改变光。
as I said, like for this cylinder, let's make it very shiny, very reflective, and a little bit rough.
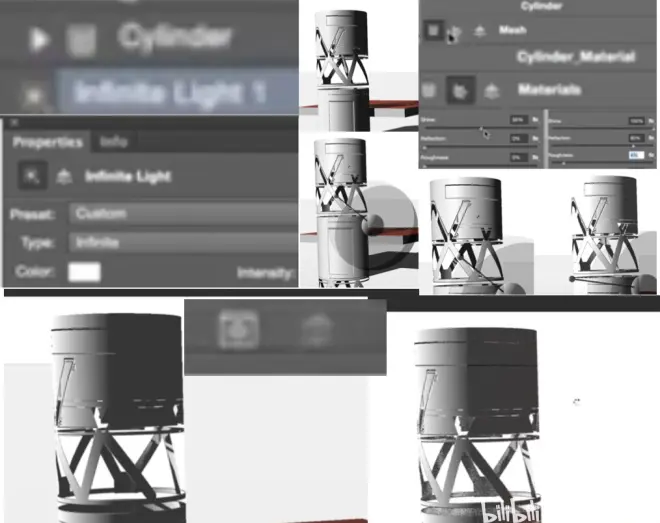
P54 - 19:08镜反射粗糙度。
let's see what we get in terms of surrender. Click render. Probably needs a little bit more off roughness. now you're having a very nice surface.
P54 - 19:42渲染后 加入粗糙度 再渲染。
So that's pretty much it about textures. If this is just like a basic, so I won't keep showing you. But before we move on, I wanna show you instances.
P54 - 19:52下节课拿像依物体举例子。
And this is what the next chapter about. Thank you very much.
6. 3D in Photoshop---1-4.Phototextures
P55 - 00:00
In this chapter, I will show you how to use photo textures, I showed you how to paint textures on our geometry.
P55 - 00:10如何在几何体上绘制材质。
And now instead of just painting, we will be using photos to get much more photo real results, just similar to this one.
P55 - 00:17利用照片的保真度。
So basically, it's a simple sphere. Like if I go to 3D, switch off my shading a simple sphere with some texture, which gives us a very good base. And we can play with all the bumps settings that mean kind of export before.
P55 - 00:40加入贴图材质。
And we can get some really cool stuff. let's just create something similar from scratch.
P55 - 00:46从草图创建些类似的。
So basically, we'll go over here. New 3D layer from file.
P55 - 00:503D打开本地文件夹。
We will go to and select this geometry that I created a 3D code. It's very simple kind of thing,
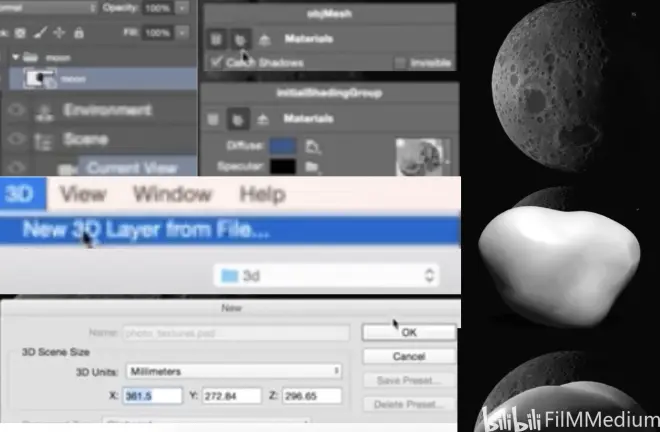
P55 - 01:03打开3D建模的。
and now we will go and actually apply some diffuse map to it. and we can go to Google and find some fancy moon texture. Actually, this is a good one, so copy it. I will go to this one and say, if you diffuse edit my texture. So it shows me the uv mapping ink over here. And all I need to do is copy past this texture, stretch it, it doesn't need to align perfectly.
P55 - 01:35下载纹理粘贴3D是UV贴图。
But so let's just delete, ctrl save. And let's see what we have. We've got this guy doesn't quite look right yet,
P55 - 01:50保存,但目前看起来不是很对。
but what we will do, we will go over here, press here generate bumped from diffuse. But if you using photoshop CES, something lower than photoshop CC 2015. You won't be having this option,
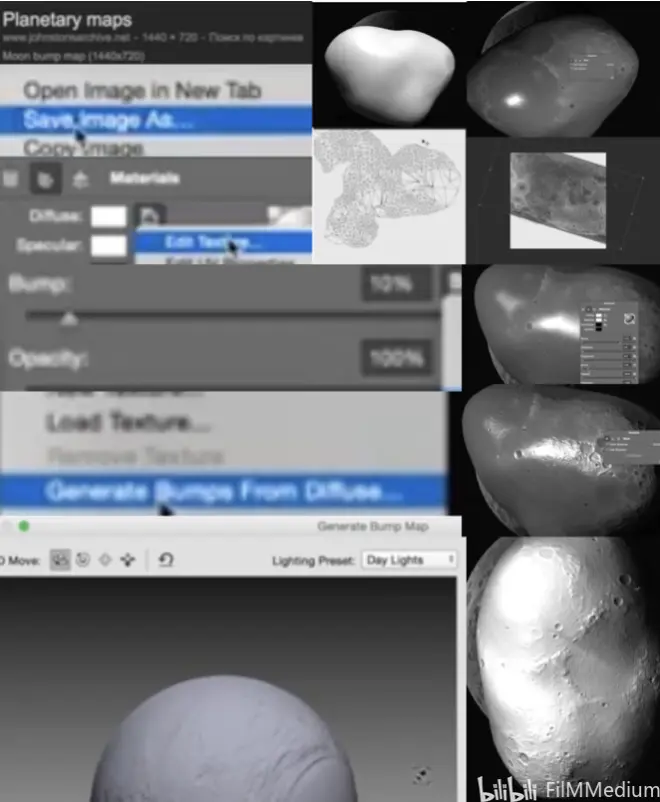
P55 - 02:07贴图 从漫射中生成。
but basically what we will do, you will create a new bumper to copy past the texture. But in new version, they have this option, which is awesome. Look, basically what is does launch is very nice. really cool. you can play with all settings. It's very, very powerful. You are actually seeing what you will reproduce. So I will do this. And as you can see, i've got my bump right now. All I need to do is to make it more obviously, increase the roughness of this object. And now we've got our asteroid,
P55 - 02:52漫射生成贴图,增加粗糙度。
for example. If I zoom out. And play with the lighting. I think the light is too strong. So yeah, we've got our nice asteroid and as you can see, you can change your texture, once again, go to your textures and edit texture. Open your texture. I'd move stuff around. Make it smaller. Press CTRL s again. And it will change. The texture over here.
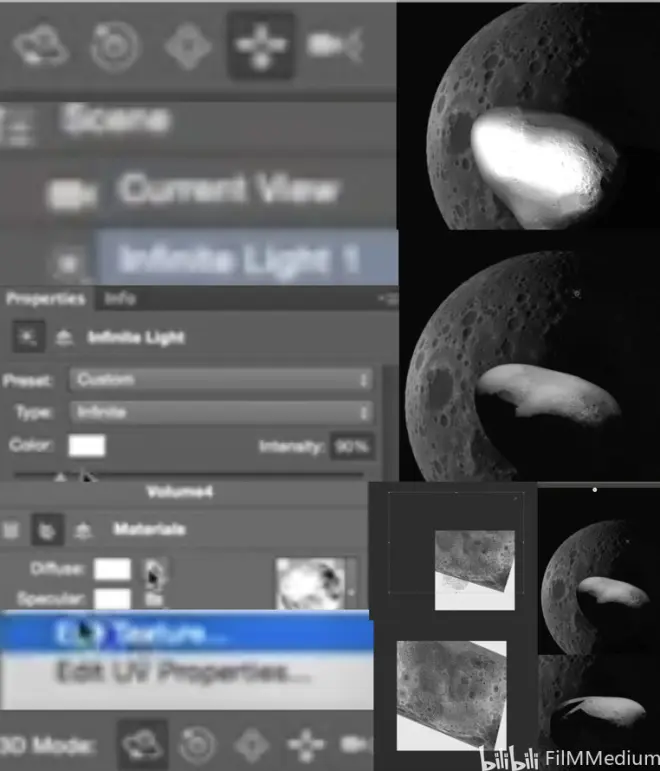
P55 - 03:45灯光,编辑材质。
So it's very powerful. And together with instance think you can like instance this object. scale rotate somehow. And then you can group these two guys. Instance this group.
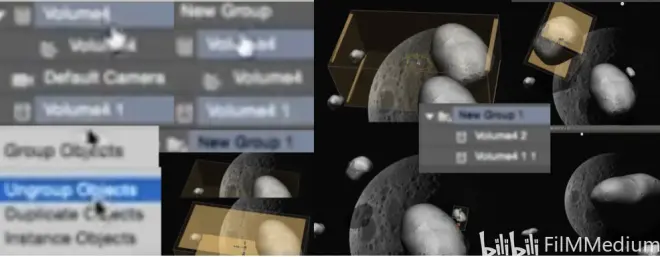
P55 - 04:15大小旋转打组再实例。
Take them. Now we're starting to have a nice Uranus field. you can keep going on. Like I never tried What's the upper limit photo. it has to be quite a large amount of polygon of geometry. Because this geometry is very, very simple. And then you've got a really nice control. So you're doing a space.
P55 - 04:58打组后,淡出,星际中陨石。
So that's a cool thing. These two layers, the layer behind it is 3D layer. And these two layers are also 3D layer. There is a way to actually combine those.
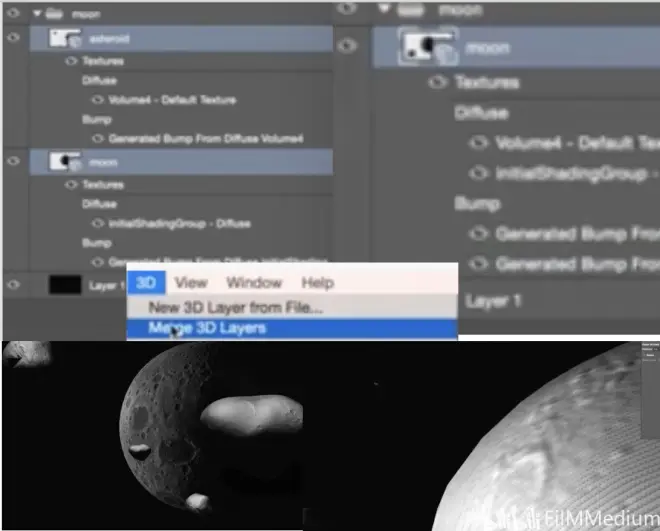
P55 - 05:15星体和陨石结合的方案。
If I select those two layers together, and I go to 3D and emerge two layers, basically it will combine them into one scene. Now look what's happening.
P55 - 05:263D 融合。
So now when I rotate in the 3D space. where is my moon? I need to find my moon. On this panel, apparently my mouth is just too small. So I need to make it bigger. I still don't like this.
P55 - 05:58月球放大,调节粗糙度。
Because it's a masterpiece. We need to get rid of the specular color.
P55 - 06:09关闭掉反射颜色。
And that's what we have now. So imagine, if you're doing something minimally stick you need. Something like this. And then having full control over the light is just priceless,
P55 - 06:31可以调节光源。
As I already showed in a very less first lesson, you can create crazy things. Like you can create Uranus, you can create all of those very complicated things. And don't forget any time you can go and start painting on this, let's say, if there was some kind of structure on Top of this Uranus,
P55 - 06:57可以在陨石上绘制。
it will start painting on this. It's like designing in 3D space. you wanna paint a bump, That's backwards.
P55 - 07:13在3D绘制比如绘制凹凸贴图。
Are you go paint a bump. There are two ways of painting things, texture and projection. Sometimes when you have a complex geometry need to go for projections.
P55 - 07:303D 绘制系统 投射。
So and you can see you can start designing. So yeah, using photo textures can give you a very not exactly 100% for the real stuff, but that's why you using it in photoshop. Because it gives you a very nice solid base.
P55 - 07:50做不到百分百精确但是可以用。
let's move on, guys. Thank you very much. All right.
