
vits语音合成(基于原版vits)-失败原因整理
这个教程失败于nccl(windows无法配置),所以没成功就不面向需要学习的人了,这篇属于记录一下原因和一些配置方式防止自己遗忘的文档,如果系统是windows就别跟着配前置了,找别的版本吧,(没有配置使用过)以下是推荐:
https://github.com/PlayVoice/vits_chinese
https://github.com/Plachtaa/VITS-fast-fine-tuning
https://github.com/svc-develop-team/so-vits-svc
https://github.com/Edresson/YourTTS/
本文档基于:
windows11
CUDA 12.1
Anaconda
Anaconda对于配置单个AI可有可无,这是用来用于虚拟多个python环境,防止之后组合别的ai出现环境和包不匹配导致安装多AI失败的情况,比如拟声鸟需要的是python3.9,而stablediffusion需要的是python3.10,以及各个包之间会有相同的依赖库但版本不同
NCCL(无法在windows运行)
显卡2080ti
开始:
查看当前电脑的CUDA版本:
打开“命令提示符(CMD)”
输入nvidia-smi

下载所用文件:
下载vits项目(Github)
https://github.com/jaywalnut310/vits
下载AnaConda(Windows):
https://www.anaconda.com (主页)
https://repo.anaconda.com/archive/Anaconda3-2023.03-Windows-x86_64.exe
https://mirrors.bfsu.edu.cn/anaconda/(北京外国语大学开源软件镜像站)
msvc:
https://visualstudio.microsoft.com/zh-hans/downloads/
下载pytorch文件(以防各种莫名其妙的pytorch报错):
命令行方式:https://pytorch.org/get-started/locally/
Pytorch下载:
https://download.pytorch.org/whl/ (所有库下载)
pytorch:
https://download.pytorch.org/whl/torch
cp:python版本(cp310=python3.10版本)
cu:cuda版本(cu118=cuda11.8版本) 使用显卡
cu118可以适用于cuda12.1版本
cpu:cpu版本 使用CPU
cpu版本适用于显卡显存不足6g的电脑
2.0.0为最新版本
Pytorch Audio
https://download.pytorch.org/whl/torchaudio
Pytorch Vision
https://download.pytorch.org/torchvision/
CUDA下载(CUDA Toolkit):
https://developer.nvidia.com/cuda-downloads
需要的软件:
buzz(语音转文字,基于openai的whisper)
https://github.com/chidiwilliams/buzz/releases/tag/v0.7.2
audio-slicer(视频切片,可以多切几次弄多一点训练材料)
https://github.com/flutydeer/audio-slicer/releases/tag/v1.1.0
Espeak:
https://github.com/espeak-ng/espeak-ng/releases/tag/1.51
FFmpeg:
https://github.com/BtbN/FFmpeg-Builds/releases(win,大小126M的版本)
环境变量


nvcc,ffmpeg,git,anaconda等软件的命令也需要配置环境变量
假设我的项目路径在
C:\Users\用户名\Desktop\AIS\vits-main\
Vits配置安装:
首先conda create -n vits python=3.9 创建一个3.9的python环境
conda activate vits
cd C:\Users\用户名\Desktop\AIS\vits-main\
pip install 下好的torch,torchaudio,torchvision文件路径
requirement.txt文件内容修改为:
Cython==0.29.21
librosa==0.8.0
matplotlib==3.3.1
numpy==1.18.5
phonemizer==2.2.1
scipy>=1.5.2
tensorboard==2.3.0
Unidecode==1.1.1
pip install -r requirement.txt
修改项目文件:
训练材料(炼丹材料):
基于https://www.bilibili.com/read/cv21153903/
修改内容基于https://github.com/wac81/vits_chinese/tree/37edf5f4c5a1b1f746729bdb5c16bfb3b0bd52e4
text文件夹中cleaners.py:

def chinese_cleaners1(text):from pypinyin import Style, pinyinphones = [phone[0] for phone in pinyin(text, style=Style.TONE3)]return ' '.join(phones)def chinese_cleaners2(text):phones = [pfor phone in pinyin(text, style=Style.TONE3)for p in [get_initials(phone[0], strict=True),get_finals(phone[0][:-1], strict=True) + phone[0][-1]if phone[0][-1].isdigit()else get_finals(phone[0], strict=True)if phone[0][-1].isalnum()else phone[0],]# Remove the case of individual tones as a phonemeif len(p) != 0 and not p.isdigit()]return phones
text中symbols.py改的一样:

""" from https://github.com/keithito/tacotron """'''Defines the set of symbols used in text input to the model.'''_pad = '_'_punctuation = ';:,.!?¡¿—…"«»“” '_punctuation_zh = ';:,。!?-“”《》、 '_letters = 'ABCDEFGHIJKLMNOPQRSTUVWXYZabcdefghijklmnopqrstuvwxyz'_numbers = '123450'_others = ''_letters_ipa = "ɑɐɒæɓʙβɔɕçɗɖðʤəɘɚɛɜɝɞɟʄɡɠɢʛɦɧħɥʜɨɪʝɭɬɫɮʟɱɯɰŋɳɲɴøɵɸθœɶʘɹɺɾɻʀʁɽʂʃʈʧʉʊʋⱱʌɣɤʍχʎʏʑʐʒʔʡʕʢǀǁǂǃˈˌːˑʼʴʰʱʲʷˠˤ˞↓↑→↗↘'̩'ᵻ"# Export all symbols:symbols = [_pad] + list(_punctuation) + list(_letters) + list(_letters_ipa)symbols_zh = [_pad] + list(_punctuation_zh) + list(_letters) + list(_numbers)# Special symbol idsSPACE_ID = symbols.index(" ")
preprocess文件:

parser.add_argument("--text_cleaners", nargs="+", default=["chinese_cleaners1"]) # english_cleaners2
炼丹材料和list.txt放置方式以及config配置,默认基于教程:
https://www.bilibili.com/read/cv21153903/
以下操作全在
C:\Users\用户名\Desktop\AIS\vits-main\文件夹下
config下创建文件(基于ljs_base),文件名自定义:
config.json
在这里我们选择给出的chinese_base.json为例。
train部分:
eval_interval为保存间隔,默认的1000即可以满足保存的需求,设置过小会训练过程会耗费大量时间在保存上;设置过大如果训练出现问题无法满足及时保存最近的模型的需求。
epochs迭代次数,一般来说比较好的数据集质量不到一千就能出现效果,两千往上勉强可以使用,这里个人建议一万到两万效果最佳。
batch_size一定要改!请按照你的显存酌情修改(否则开始训练就爆显存),6G大概为4左右,10G可以到6左右。
fp16_run半精度训练,一般按照默认开启即可,如果你对你的配置过于自信可以尝试关闭。
data部分:
前两行要改成我们前面保存list.txt和list_val.txt路径,即filelists/list.txt.cleaned和filelists/list_val.txt.cleaned
cleaned是preprocess(预处理)后的文件
n_speakers说话人数,单人改为0
回到anaconda prompt:
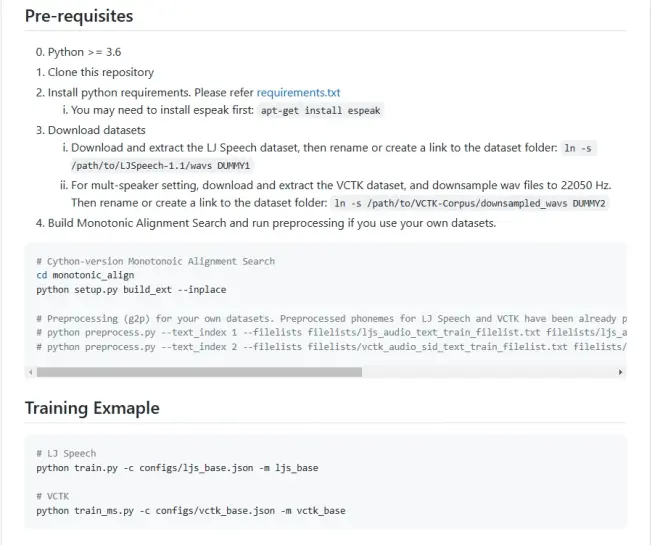
按照官方给的方式使用
cd monotonic_align
python setup.py build_ext --inplace
小坑:
monotonic_align下还要建立一个文件夹叫monotonic_align,不然报错
python preprocess.py --text_index 1 --filelists 两个list.txt文件的位置,中间用空格分开
(windows无法运行的最后一步)
python train.py -c 自定义config.json文件路径 -m 输出后的model名称
# LJ Speech
python train.py -c configs/ljs_base.json -m ljs_base
# VCTK
python train_ms.py -c configs/vctk_base.json -m vctk_base
问题总览:
No module named 'numpy.random.bit_generator'
pip install numpy==1.19.3
TypeError: Descriptors cannot not be created directly. If this call came from a _pb2.py file, your generated code is out of date and must be regenerated with protoc >= 3.19.0. If you cannot immediately regenerate your protos, some other possible workarounds are: 1. Downgrade the protobuf package to 3.20.x or lower. 2. Set PROTOCOL_BUFFERS_PYTHON_IMPLEMENTATION=python (but this will use pure-Python parsing and will be much slower).
pip install protobuf==3.20.0
ValueError: port must have value from 0 to 65535 but was 80000.
train.py|train_ms.py
os.environ['MASTER_PORT'] = '80000'
改为没被占用的端口号(80,3306,22,21,20,443等常用端口不要去设置,比如:网页常用端口,后端和数据库常用端口,应用服务已占用端口如微信、MC服务器等,服务占用的端口,数据库常用端口,文件传输常用端口,各种协议如邮件传输协议的常用端口等端口,一定需要避免设置这些端口,且范围控制在0~65535中)
例子:os.environ['MASTER_PORT'] = '5321'
windows无法配置的原因:
RuntimeError("Distributed package doesn't have NCCL " "built in")
RuntimeError: Distributed package doesn't have NCCL built in
NVIDIA Collective Communications Library (NCCL) | NVIDIA Developer
https://developer.nvidia.com/nccl
https://docs.nvidia.com/deeplearning/nccl/install-guide/index.html
坑踩烂了都,这个nccl官方版本不适用windows,没装双系统没法继续,文档结束
