
MECH ENGINEER(机械工程师)steam指南

注意!此为搬运的steam上该游戏的指南翻译,如有侵权望告知
注意!此指南并非最新版,有出入的地方以游戏实际为准
Guide to Gameplay
游戏指南
Will be piecing this together slowly part by part.
将慢慢地一部分一部分地拼凑起来。
Introduction
介绍
I'll be filling out this guide as I have time with information to help clarify the systems in this game.
我会填写这个指南,因为我有时间提供信息来帮助澄清这个游戏中的系统。
Starting Location
起始位置
When you start a new game, you will get to choose where your base starts. As you move around the cursor, each area will show up as either red or white. White locations are "easy" to handle terrain; red locations are difficult, and will generally require you to have upgraded and specially fitted out mechs to succeed. When choosing a starting location, there's no difference between choosing a red or white spot, but you will want to choose a location that has access to a lot of white spaces, or you're not going to make it very far.
当你开始一个新的游戏时,你可以选择你的基地从哪里开始。当您在光标周围移动时,每个区域将显示为红色或白色。白色位置“容易”处理地形;红色位置是困难的,通常需要你升级和专门安装的机械才能成功。在选择出发地点时,选择红点或白点没有区别,但你会想选择一个可以进入大量空白的地点,否则你就走不了多远。
This is what I've found to be the best starting spot:
这是我发现的最好的起点:

This is a red desert tile in Africa. You start pretty close to three cities, and you have fairly easy access to Europe, Africa, and Western Asia.
这是非洲的一块红色沙漠瓷砖。你的起点离三个城市很近,而且你可以很容易地到达欧洲、非洲和西亚。
Getting to Eastern Asia from here looks like it would be easy, but is actually fairly difficult. There's unpassable mountains, and 300 degree terrain that block off most routes to Eastern Asia. You'll have to cross some 161 degree red desert to get to Eastern Asia, and there's a high chance you will get blocked out by enemy bases on these tiles, so you'll need some luck. In practice, you'll probably need to get to Eastern Asia through the Indian Ocean, so prepare accordingly.
从这里去东亚看起来很容易,但实际上相当困难。那里有无法通行的山脉和300度的地形,挡住了通往东亚的大部分路线。你必须穿过161度的红色沙漠才能到达东亚,而且你很有可能被这些瓷砖上的敌人基地挡住,所以你需要一些运气。在实践中,你可能需要通过印度洋到达东亚,所以要做好相应的准备。
Here's one interesting starting spot:
这里有一个有趣的起点:

This is a red water tile. Choosing this as a starting location connects North America to Europe with a white trail of tiles, which allows you to access most of the white areas of the map without needing to go through any red tiles. You might still get blocked by an enemy base, but at least you have a chance of making it through with minimal difficulty.
这是一块红色的水瓷砖。选择这里作为起点,可以通过白色瓷砖连接北美和欧洲,这样你就可以访问地图上的大部分白色区域,而无需穿过任何红色瓷砖。你可能仍然会被敌人的基地阻挡,但至少你有机会以最小的难度通过。
In theory this should be a pretty good starting spot. In practice, I've had really bad luck with this spot, getting wedged in by enemy bases, hard enemy spawns at the start, and enemy bosses chasing me very early.
理论上,这应该是一个很好的起点。在实践中,我在这个地方运气真的很差,被敌人的基地卡住了,一开始就产生了强大的敌人,敌人的BOSS很早就追上了我。
Internal Combustion Engines (ICEs)
内燃机
Injectors and Pistons
喷油器和活塞
In general, run the biggest piston with the smallest injector that will meet your energy requirements.
一般来说,用最小的注射器运行最大的活塞,以满足您的能源需求。
The behavior or Injectors and pistons are not documented at all in the game, as far as I can tell. However, they appear to work as follows:
据我所知,比赛中根本没有记录注射器和活塞的行为。然而,它们的工作原理如下:
Higher injector values increase energy output and decrease maximum temperature.
较高的喷射器值可增加能量输出并降低最高温度。
Higher piston values decrease energy output and increase maximum temperature.
活塞值越高,能量输出越低,最高温度越高。
Both change the values at an equal inverse to each other, so increasing the value of both the injector and piston by the same amount will result in no change to an ICE. It's only the difference between the two values that matters.
两者的值都以相等的倒数变化,因此将喷油器和活塞的值增加相同的量将不会导致ICE发生变化。重要的只是这两种价值观之间的差异。
Note, the maximum temperature is the maximum temperature caused by load on the ICE, and has no impact on external temperature resistance.
注意,最高温度是由ICE上的负载引起的最高温度,对外部温度电阻没有影响。
AUX Components
AUX组件
The general rule with AUX components is to always fill up slots 1-4 with cooling modules, always put a system multiplier in slot 6, and put either a cooling module or a system multiplier in slot 5, depending on what you are optimizing for.
AUX组件的一般规则是始终用冷却模块填充插槽1-4,始终在插槽6中放置系统乘法器,并在插槽5中放置冷却模块或系统乘法器,具体取决于您正在优化的内容。
First thing to note is the order of the AUX components matters. The components are loaded in from top to bottom, right to left. When you hover over one of the AUX component slots on the ICE, the top number will show you the order number: 1 through 6.
首先要注意的是AUX组件的顺序很重要。零部件是从上到下、从右到左加载的。当您将鼠标悬停在ICE上的一个AUX组件插槽上时,顶部数字将显示订单号:1到6。
The second thing to note is that up to 4 numbers that will come up when you hover over a component slot. They appear to be as follows:
第二件需要注意的事情是,当您将鼠标悬停在组件插槽上时,最多会出现4个数字。它们看起来如下:
Slot number
插槽编号
System Direction Negative
系统方向负极
System Direction Positive
系统方向正极
Cooling
冷却
System multipliers will have all 4 numbers.
系统乘法器将具有全部4个数字。
Cooling components will have three numbers, with the middle number being the System Direction, with an implicit negative or positive, depending on the cooling type.
冷却组件将有三个数字,中间的数字是“系统方向”,根据冷却类型,有一个隐含的负数或正数。
There are three types of Aux components:
辅助部件有三种类型:
Internal Cooling
内部冷却
Use this when you are using weapons that produce a lot of heat.
当你使用能产生大量热量的武器时,请使用这个。
-0.04 System Direction
+0.20 Cooling
-0.04系统方向
+0.20冷却
External Cooling
外部冷却
Use this when you want to increase the environmental heat resistance of your mech.
当你想提高你的机械的环境耐热性时,可以使用这个。
+0.04 System Direction
+0.20 Cooling
+0.04系统方向
+0.20冷却
System Multiplier
系统乘法器
These multiply the cooling and system totals of the previous component slots. Only use these in slots 5 or 6.
这将使以前组件插槽的冷却和系统总计相乘。只能在插槽5或6中使用这些。
1.5 * System Direction
1.2 * Cooling
1.5*系统方向
1.2*冷却
Examples
实例
Environmental Heat Resistance Optimized
环境耐热性优化

This layout sacrifices a bit of overall cooling, but gives you a max outside temp of 156 on the starting mechs. In practice this layout seems to be the most useful for the start of the game, since the highest environment temperatures you see are either 161 or 295. This layout lets you access most terrains, and lets you complete a 161 temperature mission with heavy damage to your mechs if you really need to. You won't be able to complete a 295 temperature mission with this engine, so don't try.
这种布局牺牲了一点整体冷却,但在启动机械上的最高外部温度为156。在实践中,这种布局似乎对游戏的开始最有用,因为你看到的最高环境温度是161或295。这种布局可以让你进入大多数地形,如果你真的需要的话,可以让你完成161摄氏度的任务,对你的机械造成严重损坏。使用这种发动机你将无法完成295摄氏度的使命,所以不要尝试。
It would be nice if this layout could handle 161 on the starting mechs, but I haven't found a way to get it there.
如果这种布局能在启动机械上处理161,那就太好了,但我还没有找到实现它的方法。
Weapon Cooling Optimized.
武器冷却优化

This layout is fully optimized towards weapon cooling. It gives you a max outside temp of 112, which is high enough most environments. You really only need this if you're going really heavy on heat producing weapons though.
这种布局在武器冷却方面进行了充分优化。它给你的最高室外温度为112,这在大多数环境中都足够高了。不过,只有当你真的要大量使用发热武器时,你才真正需要这个。
You can swap slot 5 for another internal cooling component for a minor increase to the overall cooling, but the weapon cooling amount will drop significantly.
你可以将插槽5换成另一个内部冷却组件,以略微增加整体冷却,但武器冷却量会显著下降。
Balanced Cooling Layout
平衡冷却布局

This is a fairly balanced engine layout that I've had success with. It gives you the highest possible overall cooling at 2.20, with a slight bias to external cooling. It gives you a max outside temp of 121, which is high enough for most missions.
这是一个相当平衡的发动机布局,我已经取得了成功。它可以在2.20的温度下为您提供尽可能高的整体冷却,并略微偏向于外部冷却。它给你121的最高外部温度,这对于大多数任务来说已经足够高了。
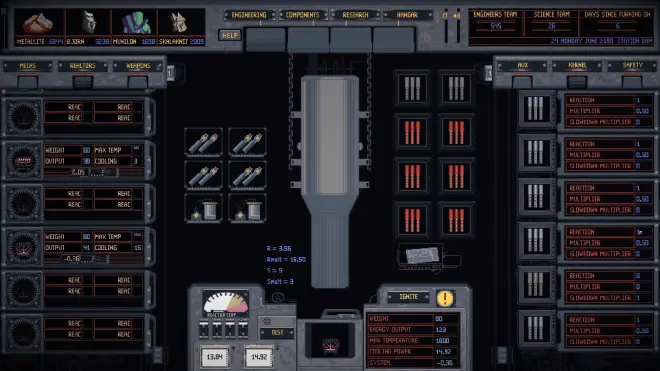
Nuclear Reactors
核反应堆
Nuclear reactors seem complex, because there is a lot of components and a lot of numbers for everything, but no in-game documentation at all.
核反应堆似乎很复杂,因为所有东西都有很多组件和数字,但根本没有游戏中的文档。
In practice, you can ignore all those numbers. There's only one thing to keep in mind with nuclear reactors: more energy = more heat. Too much heat, and you're going to have problems. You should be fine as long as you limit a reactor's energy output to around 130. Any higher, and you will either have an unstable reactor, or mech overheating problems.
在实践中,你可以忽略所有这些数字。核反应堆只需要记住一件事:更多的能量=更多的热量。太多的热量,你会有问题的。只要你把反应堆的能量输出限制在130左右,你就应该没事。再高一点,你要么会有一个不稳定的反应堆,要么会有机械过热的问题。
Nuclear reactors have three types of components: AUX, Kernel, and Safety
核反应堆有三种类型的组件:辅助、核心和安全
Components
组成部分
AUX
AUX works very similar to ICE AUX, but with some minor differences. At time of writing this, due to the way nuclear reactors work, there's pretty much only one AUX layout that makes sense to use most of the time:
AUX的工作原理与ICE AUX非常相似,但略有不同。在撰写本文时,由于核反应堆的工作方式,几乎只有一种AUX布局在大多数时候都有意义:
Slots 1-4: Inner cooling
插槽1-4:内部冷却
Slots 5-6: System Multiplier
插槽5-6:系统乘数
This is because nuclear reactors tend to not have issues with external temperatures if built correctly, and tend to run guns that generate a lot of heat.
这是因为如果建造正确,核反应堆往往不会出现外部温度问题,而且往往会运行产生大量热量的枪支。
Kernel
内核
There's three types of rods in the kernel that control your reactor's energy output.
内核中有三种类型的棒来控制反应堆的能量输出。
Slowdown Rods: Flat grey - essentially just take up a slot.
减速杆:扁平的灰色-基本上只是占据一个槽。
Reaction Rods: Bluish grey - increase your base reaction level.
反应棒:蓝灰色-增加你的基础反应水平。
Reaction Multiplier Rods: Red - multiply your base reaction level.
反应倍增棒:红色-倍增你的基础反应水平。
There's lots of stats for these rods, and no explanation for what the stats mean. Instead of trying to reverse engineer these numbers, it's far easier to just figure out what works with some simple trial and error. You can swap in and out rods to see how it affects your reactor's energy level, until the output energy level is where you want it to be.
这些杆有很多统计数据,但没有解释这些统计数据的含义。与其试图对这些数字进行逆向工程,不如通过简单的试错来找出有效的方法。你可以交换进出棒,看看它如何影响反应堆的能级,直到输出能级达到你想要的水平。
Some important notes:
一些重要注意事项:
You always need at least 2 slowdown rods in your reactor. A reactor will never be stable with fewer than 2 slowdown rods.
你的反应堆里总是需要至少两个减速棒。如果减速棒少于2个,反应堆将永远不会稳定。
The order of the rods does not matter.
杆的顺序无关紧要。
Safety
安全
This component provides a multiplier on your slowdown. The basic safety gives a 3x multiplier. I'm not sure if there's any other multipliers. There's not much to do here, expect to put in a safety.
这个组件为你的减速提供了一个乘数。基本安全系数为3倍。我不确定是否还有其他乘数。在这里没有什么可做的,只希望放在安全的地方。
Kernel Layout
内核布局
For convenience, here's the energy output for each stable combination of rods with the basic 3x safety multiplier. The layout is as follows:
为了方便起见,以下是每种具有基本3倍安全倍数的稳定杆组合的能量输出。布局如下:
<Slowdown Rods> <Reaction Rods> <Multiplier Rods> | <Energy Output>
<减速杆><反作用杆><倍增器杆>|<能量输出>
2 3 3 | 147
2 4 2 | 144
2 4 2 | 141
2 1 5 | 135
2 0 6 | 123
2 5 1 | 121
2 6 0 | 88
3 2 3 | 77
3 1 4 | 77
3 0 5 | 75
3 3 2 | 74
3 4 1 | 66
3 5 0 | 55
4 0 4 | 56
4 1 3 | 56
4 2 2 | 55
4 3 1 | 52
4 4 0 | 47
5 0 3 | 48
5 1 2 | 47
5 2 1 | 46
5 3 0 | 43
6 0 0 | 40
I generally find a 2 5 1 or 2 0 6 layout to be most effective for nuclear reactors.
我通常认为2 5 1或2 0 6的布局对核反应堆最有效。
Example Layouts
布局示例
With all that in mind, here's a couple example layouts.
考虑到所有这些,这里有几个布局示例。
2 0 6 Layout
2 0 6布局
Almost identical to the 2 5 1 layout. This is pretty much the sweet spot for energy output vs heat production. It provides a tremendous amount of energy, but still provides enough cooling to run any mission other than volcano missions. The big drawback to this layout is that it uses a lot of a single type of rod - it's likely that you won't have enough rods to run this layout on all your reactors for quite a while. You mitigate this somewhat by also using the 2 5 1 layout on some of your reactors.
几乎与2 5 1布局相同。这几乎是能源输出与热量生产的最佳点。它提供了大量的能量,但仍然提供了足够的冷却,可以执行火山任务以外的任何任务。这种布局的最大缺点是它使用了很多单一类型的棒——很可能在相当长的一段时间内,你没有足够的棒在所有反应堆上运行这种布局。你也可以通过在一些反应堆上使用2 5 1的布局来缓解这种情况。
3 3 2 Layout
3 3 2布局

Almost identical to the 3 2 3 layout. This reactor layout provides a massive amount of cooling. You'll basically never run into heating issues. It's a lot less energy output than a 2 0 6 layout, but 74 energy is still a large amount to work with. This also has the benefit of using a much more even rod distribution, making it easier to spread your rods out across your reactors.
几乎与3 2 3布局相同。这种反应堆布局提供了大量的冷却。你基本上永远不会遇到供暖问题。与2.0 6布局相比,它的能量输出要少得多,但74的能量仍然是一个很大的工作量。这也有使用更均匀的棒分布的好处,使你的棒更容易分布在反应堆中。
Station Upgrades
基地升级
To access the station upgrades, go to the calendar and click the lever in the lower right corner.
要访问工作站升级,请转到日历并单击右下角的控制杆。

Here's what the station upgrade screen looks like
以下是电台升级屏幕的样子

When you click on a station module, a couple of lines will come out of the section.
当你点击一个车站模块时,会有几条线路从该路段出来。
The orange line signifies the current module, and will point at the detail panel on the right. The orange squares in the detail panel signify the current level of the module.
橙色线表示当前模块,并将指向右侧的细节面板。细节面板中的橙色方块表示模块的当前级别。
The blue line points at the parent module for the currently selected module. The blue squares in the detail panel indicate the level of the parent module. A module cannot have a higher level than its parent module, and so the blue squares represent the current maximum level for the selected module. If you want to increase the max level, you will need to upgrade the parent module.
蓝线指向当前所选模块的父模块。详细信息面板中的蓝色方块表示父模块的级别。模块的级别不能高于其父模块,因此蓝色方块表示所选模块的当前最大级别。如果您想提高最高级别,则需要升级父模块。
Every module provides some stat bonuses to your station, but there's a few modules that provide additional bonuses that are detailed in their description.
每个模块都会为你的工作站提供一些统计奖金,但也有一些模块会提供额外的奖金,详见其描述。
Special Modules
特殊模块
There are modules that provide special bonuses. In general, you should focus on maxing the upgrades on all of these special modules before focusing on upgrades for normal modules.
有些模块提供特殊奖励。一般来说,在专注于普通模块的升级之前,您应该专注于最大限度地提高所有这些特殊模块的升级。
56 - Upper Factory
56-上部工厂
This module reduces the time to produce items in the components tab. It is the most important module to upgrade, and should be upgraded to max level before focusing on upgrading anything else. You will probably need to upgrade its parent modules to get it to max level, but it is still worth maxing module 56 and its parents before upgrading anything else.
此模块减少了在组件选项卡中生成项目的时间(建造物品所需时间)。它是最重要的升级模块,在专注于升级其他模块之前,应该升级到最高级别。您可能需要升级其父模块才能将其提升到最高级别,但在升级任何其他模块之前,仍值得将模块56及其父模块最大化。
23 - Waste Recycling Center
23-废物回收中心
Provides a few resources of each type every day. This is a very useful module, since it will provide resources that you are having trouble finding on the map, and will prevent you from getting locked out of running missions due to insufficient ammo. This should have very high priority for upgrades.
每天提供每种类型的一些资源。这是一个非常有用的模块,因为它将提供你在地图上难以找到的资源,并防止你因弹药不足而被锁定在执行任务之外。这应该具有非常高的升级优先级。
62 - Ammunition Factory
62-弹药厂
Reduces the resource cost of sending mechs into battle. This is very useful, since the cost savings are significant, and it's easy to deplete a single type of resource, locking out you of missions. This should have very high priority for upgrades.
降低派遣机甲投入战斗的资源成本。这非常有用,因为节省了大量的成本,而且很容易耗尽单一类型的资源,使您无法执行任务。这应该具有非常高的升级优先级
59 - Repair bay
59-维修间
Since the addition of ranged units to many missions types, your mechs are likely to take some damage on a most of your missions, even if you're doing everything right. And occasionally things will go wrong and you'll have a mech take a big chunk of damage that can cost over a 1000 metallite to fix. This module helps cut the costs on the repairs, and will pay for itself very quickly. Should have a have high priority for upgrades.
由于在许多任务类型中添加了远程单位,即使你做得很好,你的机甲在大多数任务中也可能会受到一些伤害。偶尔会出现问题,你会有一台机械造成很大的损坏,可能需要1000多块金属石才能修复。该模块有助于降低维修成本,并将很快支付费用。应该具有较高的升级优先级。
4 - Artillery Gun
4-火炮
Upgrading this module provides more artillery shots during a mission.
升级该模块可以在执行任务时提供更多的火炮射击。
Artillery can do a lot of damage, and can open up the terrain, but it is pretty inconsistent, and cannot be used at all during underground or water missions.
炮兵可以造成很大的破坏,可以打开地形,但它非常不稳定,在地下或水上任务中根本无法使用。
It is very useful at helping deal with turrets. If a turret is behind some terrain that makes it difficult to attack from outside the turret's range, using artillery can remove the terrain and allow you to safely destroy the turret.
它在帮助处理炮塔方面非常有用。如果炮塔位于某些地形后面,很难从炮塔射程外进行攻击,那么使用火炮可以清除地形,并使您能够安全地摧毁炮塔。
Artillery has limitations, but since it's useful for taking out turrets, it should have medium priority for for a special module.
火炮有局限性,但由于它对拆除炮塔很有用,因此对于特殊模块来说,它应该具有中等优先级。
26 - Western Factory of Standart Parts
26-斯坦达特零件西部工厂(西部标准零件工厂?)
This reduces the cost to produce the components item in the components tab. Components aren't very expensive to begin with, but a reduced cost doesn't hurt. Low priority for a special module.
这降低了在组件选项卡中生产组件项目的成本。组件一开始并不很贵,但降低成本并没有坏处。特殊模块的低优先级。
5 - Communication Center
5-通讯中心
Reduces communication delay, but the effect is relatively minor and has low priority for a special module.
减少了通信延迟,但影响相对较小,并且对于特殊模块来说优先级较低。
PS:如果经常因为移动CD而暴毙的话还是需要的,个人感觉中级优先
15 - Mech hanger
15-机械吊架
Normally mechs require 5 hanger bays in the components tab to build. This module purports to reduce the number of hangers required on the components tab to build the first type of mech when fully upgraded. However, I'm not clear on if that just means the starting mech type that you begin the game with, or if it provides benefits to other types of mechs as well. I'll need to experiment to figure this out. Depending on how many mech types this impacts, this could have either high or low priority.
通常情况下,机械设备需要在部件选项卡中设置5个吊架托架。该模块旨在减少组件选项卡上所需的吊架数量,以在完全升级时构建第一种类型的机械。然而,我不清楚这是否只是指你开始游戏时使用的初始机械类型,或者它是否也为其他类型的机械提供了好处。我需要试验才能弄清楚。根据这种影响的机械类型的多少,这可能具有高优先级或低优先级。
Weapon Customization
武器定制
Armor Penetration and Armor Damage
装甲穿透和装甲损伤
It is important to understand how armor and armor penetration interact when customizing weapons.
在定制武器时,了解装甲和装甲穿透是如何相互作用的,这一点很重要。
If a attack has a *higher* penetration value than a unit's armor, the weapon will ignore the armor and do full damage.
如果一次攻击的穿透值比一个单位的护甲高,武器会忽略护甲并造成完全伤害。
If an attack has an *equal or lower* penetration value compared a unit's armor, the armor will deflect the attack, causing no damage to the unit. This means is the slower the weapon's rate, the more important penetration is.
如果一次攻击的穿透值与一个单位的护甲值相等或更低,护甲会偏转攻击,不会对单位造成伤害。这意味着武器的速度越慢,穿透就越重要。
All attacks, whether they penetrate or not, will the target's armor. The amount of armor damage depends on the weapon type. Explosive and Laser weapons are good at destroying armor. Kinetic and Flame weapons are really bad at destroying armor.
所有的攻击,无论是否穿透,都会攻击目标的盔甲。装甲的伤害程度取决于武器类型。爆炸和激光武器擅长摧毁装甲。动能武器和火焰武器在摧毁装甲方面真的很糟糕。
If you have weapons with low penetration, you'll want to balance this by putting weapons that do a lot of armor damage onto your mechs to help reduce enemy armor so the lower penetration attacks can also do damage.
如果你有低穿透力的武器,你会想通过在你的机甲上放置会造成大量护甲伤害的武器来平衡这一点,以帮助减少敌人的护甲,这样低穿透力攻击也会造成伤害。
Kinetic Weapons
动能武器
Kinetic weapons tend to be the most rounded weapon type. They have decent penetration and damage output, but lack range and don't do much armor damage.
动能武器往往是最全面的武器类型。他们有不错的穿透力和伤害输出,但缺乏射程,不会造成太多的护甲伤害。
20MM Six Barreled Gun
20MM六管炮
This is one of the two weapons you start with, and the only weapon you can build from the start.
这是你开始使用的两种武器之一,也是你从一开始就可以建造的唯一武器。
Strengths:
优势:
- Lightweight
-重量轻
- High rate of fire
-射速高
- Low energy usage
-低能耗
- High versatility
-多功能性强
- Very good at dealing with the basic enemies
-非常擅长对付基本敌人
Weaknesses:
弱点:
Has issues applying damage
造成损坏时出现问题
- Low armor penetration
-低装甲穿透力
- Deceptively short range - heavily impacted by damage and armor penetration drop off.
-看似短距离-受到伤害和装甲穿透力下降的严重影响。
This gun is lightweight, uses minimal energy, and has a pretty high base rate of fire. It has issues with accuracy, range, and penetration.
这种枪重量轻,使用的能量最小,基本射速也很高。它在准确性、射程和穿透性方面存在问题。
There's really only two attributes to balance: rate of fire, and accuracy. As a result, there are two main customization paths to go down with this weapon: either optimize for raw damage, or optimize for accuracy.
实际上只有两个属性需要平衡:射速和准确性。因此,这款武器有两条主要的定制路径:要么针对原始伤害进行优化,要么针对精度进行优化。
The raw damage route is more flexible in terms of customization options. Your goal should be to optimize for clearing out many enemies at extremely close range, and so accuracy isn't very important. The mod you choose will have a big impact on what the weapon does. Try using different mods and see how it works out for you.
在自定义选项方面,原始损坏路线更加灵活。你的目标应该是在非常近的距离内优化清除许多敌人,所以准确性不是很重要。你选择的模式将对武器的功能产生重大影响。试着使用不同的mod,看看它对你有什么效果。
These are the staple mods for this weapon:
以下是该武器的主要MOD:
Increased Penetration: This weapon mod with let the 20MM chew through the basic enemies that you see in every level very effectively. At the start of the game, each of your mechs should be using this.
增加穿透力:这个武器模式让20MM非常有效地咀嚼你在每个级别中看到的基本敌人。在游戏开始时,你的每一个机甲都应该使用这个。
Slowing Enemies: Very effective at preventing enemies from closing the gap. It is a hard counter to several enemy types. You'll want this on at least one of your mechs as soon as
减速敌人:非常有效地阻止敌人缩小差距。这是对几种敌人的有力反击。你会希望这至少在你的一个机甲上尽快
Here are some that might be useful situationally:
以下是一些在实际情况下可能有用的内容:
Shards after hit: Gives you extremely high damage potential and a large AOE, but suffers from extremely low armor penetration, and can be unreliable.
命中后的碎片:给你极高的伤害潜力和巨大的AOE,但护甲穿透力极低,可能不可靠。
Critical Chance: Gives you extremely high damage potential, but suffers from really low armor penetration.
暴击几率:给你极高的潜在伤害,但受到非常低的护甲穿透。
Fire Component: Fire seems to do a very high amount of damage over time, but it's hard to tell exactly how much it does. The fire effect only activates when the bullet *doesn't* penetrate, so low penetration is a benefit.
火灾成分:随着时间的推移,火灾似乎会造成很大的破坏,但很难说它到底造成了多大的破坏。只有当子弹没有穿透时,火焰效果才会激活,所以低穿透是一个好处。
Here's an example of a 20MM with a Fire Component mod that I've found works really well:
以下是一个20MM的例子,我发现它非常有效:

The accuracy focused route is more limited in terms of customization options - penetration becomes more important, and so you'll want to have at least 5 penetration, with 7 being ideal. This means you're going to have to take the armor penetration mod, which limits your ability to customize this weapon. With a setup like the following, you'll have around 200 DPS, which is pretty low, but has the benefit of being able to apply that damage out to very long ranges, and has the ability to penetrate multiple targets, allowing the weapon to reach up to 600-800 DPS in many situations.
注重准确性的路线在定制选项方面更加有限——渗透变得更加重要,因此你希望至少有5次渗透,其中7次是理想的。这意味着你将不得不采取装甲穿透模式,这限制了你定制这种武器的能力。有了下面这样的设置,你将有大约200个DPS,这是相当低的,但它的好处是能够将这种伤害应用到很长的距离,并且能够穿透多个目标,使武器在许多情况下可以达到600-800个DPS。

Tank Cannon
坦克炮
The tank cannon is one of the first weapons you will unlock via research.
坦克炮是你将通过研究解锁的第一批武器之一。
Strengths:
优势:
- Extremely ammo efficient. Uses almost no ammo.
-弹药效率极高。几乎不用弹药。
- High armor penetration.
-装甲穿透力高。
- Very high damage potential if built correctly.
-如果建造正确,可能会造成非常高的损坏。
- Very low energy usage.
-能耗非常低。
Weaknesses:
弱点:
- Not a very versatile weapon. It's basically just pure damage.
-不是一种通用的武器。这基本上只是纯粹的伤害。
- Useless against anything it cant penetrate.
-对任何它无法穿透的东西都毫无用处。
- Effectively does no armor damage.
-有效地不造成护甲伤害。
- Low rate of fire. Not nearly as effective at dealing with the basic enemies as the 20MM.
-低火灾率。在对付基本敌人方面不如20MM有效。
- Deceptively short range - heavily impacted by damage and armor penetration drop off.
-看似短距离-受到伤害和装甲穿透力下降的严重影响。
I find this weapon works best when you focus on raw damage. Builds for this weapon should focus on maximizing its damage, while keeping the armor penetration high enough. While this weapon isn't great at dealing with the basic enemy swarms, the increased raw damage should help a lot with taking out special enemy types with lots of health.
我发现当你专注于原始伤害时,这种武器效果最好。这种武器的建造应该专注于最大限度地提高其伤害,同时保持足够高的装甲穿透力。虽然这种武器不擅长对付基本的敌人群,但增加的原始伤害应该有助于消灭具有大量生命值的特殊敌人类型。
I find the critical chance mod paired with maxed out damage/penetration works best with this weapon. This set up should output several times the damage a 20MM does.
我发现关键几率模式与最大伤害/穿透搭配最适合这种武器。这种设置的输出应该是20MM造成的伤害的几倍。
Accuracy improvements don't really help this weapon. The cannon is so heavily affected by armor penetration drop off, its default accuracy is fine for hitting things in its effective range.
准确度的提高并不能真正帮助这种武器。加农炮受到装甲穿透力下降的严重影响,其默认精度对于击中其有效范围内的物体来说很好。
Explosive Weapons
爆炸性武器
Explosive weapons generally have long range and focus on destroying armor. They tend to have have low damage output compared to other weapon types.
爆炸性武器通常射程远,重点是摧毁装甲。与其他武器类型相比,它们的伤害输出往往较低。
Rapid Firing Missile System
快速射击导弹系统
This is the second weapon type you start with, but you'll need to unlock some research before you can build more.
这是你开始使用的第二种武器类型,但你需要解锁一些研究,然后才能建造更多。
Strengths:
优势:
- High armor penetration and armor damage
-高装甲穿透和装甲损伤
- Very long range
-非常远的范围
- Low energy usage
-低能耗
Weaknesses:
弱点:
- Low damage
-伤害低
- Very heavy
-非常重
- Not very versatile
-不是很全能
- Has difficulty hitting targets at short range
-难以近距离打击目标
- Depletes ammo very quickly.
-弹药消耗非常快
- Causes a lot of heat build up in mechs due to reloading.
-由于重新加载,导致机械中产生大量热量。
Since this weapon's biggest benefit is its good armor penetration and armor damage, weapon mods that reduce armor penetration don't work well with this weapon.
由于这种武器最大的好处是它有很好的护甲穿透力和护甲伤害,所以减少护甲穿透力的武器模组不能很好地使用这种武器。
This means you're best off running the missile system with either the increased penetration mod, or no mod at all. The increased penetration mod results in a big increase in armor penetration and damage, but causes the missile launcher ammo to cost twice as much, and negatively impacts the accuracy.
这意味着你最好运行导弹系统,要么增加穿透模式,要么根本没有模式。增加的穿透模式会导致装甲穿透和伤害的大幅增加,但会导致导弹发射器弹药的成本增加一倍,并对精度产生负面影响。
Because the missile system is so heavy, you'll need to put most your customization points into reducing its weight until you unlock stronger motors. Once you have stronger motors, you can move all the customization points to rate of fire and accuracy.
因为导弹系统太重了,你需要把大部分定制点放在减轻它的重量上,直到你解锁更强的发动机。一旦你有了更强的马达,你就可以根据射速和精度移动所有定制点。
Here's an example of a early game missile system:
下面是一个早期游戏导弹系统的例子:

And an example of a missile system once you have stronger motors:
还有一个导弹系统的例子,一旦你有了更强的发动机:

Energy Weapons
能量武器
Energy weapons focus on raw damage output above everything else. They rely on other weapons to remove armor and deal with the basic enemy swarms.
能量武器注重原始伤害输出高于一切。他们依靠其他武器来移除盔甲并对付基本的敌人群。
Fast Laser Cannon
快速激光炮
This can be researched fairly early, and a large stash of them can be found at one of the objectives on the map.
这可以在相当早的时候进行研究,在地图上的一个目标上可以找到大量的隐藏物。
Strengths:
优势:
- Extremely high damage potential
-极高的潜在损坏
- High armor damage potential
-潜在的高装甲伤害
- No ammo usage
-无弹药使用
- Good build versatility
-良好的结构多功能性
- Lightweight
-重量轻
Weaknesses:
弱点:
- Extremely high energy usage
-极高的能源使用率
- Most weapon mods don't do anything
-大多数武器MOD什么都不做
- Generates a lot of heat
-产生大量热量
- No armor penetration at all
-完全没有装甲穿透
- Sharp weapon range cutoff
-利器射程切断(急剧的武器范围衰减)
- Very bad against the basic enemy swarm
-对基本敌人群非常不利
The fast laser cannon has a tremendous damage potential, but require effort to make work.
快速激光炮具有巨大的潜在伤害,但需要努力才能发挥作用。
Energy weapons scale with their energy usage - the higher their energy usage, the faster they will fire, and the more damage they will do per hit. For this reason, energy weapons are only useful once you unlock nuclear reactors, and they should be configured to use as much energy as you can.
能量武器随着其能量使用量的增加而增加——能量使用量越高,发射速度就越快,每次命中造成的伤害就越大。因此,能源武器只有在你解锁核反应堆后才有用,而且它们应该被配置为尽可能多地使用能源。
The second thing to deal with is their lack of any armor penetration. You will need to completely remove the armor from a unit before you can do any damage with a laser. Lasers do pretty good armor damage, but you'll want to pair them with explosive weapons to remove armor as fast as possible.
第二件要处理的事情是他们没有任何装甲穿透。你需要完全移除一个单位的护甲,然后才能用激光造成任何伤害。激光对护甲的伤害相当不错,但你需要将其与爆炸性武器配对,以尽快移除护甲。
Lastly, lasers are really bad at dealing with the basic enemy swarms, so you'll want to have some other way to deal with the basic swarms.
最后,激光在处理基本的敌人群方面真的很糟糕,所以你会想用其他方法来处理基本的群。
Enemy Units(此处已修改为57版数据)
敌人单位
If there's actual names for these guys, just let me know
如果有这些人的真实姓名,请告诉我。
operarius
佃农
The basic enemy type, you'll find thousands of them in every mission. They're very easy to kill, and mostly just act as a check to make sure you have a high rate of fire. If your mechs have a high enough rate of fire, these shouldn't cause you any problems. If you're having trouble with spiderlings, reconfigure your weapons to increase their rate of fire.
基本的敌人类型,你会在每次任务中发现成千上万的敌人。它们很容易被杀死,而且大多只是作为一种检查,以确保你有很高的射速。如果你的机甲有足够高的射速,这些应该不会给你带来任何问题。如果你遇到蜘蛛侠的麻烦,重新配置你的武器以提高它们的射速。
Armor: 3
装甲:3
Health: 12
健康:12
Damage: 5
伤害:5
Resistance: Laser
抵抗:激光
ARIES
白羊座
When these enemies see one of your mechs, they will charge up for a couple of seconds and then rush at one of your mechs at a very high speed to cause a large amount of damage.
当这些敌人看到你的一台机甲时,他们会充电几秒钟,然后以非常高的速度冲向你的一架机甲,造成大量伤害。
These are one of the most difficult enemy types to deal with.
这些是最难对付的敌人类型之一。
ARIES used to be heavily affected by the slow mod, but their rush is now immune to slow. This means they're extremely difficult to stop before they charge into your mechs - you need to have very high damage output to kill them before they reach you. You should avoid missions with Rams until you can fit your mechs with very high damage output.
白羊座过去深受慢速模式的影响,但他们的冲刺现在对慢速模式免疫了。这意味着它们在冲向你的机械之前很难被阻止——你需要有很高的伤害输出才能在它们到达你之前杀死它们。你应该避免使用公羊执行任务,直到你能为你的机械装备提供非常高的伤害输出。
Armor: 12
装甲:12
Health: 800
健康:800
Damage: 13
损坏:13
Resistance: Ballistic
抵抗:穿透
FRAGELLUM
(细胞)鞭毛
These enemies don't really do much damage, but have an extremely dangerous special ability.
这些敌人并没有造成太大的伤害,但有一种极其危险的特殊能力。
They will get to within a medium range of your mechs and then latch onto on of your mechs and pull them away. This will disable your mech, and will allow the regular spiderlings to attack it. Regular spiderlings will do a massive amount of damage to a disabled mech very quickly, making this ability extremely dangerous.
他们会到达你的机械的中等范围内,然后抓住你的机械并将其拉开。这将使你的机械失效,并允许普通蜘蛛攻击它。普通蜘蛛会很快对失效的机械造成大量伤害,使这种能力变得极其危险。
The best way to deal with this enemy is to only move when the enemy spawn rate is low. Find a place with long sight lines to wait in when enemy spawn rate increases. With long sight lines, you can take out the lasso enemies before they get into range to use their ability on your mechs.
对付这个敌人最好的方法是只有在敌人繁殖率低的时候才移动。当敌人繁殖率增加时,找一个视线很长的地方等待。有了长视线,你可以在套索敌人进入射程之前干掉他们,在你的机甲上使用他们的能力。
If you are in a tight area with a high spawn rate and lassos present, you are probably going to lose your mechs.
如果你在一个密集的区域,有很高的产卵率和套索,你可能会失去你的机械。
Armor: 6
装甲:6
Health: 700
健康:700
Damage: 13
伤害:13
Resistance: Fire
抵抗:火
Bullet Shooter
子弹射手(不知道指代那个怪物)
Long, Shoots Bullets.
远射程
Armor: 9
装甲:9
Health: 950
健康:950
Damage: 0.5
伤害:0.5
Resistance: Missiles
抵抗:导弹
SAGITTARIUS
射手座
Armor: 14
装甲:14
Health: 1450
健康:1450
Damage: 10
伤害:10
Resistance: Missiles
抵抗:导弹
FLOS
花蕾
This is the only non-turret enemy that energy shields affect. This enemy launches energy projectiles at your mechs. An active energy shield will completely block their attack. However, their attacks will put a lot of strain on your energy shields, and if they deplete your shields, they will cause a lot of damage very quickly.
这是唯一一个受到能量盾牌影响的非炮塔敌人。这个敌人向你的机甲发射能量弹。一个主动能量护盾将完全阻挡他们的攻击。然而,他们的攻击会给你的能量护盾带来很大的压力,如果他们耗尽了你的护盾,他们会很快造成很大的伤害。
The way energy shields work is a bit unclear, but it seems they tap into the unused energy output on your mech. The more unused energy, the stronger your energy shields will be. Since ICEs don't have very high energy output, these enemies are best avoided until you get nuclear reactors.
能量盾牌的工作方式有点不清楚,但它们似乎利用了你的机械上未使用的能量输出。未使用的能量越多,你的能量防护罩就越强。由于ICEs没有很高的能量输出,在你得到核反应堆之前,最好避免这些敌人。
With strong energy shields, these enemies are one of the easiest enemy types to deal with.
有了强大的能量盾牌,这些敌人是最容易对付的敌人类型之一。
Armor: 14
装甲:14
Health: 2700
健康:2700
Damage: 24
损伤:24
Resistance: Laser
抵抗:激光
GAMMARUS
钩虾
Don't let their size and large health pool scare you. These guys are actually one of the easiest special enemies to deal with. They are heavily impacted by the slow mod. If you use the slow weapon mod, you should be able to easily keep out of their range until you finish them off.
不要让他们的体型和庞大的健康池吓到你。这些家伙实际上是最容易对付的特殊敌人之一。他们受到慢速模式的严重影响。如果你使用慢武器模式,你应该能够很容易地避开他们的射程,直到你干掉他们。
Armor: 12
装甲:12
Health: 3700
生命值:3700
Damage:15
伤害:15
Resistance: Fire
抵抗:火
BRUCUS
布鲁库斯
Every level will have worms that can burrow through walls. They don't have any direct attacks, but when provoked, they will drop turrets that are a huge pain to deal with. Killing them causes them to drop a lot of resources, so it is almost always worth hunting them down.
每一层都会有能够钻穿墙壁的蠕虫。他们没有任何直接攻击,但当被激怒时,他们会放下炮塔,这是一个巨大的痛苦。杀死他们会导致他们损失大量资源,所以追捕他们几乎总是值得的。
They seem to have some armor and extremely large health pools.
他们似乎有一些盔甲和非常大的健康池。
Armor: 4
装甲:4
Health: 1400
健康:1400
Damage: N/A
损坏:不适用
Resistance: ?
抵抗:?
COLUBRA
拉丁语中的蛇
The objective for most levels will be to kill a boss worm. They frequently come with a shield that seems to negate artillery, and greatly reduces any incoming damage. You will do a lot more damage by having your mechs step into the shield. Doing enough damage to the boss will cause the shield to drop.
大多数关卡的目标都是杀死boss蠕虫。它们经常带有一个似乎可以抵消火炮的盾牌,并大大减少任何来袭的伤害。让你的机甲进入护盾会造成更多的伤害。对boss造成足够的伤害会导致护盾掉落。
The boss worm rotates in a circle. If a mech ends up in front of it - it will latch on to the mech, restricting its movement and continuously damaging it. Stay behind it to avoid its attack. Slow weapons will cause it to stop rotating, making it much easier to stay behind it.
凸台蜗杆绕圆旋转。如果一个机甲最终出现在它的前面,它会抓住机甲,限制它的移动并持续伤害它。留在它后面以避免它的攻击。慢速武器会使其停止旋转,使其更容易留在后面。
Armor: 4
装甲:4
Health: 5000
健康:5000
Damage: 8
损伤:8
Resistance: ?
阻力:?
Enemy Turrets
敌方炮塔
Turrets are present in every mission, regardless of the listed enemy types for the mission. You can't tell what type of turrets are going to be in a mission, but in general, you'll only see bullet turrets for the first dozen or so missions, and then see the other turret types start to show up in later missions.
炮塔出现在每一次任务中,而不考虑任务中列出的敌人类型。你不知道一次任务中会有什么类型的炮塔,但一般来说,你只会在前十几次任务中看到子弹头炮塔,然后看到其他类型的炮塔开始出现在以后的任务中。
You can't tell your mechs to prioritize targeting either bullet or energy turrets at the moment, since they're not selectable in the enemy types.
你现在不能告诉你的机甲优先瞄准子弹炮塔或能量炮塔,因为它们在敌人类型中是不可选择的。
The best way in general to deal with turrets is to sit just outside their range, and try to pick them off. You can use the middle mouse button to order your mechs to target where your mouse cursor is.
一般来说,处理炮塔的最好方法是坐在它们的射程之外,试着把它们摘下来。你可以用鼠标中键命令你的机械瞄准鼠标光标所在的位置。
Bullet Turrets
子弹头炮塔
Bullet turrets have a large attack range, and do a lot of damage. If you have a mech sitting in range of a bullet turret, it will take a lot of damage very quickly. Your starting mechs can be killed in just 2-3 seconds of being in range of a bullet turret.
子弹头炮塔的攻击范围很大,而且会造成很大的伤害。如果你有一个机甲坐在子弹炮塔的射程内,它会很快受到很大的伤害。你的起始机甲在子弹炮塔的射程内只需2-3秒就可以被杀死。
The best way to deal with them is to snipe at them from outside their range. You can target them by clicking on them with your middle mouse button, but it can still take a while to snipe them down.
对付它们的最好方法是在它们的射程之外狙击它们。你可以用鼠标中键点击它们来瞄准它们,但狙击它们仍然需要一段时间。
If there's a turret behind a wall that you're having trouble hitting from outside its range, use artillery to clear the wall so you can take it out safely from outside its range. If you can't use artillery, you'll need to wait until the enemy spawn rate lowers to its minimum, then rush the turret with your mechs to take it out as fast as you can to minimize damage to your mechs.
如果墙后有一个炮塔,你在其射程外无法击中,请使用火炮清除墙,这样你就可以从其射程外安全地将其取出。如果你不能使用火炮,你需要等到敌人的繁殖率降至最低,然后用你的机械冲向炮塔,以尽可能快的速度将其取出,以最大限度地减少对你的机械的伤害。
It's not clear what the stats are for this turret, since they're not shown in-game.
目前还不清楚这个炮塔的统计数据是什么,因为它们没有在游戏中显示。
Armor: ?
Health: ?
Damage: ?
Resistance: ?
Missile Turrets
导弹炮塔
Moderately difficult to deal with, but not too bad. You can select them as an enemy type to prioritize, and you can counter their rockets with active armor. As long as you have some reactive armor, and you don't let them take too many shots at you, you shouldn't have too much trouble with them.
处理起来有点困难,但也不算太糟。你可以选择他们作为敌人的优先类型,你可以用主动装甲对抗他们的火箭。只要你有一些反应装甲,并且你不让他们对你开太多枪,你就不应该有太多麻烦。
Armor: 10
护甲:10
Health: 550
健康:550
Damage: 7
伤害:7
Resistance: Missiles
抵抗:导弹
Energy Turrets(应该就是上面提到的那个蛇)
能量炮塔
This seems to be the easiest turret type to deal with. Energy Shields seem to completely shut down their attacks. I'm not sure if there's a way for them to bypass your energy shields - I haven't seen it happen yet. You only need a single energy shield on your mechs, as long as all your mechs are in the radius of the energy shield.
这似乎是最容易处理的炮塔类型。能量护盾似乎完全停止了他们的攻击。我不确定他们是否有办法绕过你的能量盾牌——我还没有看到这种情况发生。你只需要在你的机械上安装一个能量盾牌,只要你所有的机械都在能量盾牌的半径内。
It's not clear what the stats are for this turret, since they're not shown in-game.
目前还不清楚这个炮塔的统计数据是什么,因为它们没有在游戏中显示。
Armor: ?
Health: ?
Damage: ?
Resistance: ?
此百科并未收录新版添加的内容说明
